Essa tradução foi gerada por um programa e ainda não foi revisada por uma pessoa. Falas essa língua? Dá uma olhada.

Substituição da bateria do Logitech MX Master 4

Spencer Day e 4 outros colaboradores
Última atualização em 13 de ago de 2026
Visualizações: 6,8 mil
Visualizar Estatísticas:
- Últimas 24 horas:
- 30
- Últimos 7 dias:
- 235
- Últimos 30 dias:
- 934
- Ao todo:
- 6.777
Comentários: 0
Ninguém deixou comentários sobre este guia. Você será o primeiro?
Go to guide commentsConcluído: 0 1
Ninguém marcou este guia como "concluído". Será você o primeiro?
1 pessoa marcou este guia como "concluído". Você — ótimo trabalho!
Favorites: 0 1
Ninguém favoritou (e se inscreveu) neste guia como favorito. Você será o primeiro?
1 pessoa marcou como favorito (e assinou) este guia — você!
Guia OEM
A iFixit colaborou com o fabricante para fazer este guia.
Logitech
A Logitech e a iFixit estão trabalhando juntas para ajudar as pessoas a consertar seus dispositivos Logitech.
Introdução
Ir para o passo 1 ↓Siga este guia para substituir uma bateria gasta ou morta em seu mouse sem fio Logitech MX Master 4.
É natural que as baterias percam a capacidade conforme envelhecem. Se o seu mouse descarrega rapidamente e não mantém a carga, pode ser hora de substituir a bateria.
Por segurança, realize este reparo quando a bateria estiver com menos de 15 % de carga. Qualquer bateria de íon de lítio carregada pode ser perigosa se for perfurada ou danificada. Se a sua bateria parecer estufada ou inchada, tome as precauções adequadas.
O que você precisa
Fix Kit
Este kit contém todas as peças e ferramentas necessárias para executar este guia.

Peças

Ferramentas
-
Spudger4.9


-
-
-
Desloque o interruptor de energia do mouse para a posição OFF e desconecte quaisquer cabos.
 Pergunte ao FixBot
-
-
-
-
-
Use uma chave Phillips para remover os seis parafusos que prendem as duas metades do mouse:
-
Cinco parafusos de 4,3 mm de comprimento
-
Um parafuso embutido de 6,3 mm de comprimento
-
-
-
Insira a ponta chata de uma espátula na junção entre as duas metades do mouse, perto do botão liga/desliga.
-
Deslize a espátula ao longo da junção até a parte mais frontal do mouse.
-
Force delicadamente a metade inferior do mouse para longe da metade superior, até sentir e ouvir o primeiro clipe soltar.
-
-
-
Segure a metade superior do mouse com uma mão e a metade inferior com a outra.
-
Puxe lentamente a parte de trás do mouse até sentir o último clipe na parte frontal soltar.
-
-
-
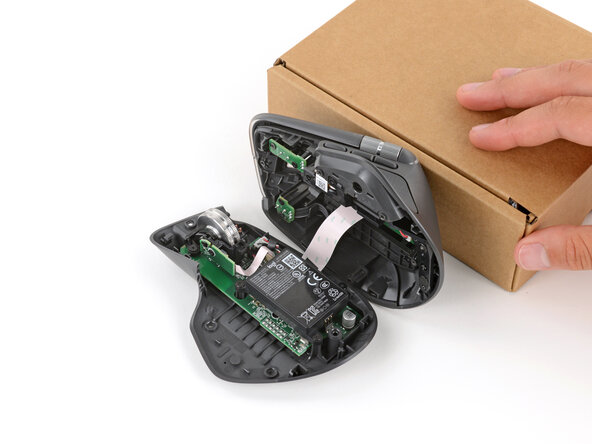
Vire a metade superior do mouse para o lado direito e use um objeto resistente para apoiá-la, de modo que você possa acessar a bateria da parte dobrável.
-
-
-
-
Use uma chave Phillips para remover os três parafusos de 4,4 mm de comprimento que prendem a bateria.
-
-
-
Use os dedos para levantar a bateria diretamente para cima e removê-la.
-
-




Compare a sua nova peça de reposição com a original — talvez você precise transferir os componentes restantes ou remover as proteções adesivas da peça nova antes de instalá-la.
Para a remontagem de seu dispositivo, siga estas instruções na ordem inversa.
O reparo não deu certo? Tente alguns passos básicos para solução de problemas ou peça ajuda a nossa comunidade do Respostas.
Reutilize ou Recicle — Nunca coloque peças eletrônicas descartadas no lixo doméstico. Visite Reciclagem Logitech para encontrar os pontos de reciclagem mais próximos, incluindo a opção de enviar dispositivos antigos de volta para a Logitech gratuitamente, caso não haja uma solução conveniente em sua região. Você também pode levar seu e-waste, lixo eletrônico, a qualquer reciclador certificado R2 ou e-Stewards. E não deixe peças funcionando ou dispositivos reparados parados em uma gaveta — passe-os adiante para alguém que possa usá-los.
Compartilhe sua experiência — Deixe um comentário aqui ou envie seu feedback diretamente para a Logitech pelo e-mail repair@logitech.com para ajudar a moldar futuros guias de reparo e o design de produtos.

