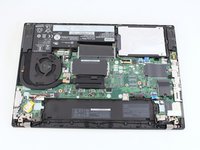
Ir para o conteúdo principal

Lenovo ThinkPad T480 Wi-Fi Card Replacement

O que você precisa

  1. Lenovo ThinkPad T480 Wi-Fi Card Replacement, External Battery: passo 1, imagem 1 %32 Lenovo ThinkPad T480 Wi-Fi Card Replacement, External Battery: passo 1, imagem 2 %32
    • Disable the battery, power down, and unplug your device before you begin.

    • Flip the laptop over so the bottom of the device is showing.

  2. Lenovo ThinkPad T480 Wi-Fi Card Replacement: passo 2, imagem 1 %32 Lenovo ThinkPad T480 Wi-Fi Card Replacement: passo 2, imagem 2 %32 Lenovo ThinkPad T480 Wi-Fi Card Replacement: passo 2, imagem 3 %32
    • Using your fingers, slide the lock on each side of the battery to the unlocked position.

    • Remove the battery from the slot.

  3. Lenovo ThinkPad T480 Wi-Fi Card Replacement, Back Cover: passo 3, imagem 1 %32 Lenovo ThinkPad T480 Wi-Fi Card Replacement, Back Cover: passo 3, imagem 2 %32
    • Using the Phillips #1 screwdriver, loosen the six captive screws.

  4. Lenovo ThinkPad T480 Wi-Fi Card Replacement: passo 4, imagem 1 %32 Lenovo ThinkPad T480 Wi-Fi Card Replacement: passo 4, imagem 2 %32 Lenovo ThinkPad T480 Wi-Fi Card Replacement: passo 4, imagem 3 %32
    • Insert the blue plastic opening tool into the space between the lower case and the chassis.

    • Slide the opening tool around the perimeter of the case to release the clips holding the case and the chassis together.

    • If it feels like the battery well portion of the back cover isn't loose, these clips may be holding the cover to the laptop. Use your opening tool to pry the clips loose and try removing the cover again.

    • Remove the back case.

  5. Lenovo ThinkPad T480 Wi-Fi Card Replacement, Internal Battery: passo 5, imagem 1 %32 Lenovo ThinkPad T480 Wi-Fi Card Replacement, Internal Battery: passo 5, imagem 2 %32
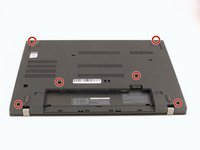
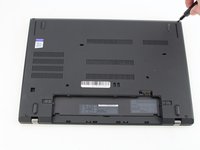
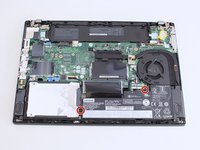
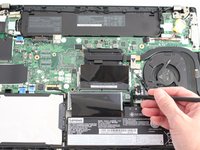
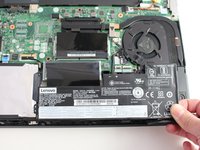
    • Use a Phillips #1 screwdriver to remove the two 4.6 mm screws that secure the internal battery to the frame.

  6. Lenovo ThinkPad T480 Wi-Fi Card Replacement: passo 6, imagem 1 %32 Lenovo ThinkPad T480 Wi-Fi Card Replacement: passo 6, imagem 2 %32 Lenovo ThinkPad T480 Wi-Fi Card Replacement: passo 6, imagem 3 %32
    • Use the spudger to slide the battery socket connector parallel to the motherboard and out of its socket on the motherboard.

  7. Lenovo ThinkPad T480 Wi-Fi Card Replacement: passo 7, imagem 1 %32 Lenovo ThinkPad T480 Wi-Fi Card Replacement: passo 7, imagem 2 %32
    • Lift the battery straight out of its recess and remove it.

    • If the battery is difficult to remove from the recess, use a nylon spudger to gently lift it on one edge, making it easier to grasp and remove by hand.

    • To prevent damage or potential fire, do not bend or flex the battery. Only use a plastic spudger and avoid any sharp tools that could puncture the battery.

  8. Lenovo ThinkPad T480 Wi-Fi Card Replacement, Wi-Fi Card: passo 8, imagem 1 %32
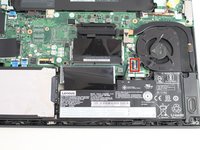
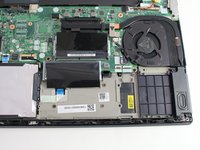
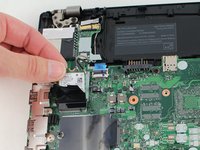
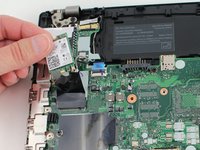
    • Using the Phillips #1 screwdriver, remove the single 3.6 mm screw at the top of the Wi-Fi card attaching it to the motherboard.

  9. Lenovo ThinkPad T480 Wi-Fi Card Replacement: passo 9, imagem 1 %32 Lenovo ThinkPad T480 Wi-Fi Card Replacement: passo 9, imagem 2 %32
    • Insert the point of a spudger under one of the antenna cables close to the connector. Pry straight up to disconnect the cable off of the Wi-Fi card.

    • Be careful as you pry the cables off of the Wi-Fi card as they are fragile and easily damaged.

  10. Lenovo ThinkPad T480 Wi-Fi Card Replacement: passo 10, imagem 1 %32 Lenovo ThinkPad T480 Wi-Fi Card Replacement: passo 10, imagem 2 %32
    • Slide the Wi-Fi card out from the slot to remove it from the board.

Conclusão

To reassemble your device, follow the above steps in reverse order.

Take your e-waste to an R2 or e-Stewards certified recycler.

Repair didn’t go as planned? Try some basic troubleshooting, or ask our Answers community for help.

4 outras pessoas executaram este guia.

Sarah Westberg

Membro desde: 03/11/19

29.606 Reputação

Autoria de 71 guias

Equipe

iFixit Membro de iFixit

Staff

118 Membros

Autoria de 19.545 guias

Um comentário

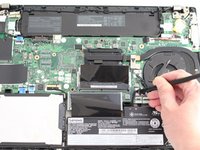
Great guide! Everyone make sure to reconnect the black cable to terminal 2 (on the left) and white to t1 (to the right).

Lorenzo Serrano - Responder

Comentar

Exibir estatísticas:

Últimas 24 horas: 15

Últimos 7 dias: 52

Últimos 30 dias: 255

Ao todo: 7,607