Introdução
Use this guide to fix the mouse if there is a double click problem on your Logitech G403.
Double clicking is a very common problem for G403. If your warranty is finished, you can fix the mouse by yourself, rather than buy a new one.
You will need a precision screwdriver set to fix the mouse. However, in case your screwdriver doesn’t work, you can look at these pages for help:
Don’t forget to unplug your mouse before you start.
O que você precisa
-
-
Use a prying tool or your hand to take out both sides of the mouse feet.
 Pergunte ao FixBot
-
-
-
Slowly open the mouse, and take care not to tear the ribbon cable.
-
Detach the cable connector.
-
-
-
-
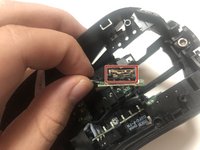
Find the place where more tension is needed.
-
Use a prying tool or your hand to give more tension to the copper piece, making sure the copper is curved.
-



To reassemble your device, follow these instructions in reverse order.
Cancelar: não concluí este guia.
10 outras pessoas executaram este guia.

Equipe

York University, Team S1-G25, Allen Summer 2020 Membro de York University, Team S1-G25, Allen Summer 2020
YORK-ALLEN-SU20S1G25
1 Membro
Autoria de 2 guias
10Comentários do guia
Worked, thanks
step 8 made no sense and had to google it
did you find a video about that? if you could send it pls or if it was some place where talk more about it
Worked!!! I had this problem for years, even stoped playing valorant bacause of that. Thanks
I could not open these screws :( What are the screwdriver size to open these?
