Esta versão pode conter edições incorretas. Mude para o último instantâneo verificado.
O que você precisa
-
Este passo não foi traduzido. Ajude a traduzi-lo
-
Insert a SIM eject tool, bit, or straightened paper clip into the SIM tray hole.
-
Press directly into the hole to eject the SIM card tray.
-
Remove the SIM card tray.
-
-
-
Observe as duas costuras na borda do telefone:
-
Emenda da tela: esta emenda separa a tela do resto do fone. É aqui que você deve fazer alavanca.
-
Emenda da moldura: é aqui que a moldura de plástico e a tampa traseira se tocam. Ela é fixada por meio de parafusos. Não faça alavanca nesta emenda.
-
Antes de começar, observe as seguintes áreas da tela:
-
Cabo conector flex da tela: não insira a palheta de abertura a uma profundidade maior do que a instruída ou você corre o risco de danificar esse cabo.
-
Limite do adesivo: fazer alavanca além deste limite estrito sem inclinar a palheta causará danos ao painel OLED.
-
-
-
Aplique uma bolsa térmica iOpener aquecida na borda direita do visor por um minuto para amolecer o adesivo.
-
-
-
Coloque uma ventosa de sucção o mais próximo possível da borda direita da tela.
-
Levante a ventosa com força e firmeza.
-
Insira a ponta de uma palheta de abertura na emenda da tela sem exceder 1 mm.
-
-
-
Com a palheta inserida 1 mm no vão, vire a palheta para cima, para deixá-la em um ângulo menor em relação ao fone.
-
Perfazendo um ângulo obtuso em relação ao fone, empurre cuidadosamente a palheta no vão por uns 6 mm ou 1/4 de polegada. A palheta deve deslizar para dentro abaixo do painel OLED.
-
-
-
Passe a palheta ao longo da borda direita da tela para cortar o adesivo.
-
Deixe a palheta no canto superior direito para evitar que o adesivo volte a selar.
-
-
-
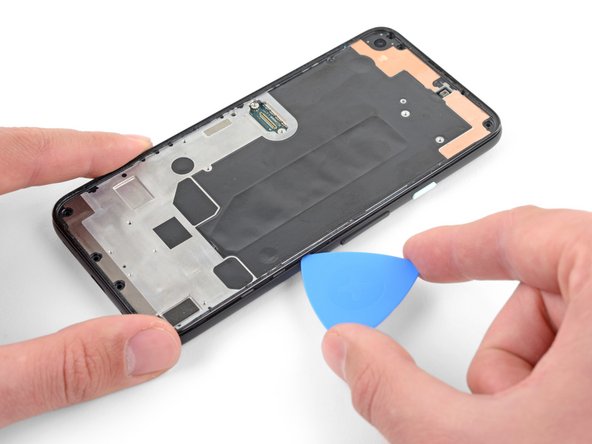
Insira outra palheta de abertura inclinada onde já tenha se formado um vão na borda direita do telefone, para evitar danos ao painel OLED.
-
Deslize a palheta de abertura ao redor da parte inferior do telefone para cortar o adesivo.
-
Deixe a palheta inserida na borda inferior para evitar que o adesivo volte a selar.
-
-
-
Insira outra palheta de abertura inclinada onde já tenha se formado um vão na borda inferior do telefone, para evitar danos ao painel OLED.
-
Use a palheta para abrir caminho pela borda esquerda do telefone.
-
Deixe a palheta inserida na borda esquerda do telefone para evitar que o adesivo volte a selar.
-
-
-
Levante a tela pela borda superior e vire-a por sobre a borda inferior, até que possa apoiá-la com o lado do vidro para baixo.
-
-
-
Com uma pinça, retire cuidadosamente a fita preta que cobre o suporte do conector da tela.
-
-
-
-
Remova a tela.
-
Compare a tela de reposição com a original. Pode ser que você precise transferir componentes adicionais (como a grelha do alto-falante) para a peça nova.
-
Raspe o adesivo restante do contorno da moldura.
-
Siga este guia se você estiver usando adesivos customizados.
-
Se você estiver usando uma fita dupla face como a fita da Tesa, siga este guia.
-
-
Este passo não foi traduzido. Ajude a traduzi-lo
-
Use a T3 Torx driver to remove the eight 4.3 mm screws securing the back cover to the midframe.
-
-
Este passo não foi traduzido. Ajude a traduzi-lo
-
Insert an opening pick into the seam between the midframe and the back cover.
-
Slide the opening pick along the bottom edge of the phone to release the plastic clips securing the back cover to the midframe.
-
-
Este passo não foi traduzido. Ajude a traduzi-lo
-
Slide the opening pick around the left edge of the phone to release the plastic clips securing the back cover to the midframe.
-
-
Este passo não foi traduzido. Ajude a traduzi-lo
-
Slide the opening pick around the top and right edges of the phone to release the rest of the clips.
-
-
Este passo não foi traduzido. Ajude a traduzi-lo
-
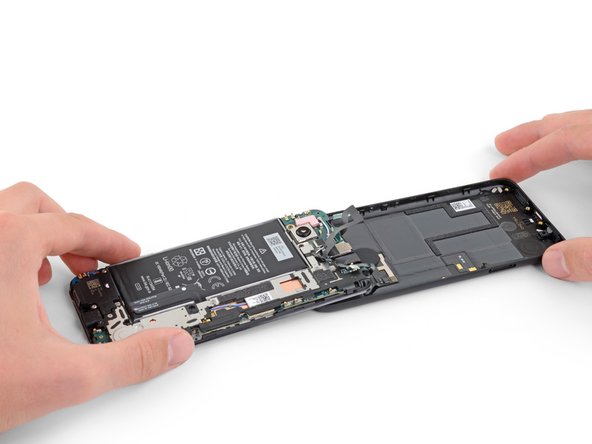
Carefully swing the back cover from the bottom of the phone over the top and around the back.
-
Lay the back cover on the work surface and lightly rest the midframe on the back cover, being careful not to put any stress on the attached ribbon cables.
-
-
Este passo não foi traduzido. Ajude a traduzi-lo
-
Use a T3 Torx driver to remove the seven screws securing the motherboard bracket:
-
Three 2.9 mm-long black screws
-
Three 2 mm-long screws
-
One 4.1 mm-long screw
-
-
Este passo não foi traduzido. Ajude a traduzi-lo
-
Use the tip of a spudger to unclip the motherboard bracket from the upper-right and lower-right corners of the motherboard.
-
-
Este passo não foi traduzido. Ajude a traduzi-lo
-
Use a pair of tweezers to remove the motherboard bracket.
-
-
Este passo não foi traduzido. Ajude a traduzi-lo
-
Use the flat end of a spudger to pry up and disconnect the battery cable.
-
-
Este passo não foi traduzido. Ajude a traduzi-lo
-
Use the tip of a spudger to disconnect the two flex cables connecting the fingerprint sensor and buttons to the motherboard.
-
-
Este passo não foi traduzido. Ajude a traduzi-lo
-
Use the tip of a spudger to disconnect the headphone jack cable from the motherboard.
-
-
Este passo não foi traduzido. Ajude a traduzi-lo
-
Insert an opening pick under the headphone jack and twist to release it from the adhesive securing it to the midframe.
-
Remove the headphone jack.
-
-
Este passo não foi traduzido. Ajude a traduzi-lo
-
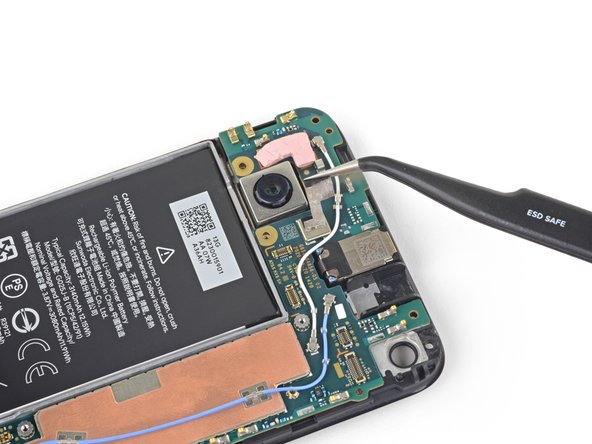
Pry up with the flat end of a spudger to disconnect the front-facing camera from the motherboard.
-
-
Este passo não foi traduzido. Ajude a traduzi-lo
-
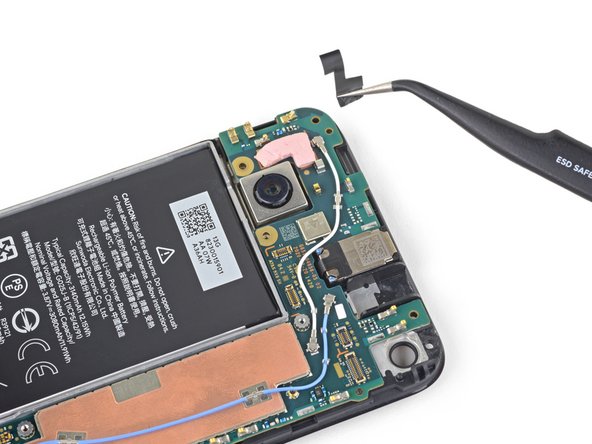
Use a pair of tweezers to remove the front-facing camera.
-
-
Este passo não foi traduzido. Ajude a traduzi-lo
-
Use a T3 Torx driver to remove the two 4.1 mm screws securing the loudspeaker assembly.
-
-
Este passo não foi traduzido. Ajude a traduzi-lo
-
Insert the tip of a spudger underneath the loudspeaker assembly.
-
Flip the loudspeaker assembly over so it lightly rests on top of the battery.
-
-
Este passo não foi traduzido. Ajude a traduzi-lo
-
Use the tip of a spudger to disconnect the antenna flex cable from the loudspeaker assembly.
-
-
Este passo não foi traduzido. Ajude a traduzi-lo
-
Carefully peel the loudspeaker assembly up off of the tape underneath it.
-
Remove the loudspeaker assembly.
-
-
Este passo não foi traduzido. Ajude a traduzi-lo
-
Use the tip of a spudger to disconnect the loudspeaker cable from the motherboard.
-
-
Este passo não foi traduzido. Ajude a traduzi-lo
-
Use a T3 Torx driver to remove the three screws securing the motherboard:
-
Two 2.9 mm-long black screws
-
One 2.1 mm-long screw
-
-
Este passo não foi traduzido. Ajude a traduzi-lo
-
Use the corner of an opening pick to peel up the tape covering the earpiece speaker.
-
-
Este passo não foi traduzido. Ajude a traduzi-lo
-
Use a pair of tweezers to completely remove the tape covering the earpiece speaker.
-
-
Este passo não foi traduzido. Ajude a traduzi-lo
-
Insert the tip of a spudger underneath the bottom edge of the motherboard and pry it up enough to grip it with your fingers.
-


Cancelar: não concluí este guia.
6 outras pessoas executaram este guia.

5 comentários
Longshot here… I dropped my phone and it appears to be dead, although no physical signs of damage. Right after it happened, I could see an image on the screen but it was frozen, so I pressed the power button and the screen turned off, and then I wasn’t able to turn it back on from then on. There are no signs of life at all… no lights, no vibrations, no sounds. If I plug it into my computer, nothing happens. So totally dead. I already opened it up and checked for any obvious damage to internal components or loose cables. Didn’t find any smoking guns, so I just tried disconnecting and re-connecting all the ribbon cables. Still no success. I’m wondering if you have any thoughts on whether a battery or motherboard replacement might bring my phone back to life, and if so, if you have any thoughts on one or the other. My initial thought is that’s it more likely that something on the motherboard got damaged from a physical drop vs. the battery, but any other input you could offer would be great.
That’s a tough one Sally… I can’t guarantee replacing any certain component will fix your phone given the information. Disconnecting and reconnecting the cables was a good idea. No signs of life at all suggests to me it’s likely the battery or motherboard, like you said.
If it’s still under warranty see if Google will replace it, they replaced my pixel 3 twice when it bricked for no apparent reason. If it’s not then I think the best course of action would be to meticulously search for the damage starting with the motherboard. Use a magnifying glass. Even if a single tiny transistor popped off that would be enough to brick it. If you can’t find anything, you’ll have to take a chance replacing one part at a time until you get it working again.
Good luck!
Hey there, probably no fix to this, but I went swimming in a salt water pool with my 4a on accident and the repair store said the motherboard was fried and unrepairable. Is there any chance that I can still get data off the phone?
Unfortunately, even if you disassemble your phone clean it in an ultrasonic bath, then replace the battery, you’d still have to be very lucky for it to power back on with data intact.