Ir para o conteúdo principal

Fitbit Ionic Battery Replacement

O que você precisa

  1. Fitbit Ionic Battery Replacement, How to open the Fitbit Ionic: passo 1, imagem 1 %32 Fitbit Ionic Battery Replacement, How to open the Fitbit Ionic: passo 1, imagem 2 %32
    • Before starting, take your Fitbit Ionic off the charger and power it down.

    • Feel free to attach or remove the watch band as needed to provide more control as you make repairs.

  2. Fitbit Ionic Battery Replacement: passo 2, imagem 1 %32
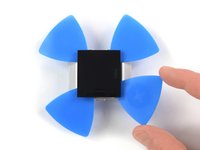
    • Heat an iOpener and apply it on the display for at least two minutes to soften the adhesive underneath.

    • The adhesive of the Fitbit Ionic is very strong. You may need to reheat the iOpener and repeat this procedure several times until the display adhesive gets loose enough.

  3. Fitbit Ionic Battery Replacement: passo 3, imagem 1 %32 Fitbit Ionic Battery Replacement: passo 3, imagem 2 %32 Fitbit Ionic Battery Replacement: passo 3, imagem 3 %32
    • Insert a technician's razor with a flat blade into the small gap between the watch case and the display.

    • Cut through the adhesive on the upper side of the Fitbit Ionic.

  4. Fitbit Ionic Battery Replacement: passo 4, imagem 1 %32 Fitbit Ionic Battery Replacement: passo 4, imagem 2 %32
    • Use a technician's razor with a flat blade to pry up the top edge of the display and create a small gap.

  5. Fitbit Ionic Battery Replacement: passo 5, imagem 1 %32 Fitbit Ionic Battery Replacement: passo 5, imagem 2 %32 Fitbit Ionic Battery Replacement: passo 5, imagem 3 %32
    • Insert two opening picks underneath the top left and the top right corner.

    • Leave the opening picks in place to prevent the adhesive from resealing.

    • Remove the razor blade.

  6. Fitbit Ionic Battery Replacement: passo 6, imagem 1 %32 Fitbit Ionic Battery Replacement: passo 6, imagem 2 %32
    • Insert a third opening pick underneath the top right corner and slide it along the right edge of the display.

    • Leave the opening pick in the bottom right corner to prevent the adhesive from resealing.

    • If cutting becomes too difficult, reheat and reapply the iOpener.

  7. Fitbit Ionic Battery Replacement: passo 7, imagem 1 %32 Fitbit Ionic Battery Replacement: passo 7, imagem 2 %32
    • Insert a fourth opening pick underneath the top left corner and slide it along the left edge of the display.

    • Leave the opening pick in bottom left corner to prevent the adhesive from resealing.

    • Do not remove the display assembly all the way yet—it's still connected to the mainboard.

  8. Fitbit Ionic Battery Replacement: passo 8, imagem 1 %32 Fitbit Ionic Battery Replacement: passo 8, imagem 2 %32
    • Carefully fold the display assembly in the direction of the bottom edge.

  9. Fitbit Ionic Battery Replacement, Display Assembly: passo 9, imagem 1 %32 Fitbit Ionic Battery Replacement, Display Assembly: passo 9, imagem 2 %32
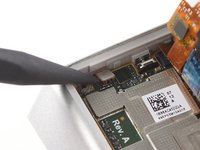
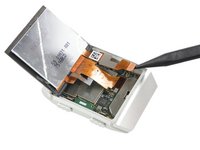
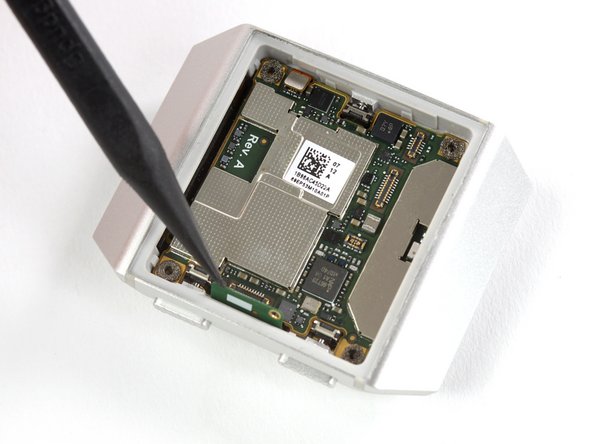
    • Use the flat end of a spudger to loosen and pry up the mildly glued NFC antenna.

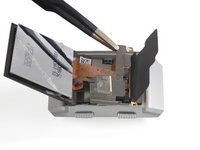
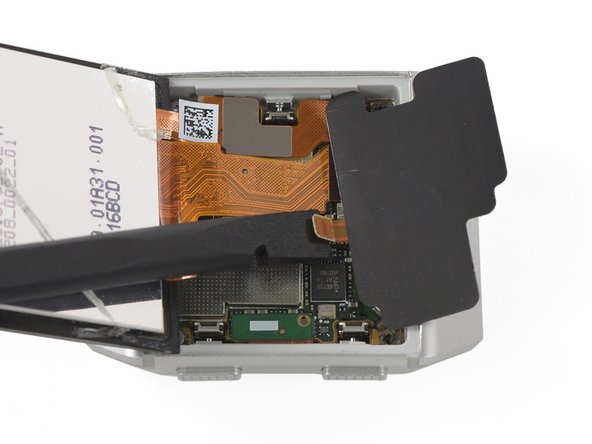
    • Carefully fold the NFC antenna in the direction of the upper edge of the watch.

  10. Fitbit Ionic Battery Replacement: passo 10, imagem 1 %32 Fitbit Ionic Battery Replacement: passo 10, imagem 2 %32
    • Carefully fold the display assembly onto the upper side of the watch.

    • Take care not to pull or bend the cables too much—they are still connected to the mainboard.

  11. Fitbit Ionic Battery Replacement: passo 11, imagem 1 %32
    • Remove the Torx T2 screw (3.65 mm length) on the bottom left corner.

  12. Fitbit Ionic Battery Replacement: passo 12, imagem 1 %32 Fitbit Ionic Battery Replacement: passo 12, imagem 2 %32
    • Use a pair of tweezers to remove the metal shield covering the battery flex cable.

  13. Fitbit Ionic Battery Replacement: passo 13, imagem 1 %32 Fitbit Ionic Battery Replacement: passo 13, imagem 2 %32
    • Use a spudger to pry up and disconnect the battery flex cable.

  14. Fitbit Ionic Battery Replacement: passo 14, imagem 1 %32 Fitbit Ionic Battery Replacement: passo 14, imagem 2 %32
    • Fold the display assembly back to its original position.

  15. Fitbit Ionic Battery Replacement: passo 15, imagem 1 %32
    • Remove the two Torx T2 screws (3.65 mm length) from the top edge of the watch.

  16. Fitbit Ionic Battery Replacement: passo 16, imagem 1 %32 Fitbit Ionic Battery Replacement: passo 16, imagem 2 %32
    • Use a pair of tweezers to remove the metal cover.

  17. Fitbit Ionic Battery Replacement: passo 17, imagem 1 %32 Fitbit Ionic Battery Replacement: passo 17, imagem 2 %32
    • Use a spudger to pry up and disconnect the NFC antenna.

    • Remove the NFC antenna.

  18. Fitbit Ionic Battery Replacement: passo 18, imagem 1 %32 Fitbit Ionic Battery Replacement: passo 18, imagem 2 %32 Fitbit Ionic Battery Replacement: passo 18, imagem 3 %32
    • Use a spudger to pry up and disconnect the two display cables from the motherboard.

  19. Fitbit Ionic Battery Replacement: passo 19, imagem 1 %32
    • Remove the display assembly.

    • If possible, turn on your Fitbit Ionic and test your repair before installing new adhesive and resealing.

  20. Fitbit Ionic Battery Replacement, Battery: passo 20, imagem 1 %32
    • Remove the Torx T2 screw (3.65 mm length).

  21. Fitbit Ionic Battery Replacement: passo 21, imagem 1 %32 Fitbit Ionic Battery Replacement: passo 21, imagem 2 %32
    • Use a spudger to pry up and disconnect the heart rate sensor from the motherboard.

  22. Fitbit Ionic Battery Replacement: passo 22, imagem 1 %32 Fitbit Ionic Battery Replacement: passo 22, imagem 2 %32 Fitbit Ionic Battery Replacement: passo 22, imagem 3 %32
    • Insert a spudger into the gap between the watchcase and the upper edge of the motherboard.

    • Use the spudger to pry up the motherboard.

    • Avoid damaging the battery and heart rate sensor cables during the motherboard removal procedure.

    • Remove the motherboard.

  23. Fitbit Ionic Battery Replacement: passo 23, imagem 1 %32
    • Remove the four Torx T2 screws (1.8 mm length).

  24. Fitbit Ionic Battery Replacement: passo 24, imagem 1 %32 Fitbit Ionic Battery Replacement: passo 24, imagem 2 %32 Fitbit Ionic Battery Replacement: passo 24, imagem 3 %32
    • Insert the flat end of a spudger between the watchcase and the battery on the top edge of your Fitbit Ionic.

    • Use the spudger to pry up the battery.

  25. Fitbit Ionic Battery Replacement: passo 25, imagem 1 %32
    • Remove the battery.

Conclusão

To reassemble your Fitbit ionic follow these instructions in reverse.

If possible, turn on your device and test your repair before installing new adhesive and resealing.

For optimal performance, calibrate your newly installed battery: Charge it to 100% and keep charging it for at least 2 more hours. Then use your device until it shuts off due to low battery. Finally, charge it uninterrupted to 100%.

Take your e-waste to an R2 or e-Stewards certified recycler.

Repair didn’t go as planned? Try some basic troubleshooting, or ask our Answers community for help.

7 outras pessoas executaram este guia.

Adriana Zwink

Membro desde: 12/18/19

48.076 Reputação

Autoria de 167 guias

Equipe

iFixit Membro de iFixit

Staff

Membros da 135

Autoria de 16.757 guias

14 comentários

This guide is very detailed and pretty accurate. Thank you for posting it!

Does anyone know how crucial the ‘Calibration’ procedure noted at the end article is?

I replaced my battery and it drains so quickly - during the course of a few hours.

But I didn’t try leaving it on the charger for 2 hours after 100% is reached. Trying that now.

Monte87 - Responder

Und woher bekommt man die Batterie?

k.krah - Responder

From iFixit.com - they are back in stock now.

Monte87 -

Sehe keine Battery im Shop.

Gibt es einen Link?

k.krah -

The new battery part is linked at the top of this page.

Here is the link: [produto vinculado ausente ou desativado: IF384-004]

- regards

Monte87 -

Adicione um comentário

Exibir estatísticas:

Últimas 24 horas: 1

Últimos 7 dias: 33

Últimos 30 dias: 160

Duração total: 14,144