Introdução
A laptop battery's performance naturally decreases with time, so replacement is necessary to maintain high performance and charge duration.
O que você precisa
-
-
Turn the laptop upside-down and remove the following screws using a Phillips #0 driver:
-
Two 9.5 mm screws in the middle of the back edge, and one 9.5 mm screw in the right edge
-
Two 4.3 mm screws in the back corners
-
One 17.5 mm screw at the left edge near the optical drive
-
Three 4.3 mm screws in the front edge
 Pergunte ao FixBot
-
-
-
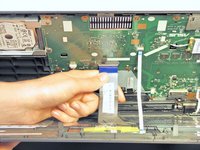
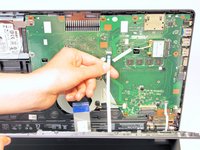
Use the plastic opening tool to separate the keyboard plate cover from the bottom cover. In order to do this, insert the plastic opening tool in between the keyboard plate cover and the bottom cover, then slide along edges to pry open.
-
-
-
-
Locate the three ribbons connecting the keyboard plate cover to the bottom cover.
-
-
-
Invert the laptop in order to gain access to the ribbons.
-
Remove each ribbon by flipping the small white plastic flap up and gently pulling on the ribbon.
-
-
-
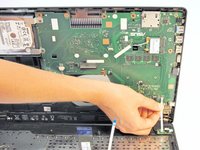
Now that the ribbons have been detached from the bottom cover, carefully remove the keyboard plate cover. Once it has been removed, place it in a safe and moisture free area so it does not get damaged.
-
-
-
Remove the battery from the laptop by applying pressure on both ends and lifting it out of the case.
-


To reassemble your device, follow these instructions in reverse order.
Take your e-waste to an R2 or e-Stewards certified recycler.
Repair didn’t go as planned? Try some basic troubleshooting, or ask our Answers community for help.
Cancelar: não concluí este guia.
58 outras pessoas executaram este guia.

Equipe

Cal Poly, Team 7-22, Regan Spring 2014 Membro de Cal Poly, Team 7-22, Regan Spring 2014
CPSU-REGAN-S14S7G22
5 Membros
Autoria de 15 guias
11Comentários do guia
Thank you for the procedure. I never worked with ribbon connectors like that; perhaps a few words or pictures that shows connecting procedures may be helpful to others. How far in ribbon must be etc. Thanks again, good job.
Thank you very much for your guide
Hi there! I have replaced my battery but the new one does not charge. Does anyone have any idea on how to solve it? I have tried several possible solutions found online like removing the battery (completely) turning on the CPU and then off, placed the battery and restarted. Pressing the power button for 15s or 60s and then turn on the CPU.... well.... Loosing hope here.... :( Help!
The only thing I can think of is that the new battery was faulty. It is probably way too late to return it, but you could try buying another and see if the same problem recurs with the new, new one.
Thank you, Josh. Clear instructions. The most difficult part for me was to re-connect the "ribbons", since I don't have nimble fingers. I actually used a plastic toothpick to help doing this :)