Ir para o conteúdo principal

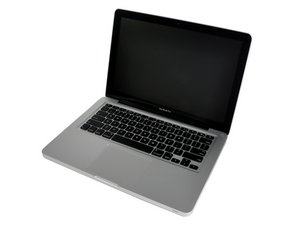
Late 2011 model, A1278 / 2.4 GHz i5 or 2.8 GHz i7 processor.

593 Perguntas Visualizar todos

Restoring apps when replacing the original hard drive with a SSD

I will be replacing the original hard drive in my Macbook with a SSD. I have a complete time machine backup of all my files to be restored after the swap. But is there a way to restore my non-Apple applications as well? I am most concerned with Microsoft Office and, secondly, with the Adobe apps. I don't have the disks or licensing information.

Also, is there anything I should be aware of when installing the OS on my new drive? I'm currently running OS X El Capitan 10.11.3

Thanks

Respondido! Ver a resposta Também tenho esse problema

Esta é uma boa pergunta?

Pontuação 1
Adicionar um comentário

5 respostas

Solução escolhida

I would backup the existing drive with Acronis 2016, it is compatible with OS X.

This can make a complete image of the drive which can be restored onto the blank SSD.

After the restore, the machine should startup and operate normally as if nothing has happened.

No need to re-install anything.

Acronis is backup software, that can make a complete mirror image of any drive, and then restore individual files, folders, or the entire drive image.

The better version can transfer active applications from one PC to another, seamlessly.

No re-installation.

It provides great peace of mind to protect not only your data, but all of your installed applications and settings, which can be restored in a few minutes.

Esta resposta foi útil?

Pontuação 0

2 comentários:

The problem with Acorns 2016 first is it's $49.99 for just a single license. While a basic copy of super duper is free.

http://www.acronis.com/en-us/personal/co...

por

@mayer, some SSD manufacturers bundle their SSDs with a free license of Acronis and sell it as an "upgrade solution." I think Transcend does it. I still prefer to use the restore method. Efficient, fast, cheap and safe, unless someone messes up source and target.

por

Adicionar um comentário
Pergunta mais útil

There are a couple of ways. You can install the new drive. Just put the drive in, here's how:

MacBook Pro 13" Unibody Late 2011 Hard Drive Replacement

1. Internet Set UP: Now boot up holding down the Option key, enter your router password, get to Disk Utilizes and format the drive and set it to MacOS Extended, GUID partition, you can give it one partition to ensure you've done it correctly. Now you have a drive that you can download and install a system onto.

You can now download and install he (usually) the original Mac OS system. You can later upgrade via the APP store (purchased items). You will need to take it to the OS X that you were previously using and backed up to your Time Machine. On the first reboot it will ask if you want to back up from something and TM is an option.

*Potential issues - I've no problems with most third party programs like MS Office. The problem hits with Adobe (they are very protective of their intellectual rights and getting paid). The Adobe high end programs will request serial numbers or re-installation and even tell you that they've been transferred by a Time Machine backup.

2. Use an external enclosure or USB to SATA adapter. Plug the drive into the USB and format it. Download and install SuperDuper: http://www.shirt-pocket.com/SuperDuper/S...

Now run SuperDuper and clone your old drive onto the new one. This can save the Adobe programs. Do your house keeping (get rid of duplicates, stuff in your download folder and stuff you don't need anymore) before cloning to keep it as clean as possible. Usually you're going to have less room on the SSD than you did on the old HD. This should do the trick.

If the old drive is good, get a cheap enclosure for a 2.5" drive and keep the old drive for storage.

Esta resposta foi útil?

Pontuação 4

1 comentário:

I request if you could share your comments about cloning a hard drive that has El Capitan and only program that I’d like to transfer to a new SSD is MS Office 2011 from hard drive. Other programs are not that important. The data to be saved is minimal and not essential as I have backed it up on an external storage drive. Thanks.

por

Adicionar um comentário

You'll need an enclosure (or SATA to USB interface) and your new SSD and you can get everything back exactly the same. *I think* that Time Machine restores don't transfer licenses and you have to key them back in.

So connect the SSD via the interface to your laptop. Restart in "Restore Mode" = press and hold Command+R when restarting your laptop.

Once in restore mode, select utilities from the top, and choose disk utilities.

Select your SSD, then "Partition" and partition it into 1 GUID partition, Mac OS Journaled.

You will see the partition appear underneath your SSD's name.

Now you should see in Disk Utility 2 disks:

- Your main HDD (usually depicted as a grey HDD image) with the partition underneath it. The latter is your source.

- Your new SSD (usually depicted as an orange USB device) with the new partition underneath it. The latter is your destination.

Click on the old/source partition to select it, then click on "Restore."

You should see two dialogue boxes appear, where you drag and drop the partitions. The SOURCE dialogue box will already be populated. Make sure it is the old HDD partition.

Then drag and drop the new SSD partition in the target dialogue box.

Double check to make sure you are not mixing target and source. Read and re-read and triple-check.

Once sure, click on "Restore."

Once restore is finished (15 minutes to a couple of hours depending on the amount of data), run "verify disk" or "repair disk" on the new SSD partition. If everything checks out, turn off disk utility, then turn off your laptop (drop down commands on top/left of the screen).

Now open your computer, unplug your battery. Swap the SSD with the HDD. Plug the battery back LAST.

Restart your computer, set the correct time and date if needed, and enjoy.

P.S.: if you are using the latest OS X, the disk utility will look different, and all the commands are present in drop down menus from the top of the screen. Look there if you can't see the commands I am referring to.
Esta resposta foi útil?

Pontuação 2
Adicionar um comentário

Saas application development company

Subcription and saas based app development services in india are most in demand on this generation . Most of them expecting saas development services at low price. Webnox have capability to give saas app development at low cost with more features. For more details immediately reach us !

Esta resposta foi útil?

Pontuação 0
Adicionar um comentário

When replacing your original hard drive with a solid-state drive (SSD), you'll typically need to reinstall your operating system and applications onto the new SSD. Here's a general outline of the steps you would typically follow:

1. Backup Your Data: Before starting the replacement process, make sure to back up all your important data from the original hard drive. You can use an external hard drive, cloud storage, or a backup tool to do this.

2. Install the SSD: Physically replace the original hard drive with the new SSD. Depending on your computer model, this might involve opening up the case or accessing a panel on the bottom of your laptop.

3. Install the Operating System: After installing the SSD, you'll need to install the operating system (e.g., Windows, macOS, Linux) onto the new drive. You can typically do this using installation media such as a USB drive or DVD.

4. Install Drivers: Once the operating system is installed, you may need to install drivers for your hardware components (e.g., graphics card, network adapter). These can usually be downloaded from the manufacturer's website.

5. Reinstall Applications: After the operating system and drivers are installed, you'll need to reinstall your applications onto the new SSD. This includes any programs you use regularly, such as web browsers, office suites, and other productivity tools. You can download these from their official websites or reinstall them using installation media.

6. Transfer Data: Once the operating system and applications are installed, you can transfer your backed-up data back onto the SSD. This includes documents, photos, music, and any other files you backed up earlier.

7. Configure Settings: Finally, you may need to configure settings for your operating system and applications to match your preferences. This could include things like setting up user accounts, adjusting display settings, and configuring email accounts.

By following these steps, you can effectively replace your original hard drive with an SSD and restore your applications and data onto the new drive. Make sure to follow any specific instructions provided by your computer manufacturer or SSD manufacturer to ensure a smooth installation process.

Esta resposta foi útil?

Pontuação 0
Adicionar um comentário

Adicionar a sua resposta

meadow140 será eternamente grato(a).
Exibir estatísticas:

Últimas 24 horas: 1

Últimos 7 dias: 3

Últimos 30 dias: 42

Duração total: 5,858