Introdução
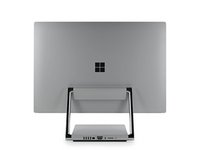
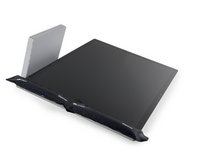
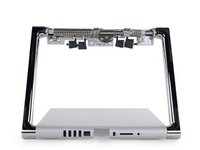
Good news, everyone! Microsoft made their first desktop ever. The Surface Studio is big, expensive, powerful, and most importantly, it's on our teardown table. Is this a machine for creative pros, or a me-too entry in the modern wave of fashionably disposable hardware? If it survives this teardown, we'll have our answer. Let's tear down the Microsoft Surface Studio.
Need a window on the teardown world? Follow us on Facebook, Instagram, or Twitter for high-def updates.
O que você precisa
Vídeo de Apresentação
-
-
It's no stocking, but we're thinking this machine is still stuffed with goodies:
-
28-inch adjustable PixelSense Display with 4500 x 3000 resolution (192 DPI)—supporting sRGB, DCI-P3, and Vivid color profiles, plus 10-point multi-touch
-
6th-Generation Intel Core i5 or i7 CPU with 8 GB, 16 GB, and 32 GB RAM configuration options
-
NVIDIA GeForce GTX 965M GPU (paired with 2 GB GDDR5) or GTX 980M (paired with 4 GB GDDR5)
-
1 TB and 2 TB hybrid storage options
-
802.11ac Wi-Fi / Bluetooth 4.0 / Xbox Wireless built-in
-
Supports Surface Pen and Surface Dial
-
-
-
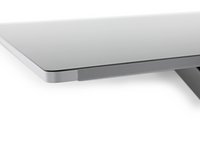
The display is this PC's party piece, but we aren't throwing any confetti just yet. First, we'll take a look at what kind of portage it's packing. From left to right:
-
Four USB 3.0 ports
-
Gigabit Ethernet jack and power inlet
-
Mini DisplayPort
-
SD card slot and 3.5 mm audio jack
-
Meanwhile, along the bottom edge of the display, we note a wide strip of speaker grille—we'll soon see how functional those dots are.
-
Oh, and a whole sensor array worthy of the Federation, including: facial recognition sign-in camera with IR projector (probably), 5 MP camera, and two microphones.
-
-
Ferramenta utilizada neste passo:Heavy-Duty Suction Cups (Pair)$14.95
-
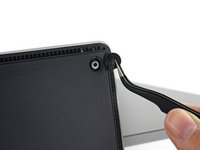
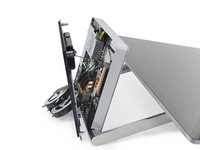
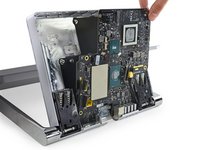
Enough of the outside, we're here to see what's on the inside. We tip the Studio onto its back and inspect the base, hoping to find our way in.
-
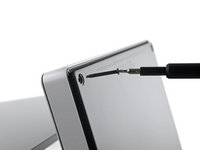
A strip of air vents borders the entire bottom panel, and at each corner we find a round rubber foot—concealing a Torx screw.
-
Screws jettisoned, the heavy bottom cover still holds on by way of several clips. So, we apply a little suction power to help yank it free.
-
With that, we're inside the
ActorsSurface Studio.
-
-
-
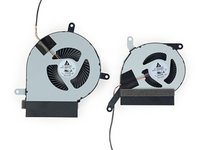
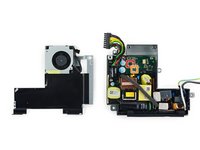
With a bit more finagling, we extract the two brushless, Delta-made exhaust fans.
-
They're sized quite differently. Is there a dedicated fan for the CPU, and a second for the GPU? Because that would be cool.
-
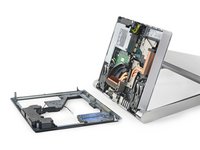
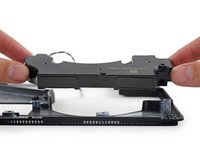
With the speaker wire disconnected, the midframe finally falls away, with the speaker still attached.
-
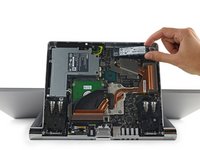
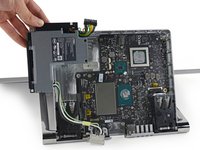
Finally, we have access to some guts—this Studio is chock-full of 'em. But we need to delve a little deeper to see if it has the glory.
-
-
-
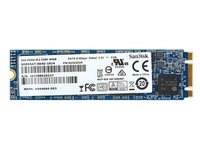
Dig in! We start with the high-powered half of this machine's hybrid storage: a standard, removable, 64 GB SanDisk Z400s M.2 SSD. And on board we find:
-
SanDisk 05466 032G 32 GB NAND flash storage module (x2 for a total of 64 GB)
-
Silicon Motion SM2246XT SATA III 6 Gb/s DRAM-less SSD Controller
-
Texas Instruments power management
-
Amusingly, someone must have decided it'd be better to slap down two 32 GB chips (perhaps leaving room for the 128 GB models), rather than four 16 GB chips—hence this pair of empty solder pads.
-
-
-
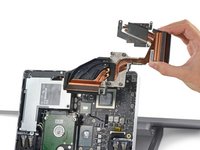
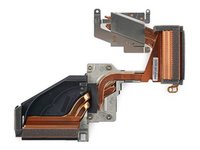
Next, we mine for copper, extracting the shiny heat sink. A tall standoff spacer, reminiscent of those found in 27" iMacs, holds this beast in place.
-
The heat sink offers quite a bit of cooling power in a tiny package:
-
Heat pipes coming off of each processor (CPU and GPU) flow out to exhaust radiators, each of which has a dedicated fan to blow all that hot air out of the system.
-
The GPU fan is the larger of the two, and its radiator gets a bonus heat pipe that runs from both the CPU and GPU, which may allow for some thermal load leveling.
-
-
-
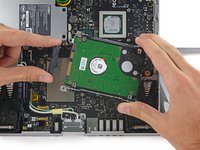
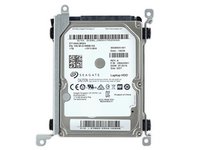
We're pleased to report that there's a standard SATA hard drive connector in here—and attached to it, a standard SATA hard drive.
-
It's nothing fancy, but here are the specs on this 2.5" laptop hard drive:
-
Seagate Spinpoint M8 ST1000LM024 5400 RPM, 1 Terabyte, SATA 3.0 Gb/s hard drive
-
-
-
-
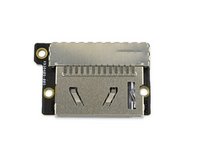
Not only does the Studio have an SD card slot, but it's on its own modular board! Other barnacles include:
-
Realtek RTS5314 SD card reader controller
-
Macronix MX25L1006E 1 Mb CMOS serial flash
-
ON Semiconductor FSA644UCX 1.5 Gbps SPDT 4-data lane switch
-
-
-
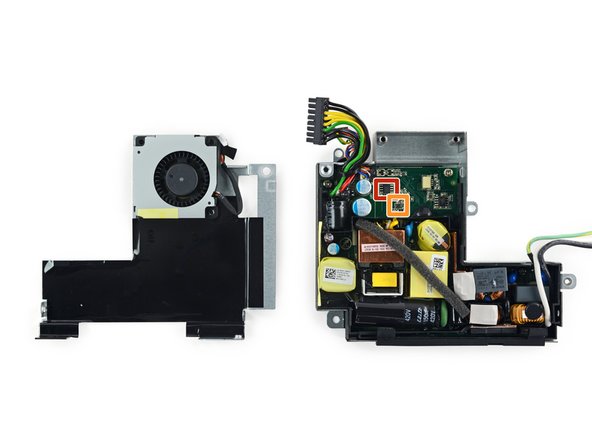
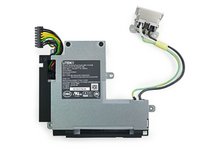
From here we're able to pull out the power supply, a custom Lite-On unit with a dual-voltage (100-240 V) rating.
-
The power supply features its own small, internal cooling fan. Our button fingers twitch involuntarily; we're having Xbox One flashbacks.
-
Overall impressions: it's a power supply. It's a beefy, well-insulated power supply. Are you happy? Alright then. Moving on.
-
IC Identification:
-
NXP Semiconductor TEA1995T dual synchronous rectifier controller
-
STMicroelectronics STTS751-0DP3F digital temperature sensor
-
-
-
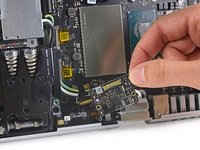
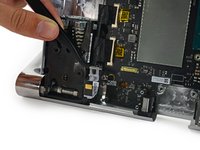
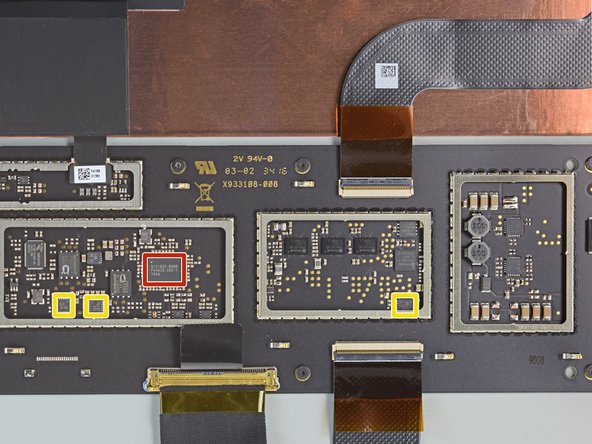
We're so close to the motherboard we can almost taste it. Best guess: it will taste like fiberglass and copper.
-
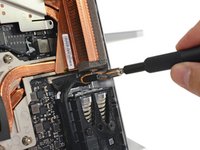
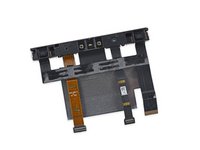
Meanwhile, one last component stands in our way: this little headphone jack.
-
More importantly, this little guy is completely modular—so you can swap it out with a little patience, should the need arise.
-
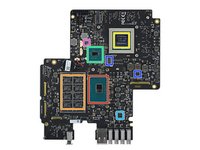
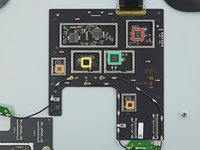
With that, the motherboard is free. Huzzah! Let's inspect those chips.
-
-
-
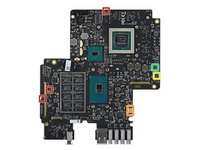
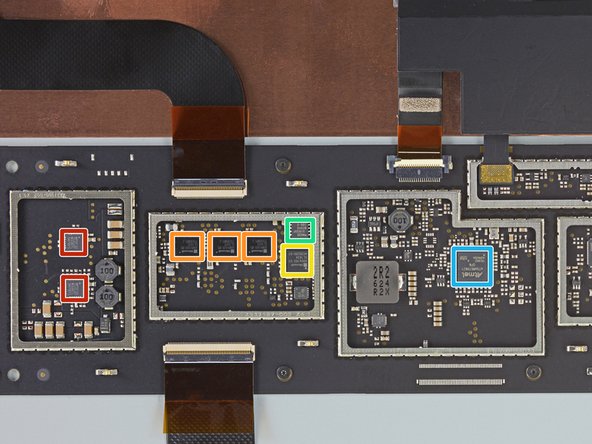
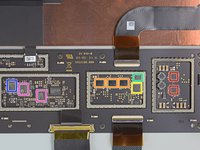
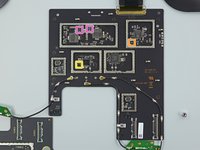
Top side, we have the following ICs:
-
Intel Core i5-6440HQ Processor (6M Cache, up to 3.50 GHz)
-
Eight Samsung K4A4G085WE-BCPB 512 MB DDR4 RAM (4 GB on this side and another 4 GB on the reverse)
-
Nvidia GeForce GTX 965M GPU
-
Intel GL82CM236 Platform Hub Controller
-
ON Semiconductor NCP81205 3+3+1 Phase Controller
-
Infineon SLB 9665 TT 2.0 TPM (as seen in the Surface Book) and Infineon 0812ND HBE613 (x14)
-
Winbond W25Q128FV 128 M Serial Bit Flash Memory
-
-
-
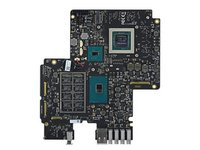
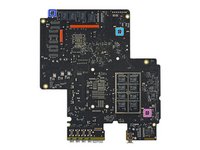
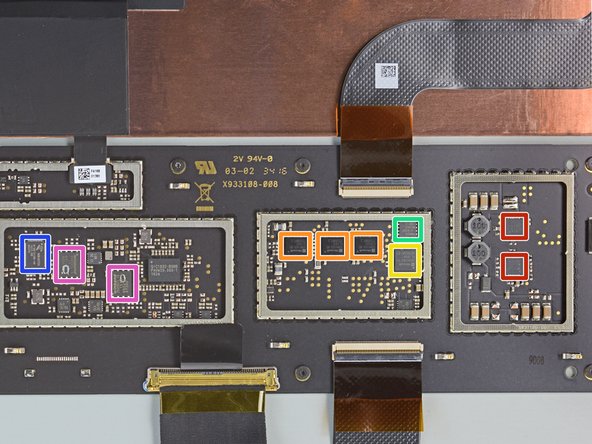
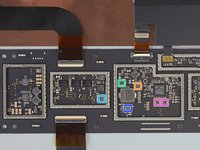
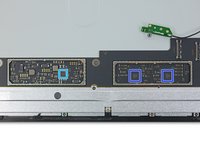
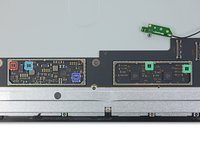
Side two:
-
Four SK Hynix H5GC4H24AJR 512 MB GDDR5 SDRAM (for a total of 2 GB)
-
Eight additional Samsung K4A4G085WE-BCPB 512 MB DDR4 (for a grand total of 8 GB)
-
Winbond W25X40CL serial flash memory
-
ITE IT8527VG I/O controller
-
Realtek ALC3269 audio codec
-
Intel I219-LM gigabit ethernet controller
-
Texas Instruments LM358A dual operational amplifier
-
-
-
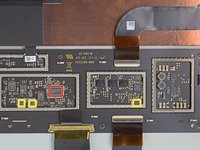
IC Identifications, continued:
-
STMicroelectronics STTS751 digital temperature sensor
-
Goodix (formerly NXP Semiconductor) TFA9890A class-D audio amplifier
-
Texas Instruments INA3221 13-bit current/voltage monitor
-
Richtek RT8813A multiphase PWM controller
-
Richtek RT6575D 2-ch. synchronous DC-DC step-down controller
-
Richtek RT8171C single-phase controller for Intel CPU
-
Richtek RT8231B DDR memory power supply
-
-
-
As promised, it's time to return to that huge 28" glass display. Gulp.
-
Unsure what kind of adhesive lies in wait (nasty Surface adhesive? Nice iMac adhesive?), we throw down a pair of iOpeners to soften it up.
-
Many swipes of the iMac opening tool later, and we're ready to call this glue the in-between. It's not the overkill tar we saw in the Surface Pro, but it's also not slice-it-down-the-middle clean iMac adhesive. It's in between. A bit of a struggle, but not impossible.
-
... But after that bit of struggle, lifting the glass is fruitless—it won't budge. Looks like we're missing some fasteners in the center of the LCD. Where might those be?
-
-
-
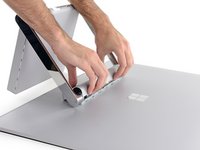
We temporarily shift our attention to a more screw-y, less glue-y portion of this desktop, in the hopes that we will have more luck in removing it.
-
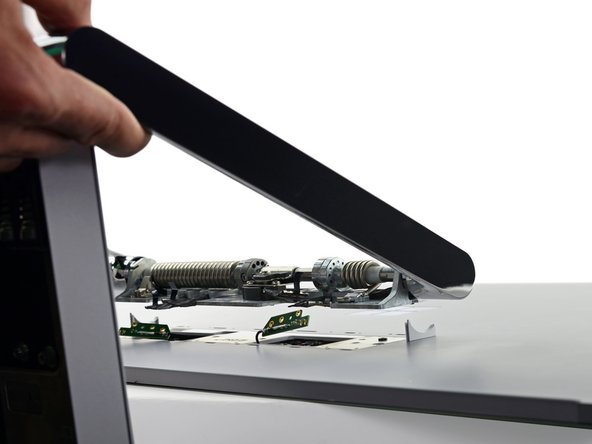
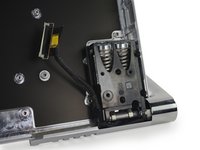
Lacking a specialized tool for the job, we hand-beast the hinge casing off the back of the display. A slew of tiny clips keep it tightly stuck, with no adhesive or screws.
-
Underneath lurks a pair of antennas, significantly-more-than-a-pair of springs, and loads of screws.
-
Removing the screws securing the hinge to the display is like playing Russian Roulette: some are spring-loaded while others are not. We test our odds, and manage to select all of the correct screws for removal, detaching the base without a springtastic explosion.
-
-
-
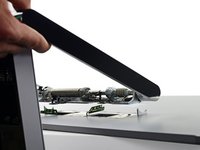
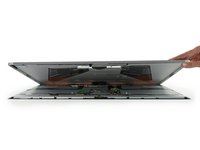
We took the long way there, but it looks like a simple display replacement is one of the easiest jobs on the Studio. Good news for any folks prone to being a little hamfisted with their Surface Dial.
-
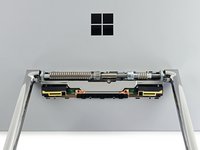
With the case emptied and display removed, this is still a hefty piece of hardware—clearly the crown jewel of Microsoft's burgeoning engineering prowess.
-
The top bar features a couple of tightly-wound springs and a calibration screw in the center, along with the termination of four display interconnect cables that run inside of the hinges and press onto the back of the display.
-
-
-
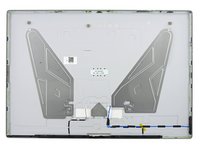
With the hinge section removed, the display separates cleanly from its housing.
-
Stuck to the inside of the housing is an unusual, asymmetrical set of metal butterfly wings—probably serving as stiffeners and/or counterweights for the enormous pane of glass out front.
-
This has been a bit of a trend lately.
-
-
-
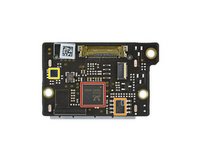
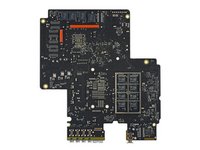
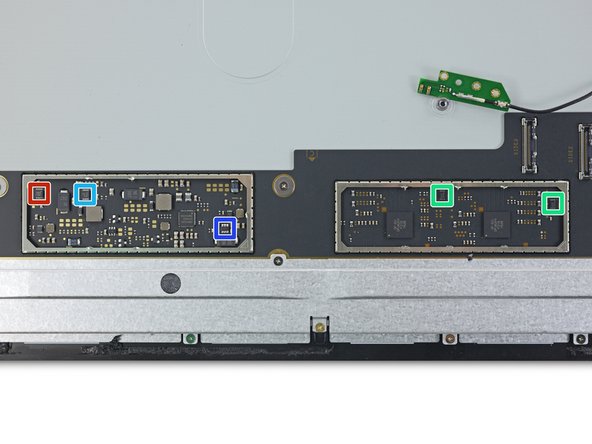
Hiding behind the display we find the other half of the motherboard. Seriously, there's way more silicon hiding in this unit than in the base. Highlights include:
-
Monolithic Power Systems MP3387LLED driving, step-up converter (x4)
-
Microsoft X904169 05 CL1631 T518907.1 (x6) likely touchscreen controller
-
Microsoft X904163 01 CL1634 4C39290-01 (x2) likely touchscreen controller
-
Macronix MX25U1635F serial NOR flash (x2)
-
Atmel ATSAMS70N21 32-bit ARM Cortex-M7 processor
-
Novatech NT96131QG-46 likely camera controller
-
Winbond W25X20CL 2 Mb Serial NOR Flash Memory (x2)
-
-
-
IC Identification, continued:
-
Unknown QIC1832-B98B ? programmable gamma buffer (likely)
-
STMicroelectronics STTS751-1DP3F digital temperature sensor
-
Richtek RT9059GQW 3 A LDO regulator
-
Texas Instruments TLV3011 comparator w/ voltage reference
-
Monolithic Power Systems NB671GQ6 A synchronous step-down converter
-
Monolithic Power Systems DC-DC converter
-
Texas Instruments SN74LVC1G3157 SPDT analog switch
-
-
-
And the mid/lowlights:
-
Genesys Logic GL3520 USB 3.1 hub controller
-
NXP TFA9890A (x2) high efficiency class-D audio amplifier
-
Marvell 88W8897 WLAN + BT4.0 + NFC Combo Chip (as seen in past Surface devices)
-
Mediatek MT7600UAN (likely integrated Wi-Fi SoC, as seen in the Xbox One Wireless Receiver)
-
Silicon Mitus SM4142A display power management
-
MegaChips F216 timing controller (likely)
-
-
-
IC Identification, continued:
-
MaxLinear (formerly Exar) iML2811 voltage reference buffer
-
Macronix MX25L512ZUI-12G 512 Kb serial NOR flash memory
-
Rohm BR24T16-W 16 Kb serial EEPROM memory
-
STMicroelectronics M24C32-W 32 Kb serial EEPROM memory (likely)
-
Maxim Integrated MAX17112 LCD step-up DC-DC converter
-
Texas Instruments TPS3808G12 current supervisor
-
Monolithic Power Systems NB671LBGQ and NB671GQ DC-DC converter
-
- The base is easy to open and home to several modular components—including the standard SATA hard drive and M.2 SSD—that can be replaced without disassembling the display.
- The entire display assembly can be replaced as a piece, without dismantling the display or the base.
- The RAM, CPU, and GPU are soldered to the board and cannot be upgraded. You may want to think twice about that 8 GB configuration.
- A few components embedded in the display (buttons, front sensors, and speakers) will be difficult to replace if they fail.


Considerações finais
Índice de reparabilidade


(10 é o mais fácil de reparar)

49 comentários
Wow, iFixit must really be mad at Apple to give this Microsoft product a 5, even after complaining about the hidden fan wires and having to disassemble half the base to get to an antique hard drive. The cop out is replacing the entire display assembly.
Both the iMac 5k and Surface Studio have a repairability of 5/10. Looks like they have the same build qualities with both cop outs being the %#*@ display assembly.
Anthony -
I thought the same thing
The midframe-over-connector design does add to the complexity of basic repairs, but we felt that the lack of adhesive and modular components in the base more than made up for this pesky design feature.
Regarding "antique" hardware: the quality/speed of the hard drive does not factor into the repairability score—we're mainly concerned with how accessible those components are. It would have been nice to find a high-speed SATA III drive lurking underneath, but the fact that this drive can be upgraded/replaced without any destructive disassembly earns major points in our book (although if it was more easily accessible the Studio would have scored higher on our repairability scale).
I think iFixit must be mad at Microsoft and happy with Apple
e.g.
"Notably, the speaker itself is anchored and vibration-proofed by way of some (very Apple-esque) rubber screw gaskets."
"A tall standoff spacer, reminiscent of those found in 27" iMacs, holds this beast in place."
"nasty Surface adhesive? Nice iMac adhesive?"
I get the last one, but the first two are very commonly used in the industry