Ir para o conteúdo principal

O que você precisa

Este teardown (desmontagem analítica) não é um guia de reparo. Para reparar seu/sua Hitachi KC30 Radio Alarm Clock, use o nosso manual de serviço.

  1. Hitachi KC30 Radio Alarm Clock Teardown, Removing top cover 1: passo 1, imagem 1 %32 Hitachi KC30 Radio Alarm Clock Teardown, Removing top cover 1: passo 1, imagem 2 %32
    • Turn the clock upside down

    • Remove the 6 screws.

    • The two front screws are shorter and slimmer.

  2. Hitachi KC30 Radio Alarm Clock Teardown, Removing top cover 2: passo 2, imagem 1 %32 Hitachi KC30 Radio Alarm Clock Teardown, Removing top cover 2: passo 2, imagem 2 %32 Hitachi KC30 Radio Alarm Clock Teardown, Removing top cover 2: passo 2, imagem 3 %32
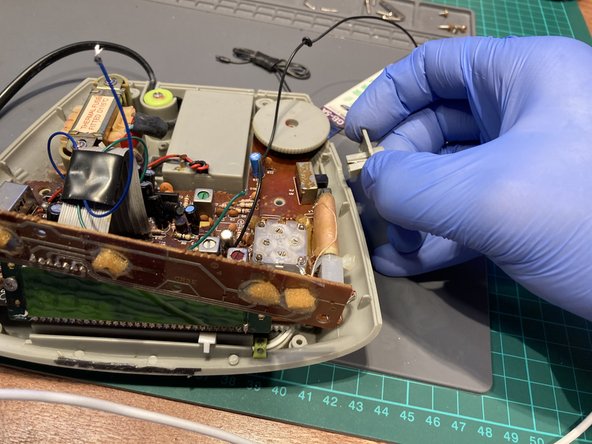
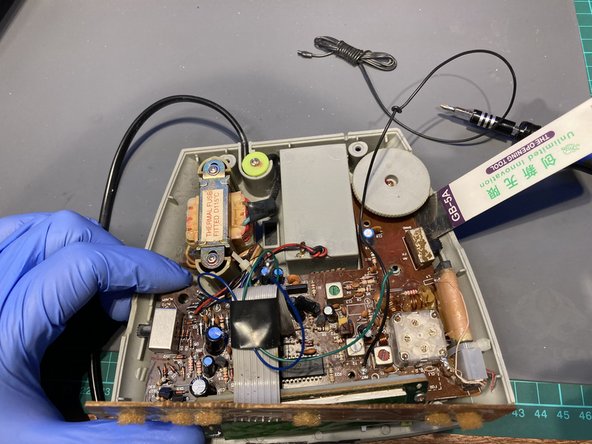
    • With the help of a pry tool, pop the cover open.

    • Open it from the back towards the clock display.

    • Don't try to separate the cover as both the speaker and the motherboard is still connected!

  3. Hitachi KC30 Radio Alarm Clock Teardown, Removing top cover 3 / Speaker disconnect: passo 3, imagem 1 %32 Hitachi KC30 Radio Alarm Clock Teardown, Removing top cover 3 / Speaker disconnect: passo 3, imagem 2 %32 Hitachi KC30 Radio Alarm Clock Teardown, Removing top cover 3 / Speaker disconnect: passo 3, imagem 3 %32
    • De-solder the speaker connections.

    • Unscrew the button panel from the top cover.

    • Pry out the button panel form the cover.

  4. Hitachi KC30 Radio Alarm Clock Teardown, Removing ALARM switch: passo 4, imagem 1 %32 Hitachi KC30 Radio Alarm Clock Teardown, Removing ALARM switch: passo 4, imagem 2 %32
    • Remove the ALARM ON/OFF button

  5. Hitachi KC30 Radio Alarm Clock Teardown, Removing FM/AM switch: passo 5, imagem 1 %32 Hitachi KC30 Radio Alarm Clock Teardown, Removing FM/AM switch: passo 5, imagem 2 %32
    • Remove the FM/AM selector knob

  6. Hitachi KC30 Radio Alarm Clock Teardown, Removing transformer: passo 6, imagem 1 %32 Hitachi KC30 Radio Alarm Clock Teardown, Removing transformer: passo 6, imagem 2 %32
    • Unscrew the transformer securing screws

    • Pull it out of the socket

  7. Hitachi KC30 Radio Alarm Clock Teardown, Remove motherboard from case: passo 7, imagem 1 %32 Hitachi KC30 Radio Alarm Clock Teardown, Remove motherboard from case: passo 7, imagem 2 %32 Hitachi KC30 Radio Alarm Clock Teardown, Remove motherboard from case: passo 7, imagem 3 %32
    • Remove the screws that secures the motherboard to the base.

    • Grab the motherboard on one side and pry it on the opposite side to release it from the base.

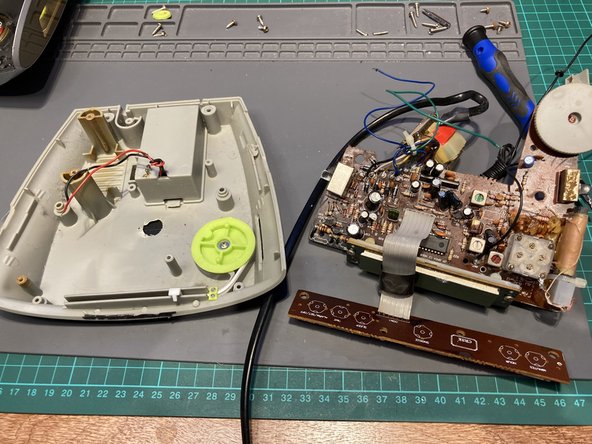
  8. Hitachi KC30 Radio Alarm Clock Teardown, Complete disassembly: passo 8, imagem 1 %32 Hitachi KC30 Radio Alarm Clock Teardown, Complete disassembly: passo 8, imagem 2 %32 Hitachi KC30 Radio Alarm Clock Teardown, Complete disassembly: passo 8, imagem 3 %32
    • For complete disassembly de-solder the transformer.

    • ...and the button (control) board

    • Remember the labelling/wire colours

honakrisi

Membro desde: 01/28/20

3.421 Reputação

Autoria de 7 guias

0 comentários

Adicione um comentário

Exibir estatísticas:

Últimas 24 horas: 0

Últimos 7 dias: 0

Últimos 30 dias: 14

Duração total: 249