Ir para o conteúdo principal
Participe da comunidade de reparos - Criar conta

O que você precisa

Este teardown (desmontagem analítica) não é um guia de reparo. Para reparar seu/sua Flipper Zero, use o nosso manual de serviço.

  1. Flipper Zero Teardown, Caution: passo 1, imagem 1 %32
    • Do not use alcohol or alcohol containing cleaners, tissues, wipes, or sanitizers on the acrylic window! It can permanently damage it.

    • The top shell, the IR cover and the acrylic window are one solid part and can't be disassembled. (They pop out with a bit of force but wont go back in as well without some sort of glue)

    • The Flipper Zero only uses two types of screws:

    • Long screw size is M1.7x8

    • Short screw size is M1.7x4

    Pergunte ao FixBot

    Comentar

  2. Flipper Zero Teardown, Remove the microSD card: passo 2, imagem 1 %32
    • Eject the microSD card (if present) by pressing it with your fingernail.

    Pergunte ao FixBot

    Comentar

  3. Flipper Zero Teardown, Remove the screws: passo 3, imagem 1 %32
    Ferramenta utilizada neste passo:
    Phillips #0 Screwdriver
    $5.49
    • Use a PH0 screwdriver to unscrew the four long screws holding the back cover.

    Pergunte ao FixBot

    Comentar

  4. Flipper Zero Teardown, Open the back cover: passo 4, imagem 1 %32 Flipper Zero Teardown, Open the back cover: passo 4, imagem 2 %32 Flipper Zero Teardown, Open the back cover: passo 4, imagem 3 %32
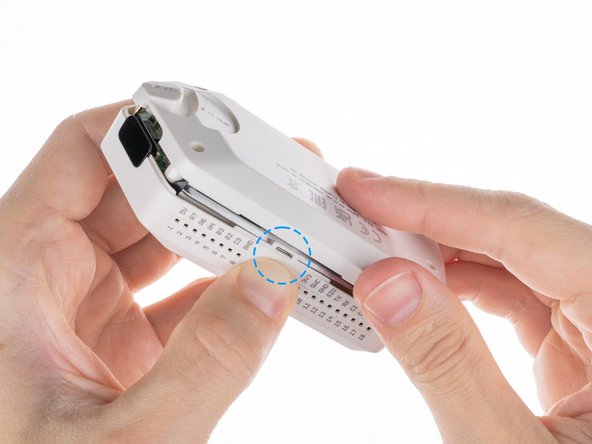
    • Press the middle of the top cover on both sides, one by one, to release the latches that hold the back cover in place.

    • Once the latches are released, you can remove the bottom cover.

    Pergunte ao FixBot

    Comentar

  5. Flipper Zero Teardown, Lift the NFC antenna: passo 5, imagem 1 %32
    Ferramenta utilizada neste passo:
    iFixit Opening Picks (Set of 6)
    $4.95
    • The board with the NFC antenna is glued to the bottom cover with adhesive tape.

    • To remove the board, gently pry one of the edges of the board with a plastic pick to peel off the adhesive tape.

    Pergunte ao FixBot

    Comentar

  6. Flipper Zero Teardown, Pull out the NFC antenna: passo 6, imagem 1 %32 Flipper Zero Teardown, Pull out the NFC antenna: passo 6, imagem 2 %32
    • Gently pull out the rest of the board.

    Pergunte ao FixBot

    Comentar

  7. Flipper Zero Teardown, Unscrew the chassis: passo 7, imagem 1 %32
    Ferramenta utilizada neste passo:
    Phillips #0 Screwdriver
    $5.49
    • Use a PH0 screwdriver to unscrew the two short screws that are holding the chassis and top cover together.

    Pergunte ao FixBot

    Comentar

  8. Flipper Zero Teardown, Seperate the chassis from the top cover: passo 8, imagem 1 %32
    • Take the chassis out of the case.

    Pergunte ao FixBot

    Comentar

  9. Flipper Zero Teardown, Disconnect the battery: passo 9, imagem 1 %32
    • Disconnect the battery by prying the connector with a plastic pry tool and pulling it out.

    • Do not use a metal screwdriver when prying out battery connectors, if you do it may short the battery terminals and cause damage to the battery.

    Pergunte ao FixBot

    Comentar

  10. Flipper Zero Teardown, Disconnect the ribbon cables: passo 10, imagem 1 %32
    Ferramenta utilizada neste passo:
    iFixit Opening Picks (Set of 6)
    $4.95
    • Disconnect the large ribbon cable from the board. Use a plastic pick to lift the latch up to release the locks.

    Pergunte ao FixBot

    Comentar

  11. Flipper Zero Teardown, Disconnect the ribbon cables: passo 11, imagem 1 %32
    • Once the connectors are unlocked, carefully pull out the ribbon cables.

    Pergunte ao FixBot

    Comentar

  12. Flipper Zero Teardown, Unscrew the iButton board: passo 12, imagem 1 %32
    Ferramenta utilizada neste passo:
    Phillips #0 Screwdriver
    $5.49
    • Unscrew the short screw holding the iButton board in place using a PH0 screwdriver.

    Pergunte ao FixBot

    Comentar

  13. Flipper Zero Teardown, Remove the iButton board: passo 13, imagem 1 %32
    • Once the screw is removed, carefully remove the iButton board.

    Pergunte ao FixBot

    Comentar

  14. Flipper Zero Teardown, Remove the cable from the iButton board: passo 14, imagem 1 %32
    Ferramenta utilizada neste passo:
    Flathead 1.5 mm Screwdriver
    $1.99
    • To disconnect the flat cable from the iButton board, use a flat screwdriver to carefully release the lock by pulling the latch up, then pulling gently on the ribbon cable.

    Pergunte ao FixBot

    Comentar

  15. Flipper Zero Teardown, Remove the cable from the iButton board: passo 15, imagem 1 %32
    • Once the connector is unlocked, gently pull the cable out of the connector.

    Pergunte ao FixBot

    Comentar

  16. Flipper Zero Teardown, Release the battery chassis: passo 16, imagem 1 %32 Flipper Zero Teardown, Release the battery chassis: passo 16, imagem 2 %32
    • To release the battery chassis, gently rock it back and forth while pulling the two parts apart.

    Pergunte ao FixBot

    Comentar

  17. Flipper Zero Teardown, Remove the NFC RFID board: passo 17, imagem 1 %32
    • To remove the NFC RFID board, release it from the latches in the sequence shown.

    Pergunte ao FixBot

    Comentar

  18. Flipper Zero Teardown, Remove the NFC RFID board: passo 18, imagem 1 %32
    • Release the board from the latches by pressing on the edge of the chassis near the specific latch in the specified sequence.

    Pergunte ao FixBot

    Comentar

  19. Flipper Zero Teardown, Remove the vibration motor: passo 19, imagem 1 %32 Flipper Zero Teardown, Remove the vibration motor: passo 19, imagem 2 %32
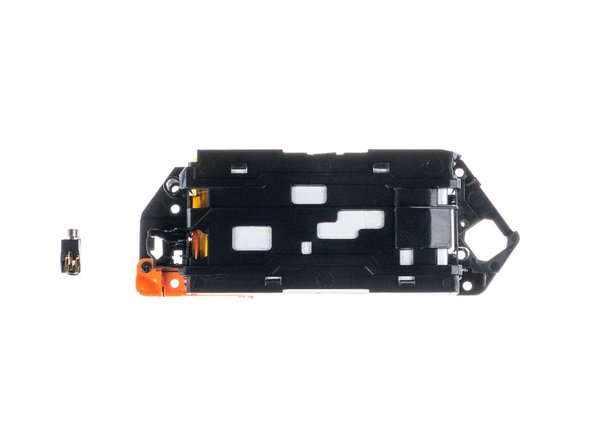
    • Take out the vibration motor.

    Pergunte ao FixBot

    Comentar

  20. Flipper Zero Teardown, Unscrew the lace mount: passo 20, imagem 1 %32
    Ferramenta utilizada neste passo:
    Phillips #0 Screwdriver
    $5.49
    • To remove the lace mount, use a PH0 screwdriver to unscrew the short screw that is securing it in place.

    Pergunte ao FixBot

    Comentar

  21. Flipper Zero Teardown, Remove the lace mount: passo 21, imagem 1 %32
    • Remove the lace mount from the chassis.

    Pergunte ao FixBot

    Comentar

  22. Flipper Zero Teardown, Remove the battery: passo 22, imagem 1 %32
    Ferramenta utilizada neste passo:
    iFixit Opening Picks (Set of 6)
    $4.95
    • The battery is attached to the chassis with double-sided tape. To remove it, use a plastic pick to gently peel the battery off the chassis.

    • Caution: Don't jab the battery with any sharp tools. A punctured battery may leak dangerous chemicals or catch fire.

    Pergunte ao FixBot

    Comentar

  23. Flipper Zero Teardown, Remove the battery: passo 23, imagem 1 %32 Flipper Zero Teardown, Remove the battery: passo 23, imagem 2 %32
    • Remove the battery from the chassis.

    Pergunte ao FixBot

    Comentar

  24. Flipper Zero Teardown, Remove the ribbon cable: passo 24, imagem 1 %32
    Ferramenta utilizada neste passo:
    iFixit Opening Picks (Set of 6)
    $4.95
    • Use a plastic pick to lift the latch up to unlock the connector.

    Pergunte ao FixBot

    Comentar

  25. Flipper Zero Teardown, Remove the ribbon cable: passo 25, imagem 1 %32
    • Pull the flat cable out.

    Pergunte ao FixBot

    Comentar

  26. Flipper Zero Teardown, Unscrew the the button chassis: passo 26, imagem 1 %32
    Ferramenta utilizada neste passo:
    Phillips #0 Screwdriver
    $5.49
    • Unscrew the two short screws holding the button chassis using a PH0 screwdriver.

    Pergunte ao FixBot

    Comentar

  27. Flipper Zero Teardown, Separate the button chassis: passo 27, imagem 1 %32
    • To disconnect the button chassis and the board, press the latch on the side shown below.

    Pergunte ao FixBot

    Comentar

  28. Flipper Zero Teardown, Remove the button chassis: passo 28, imagem 1 %32 Flipper Zero Teardown, Remove the button chassis: passo 28, imagem 2 %32
    • Remove the button chassis.

    Pergunte ao FixBot

    Comentar

  29. Flipper Zero Teardown, Disconnect the screen: passo 29, imagem 1 %32
    Ferramenta utilizada neste passo:
    iFixit Opening Picks (Set of 6)
    $4.95
    • Disconnect the screen ribbon cable from the board. Use a plastic pick to lift the latch up to open the lock.

    Pergunte ao FixBot

    Comentar

  30. Flipper Zero Teardown, Disconnect the screen: passo 30, imagem 1 %32
    • Remove the cable from the board.

    Pergunte ao FixBot

    Comentar

  31. Flipper Zero Teardown, Desolder the screen: passo 31, imagem 1 %32
    • To remove the screen you need to desolder two contacts.

    • Be careful during this step not to accidentally melt or desolder other nearby components.

    Pergunte ao FixBot

    Comentar

  32. Flipper Zero Teardown, Remove the buttons: passo 32, imagem 1 %32
    • To remove the buttons you need to release the latches.

    • OK

    • D-pad

    • Back

    • The central button (OK) is removed after the navigation button (D-pad)

    Pergunte ao FixBot

    Comentar

  33. Flipper Zero Teardown, Remove the buttons: passo 33, imagem 1 %32
    Ferramenta utilizada neste passo:
    Flathead 1.5 mm Screwdriver
    $1.99
    • Release the latches with a flat screwdriver. You need to be careful with the springs under the buttons.

    Pergunte ao FixBot

    Comentar

  34. Flipper Zero Teardown, Remove the light guide: passo 34, imagem 1 %32
    Ferramenta utilizada neste passo:
    Flathead 1.5 mm Screwdriver
    $1.99
    Pergunte ao FixBot

    Comentar

  35. Flipper Zero Teardown, Remove the light guide: passo 35, imagem 1 %32 Flipper Zero Teardown, Remove the light guide: passo 35, imagem 2 %32
    • Pull the light guide out from the inside of the chassis.

    Pergunte ao FixBot

    Comentar

  36. Flipper Zero Teardown, Finish: passo 36, imagem 1 %32
    • Here you can see all the parts laid out together.

    Pergunte ao FixBot

    Comentar

Flipper Devices

Membro desde: 06/29/22

1.099 Reputação

Autoria de 2 guias

15Comentários do guia

I'd say, that long screws requires PH1 screwdriver.

Evge Key - Responder Compartilhar

Agree with Evge, when I read "PH0" I picked mine but they wouldn't quite fit. I had to use a PH1 (1.2 to be exact, according to toolset casing) to be able to unscrew the chasis and get to the battery (I had to only remove and plug back the battery cable to fix my problem)

João Ciocca - Responder Compartilhar

Careful with those screws. They are not great quality and strip easily.

andy cooper - Responder Compartilhar

Yeah, I have run into the same issue. The screw securing my IR/iButton board sheered in half! I cant remove the bottom part since its flush with the socket, but the board seems to be alright without it and is still in place since the chassis supports it. I still need to find a way to get it out :)

SkidFace - Responder Compartilhar

Do you know what kind of these screws are?

Gugo - Responder Compartilhar

Comentar

Visualizações:

Últimas 24 horas: 17

Últimos 7 dias: 99

Últimos 30 dias: 526

Ao todo: 59,934