Approval Processes
Overview
Your company’s procedural documentation should convey only accurate, up-to-date information. Dozuki’s Approvals feature ensures that accuracy. With this feature, you can require your company’s documentation and subject matter experts to review and approve of any changes or updates made to specific guides—before deployment.
For example, when a user publishes a new version of a guide, an Approval Request will be activated which will require your experts’ digital signatures in approval of those changes. Once the required digital signatures are obtained, the new version of the guide will be published as a live version on the site for your users to view.
The Dozuki Approvals feature is assigned on a guide-by-guide basis. Multiple Approval Processes can be created, maintained and assigned on your site. Learn how to use the system below.
Approval Processes Tab
Create, edit, and view all Approval Processes in one location. Simply go to your Management Console—and in the Moderation section, click on the Approval Processes tab.

Creating a New Approval Process
To create a new Approval Process, click the “Create an Approval Process” button at the top of the page.

You will be directed to the “Creating new Approval Process” form.

Approval Process Name
Near the top of the “Creating new Approval Process” form there is a field where you will enter the name of your new Approval Process. This area is indicated by grey text that says “Enter Approval Process name”.

Click this field to type in the desired name for the Approval Process.
Stages
Stages refer to a specific user or a team of users whose digital signatures are required before a new version of a guide is published. Up to 10 stages can be arranged in your prefered order. Once the user(s) of your first Stage have signed, then the user(s) of the second Stage can begin signing—and so on. You can assign any user to a Stage; and you can assign an unlimited number of users to a team.

Adding a Stage to a guide’s Approval Process is easy. Halfway down the “Creating new Approval Process” form, you will find two neighboring buttons: “Add user” and “Add team”. Select one, and in the field below—with the gray text that reads “Enter username”—type in the name of the existing user you want to add. If you're adding a team, select the name of your prefered team when it appears in the drop-down menu. Once your team is added, use the arrows next to the team's name to specify how many members of the team must sign off.

Enabling the Approval Process
To allow this Approval Process to be applied to guide, select the checkbox next to “Enable this Approval Process”.

Allowing a User to Sign Multiple Stages
If you would like a user—whether as an individual or a member of a team—to be able to sign multiple Stages of a specific Approval Process, simply select the checkbox next to “Allow users to sign multiple stages”.

Making an Approval Process a Guide Default
You can automatically assign an Approval Process to any new guide created on your site by selecting the checkbox for "Use this as the default approval process for all new guides."

Assigning an Approval Process to a Guide
Approval Processes are assigned to each guide individually—but can be used on multiple guides. To assign an Approval Process to one or more guides, go to the Approval Processes tab of the guide’s editing interface.

In the tab, you will see a field titled “Release Approval Process”. If you have the Major and Minor Release Version feature activated, you will see two fields, one for Major Versions and one for Minor Versions.

To associate an Approval Process to the guide, simply type in the name of the desired Approval Process—and select it when it appears in the drop-down menu.

Your document control needs will determine how strictly you need to approach assigning Approval Processes to your guides. Keep in mind that only Admin users can create and assign Approval Processes.
Major & Minor Releases
When publishing a new version of a guide, the publisher will have the option to select either a "Major Release" or a "Minor Release."

This means you can have two different Approval Processes assigned to the guide, or you can have a single Approval Process assigned for one version type, and no process assigned for the other. With this option, your Authors will have the ability to publish the guide without it first going through an Approval Process.
Signing off on an Approval Request
If you are assigned as a Stage (either as an individual user or a member of a Team) for an Approval Process, you will receive requests to review the new releases of the guide for which that Approval Process has been assigned.
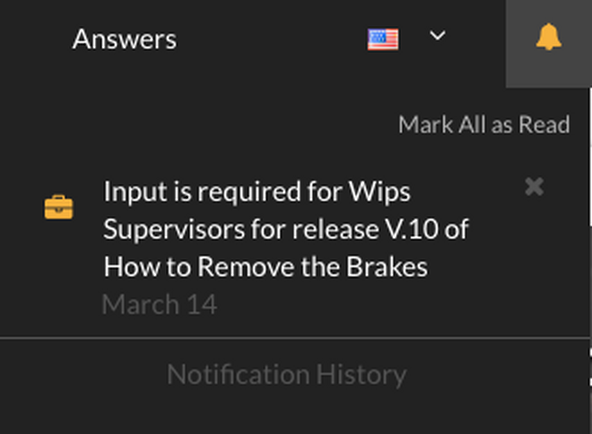
Notifications
You will receive an email request with a link to review the new version that requires your approval:

You will also receive an on-site notification for the pending approval:
View Which Approvals Need Your Signature
To view all of your Approval Requests, go to your Profile and click on the Approval Processes tab. Use the view filters to select "Mine" and "Pending" to see all of your pending requests.

Click “Review” to be directed to more information about the specific Approval Request(s).

Click the link following "At Release:" to open the pending release version and review the changes to decide if you approve or reject this new version of this guide.

To either accept or reject an Approval Request, click on your name at the bottom of the release info. Fill out the required fields, and select either the “Approve” or “Reject” button.

Approval Process Status
Administrators can easily see which Approval Processes are fully satisfied, or which ones still need digital signatures. Simply go to the Management Console—and under Moderation, click on the Approval Processes tab.
If an Approval Process needs to still be filled out, it will look something like this:

User Sign-off History
You can view a complete history of all the Approval Requests by going to your profile and clicking on the Approval Requests tab.
From there, you have the option to view all Approval Requests—or filter the list to just changes you’ve approved of, or changes you’ve rejected. Adjust which Approval Requests you want to view by using the Request Status drop-down menu, located below the navigation tabs.

You can even see more in depth information about the requests by pressing the Review button for that release.

Was this article helpful to you?
Didn't find the answer you were looking for?
Ask a QuestionYour vote has been recorded.
Tell us more. (optional)