Ir para o conteúdo principal

Reemplazo del sensor de huellas digitales y pantalla del Motorola Moto Z2 Force

Aviso: Você está editando um guia tipo pré-requisito. Todas as alterações que você fizer afetarão todos os 6 guias que incluem este passo.

Inglês
Espanhol
Passo 2
Motorola Moto Z2 Force Display and Fingerprint Sensor Replacement, Release the Screen Assembly: passo 0, imagem 1 %32 Motorola Moto Z2 Force Display and Fingerprint Sensor Replacement, Release the Screen Assembly: passo 0, imagem 2 %32 Motorola Moto Z2 Force Display and Fingerprint Sensor Replacement, Release the Screen Assembly: passo 0, imagem 3 %32
Release the Screen Assembly
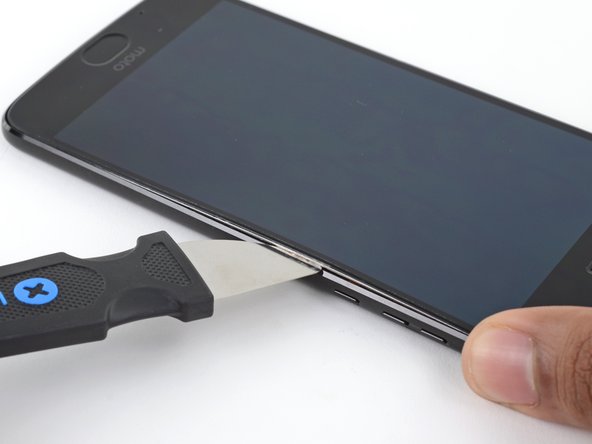
  • Insert a Jimmy or other metal tool between the right side of the plastic display and the metal frame, near the phone's side buttons.

  • This may require a considerable amount of force. Push the tool as far down into the gap as you can, taking care to not scratch the chassis of your device in the process.

  • Tilt the Jimmy downward while continuing to push it deeper into the gap to pry up the right side of the screen assembly.

  • Since the display on top of the screen assembly is flexible and only attached with a slight amount of adhesive, you may end up prying up only the display instead of lifting the entire assembly. If this occurs, remove the tool and try again, this time using more downward force to get underneath the entire assembly.

  • Ensure your tool is behind the entire screen assembly and not just the display. If done correctly, you should notice the thin silver metal midframe come up with the plastic display (as pictured).

Introduce un Jimmy u otra herramienta metálica entre el lado derecho de la pantalla de plástico y el marco metálico, cerca de los botones laterales del teléfono.

Esto puede requerir una fuerza considerable. Introduce la herramienta en el hueco tanto como puedas, con cuidado de no arañar el chasis del aparato.

Inclina el Jimmy hacia abajo mientras sigues introduciéndolo en el hueco para hacer palanca en el lado derecho del conjunto de la pantalla.

Como la pantalla de la parte superior es flexible y sólo está unida con un poco de adhesivo, puede que acabes levantando sólo la pantalla en lugar de levantar todo el conjunto. Si esto ocurre, retira la herramienta e inténtalo de nuevo, esta vez empleando más fuerza hacia abajo para llegar debajo de todo el conjunto.

Asegúrate de que la herramienta está detrás de todo el conjunto de la pantalla y no sólo de la pantalla. Si lo haces correctamente, deberías notar que el fino marco intermedio de metal plateado sale junto con la pantalla de plástico (como en la imagen).

Suas contribuições são licenciadas pela licença de código aberto Creative Commons.