Essa tradução foi gerada por um programa e ainda não foi revisada por uma pessoa. Falas essa língua? Dá uma olhada.
Introdução
A bateria não dura muito? Troque-a.
O que você precisa
-
-
-
Antes de abrir o seu iPod, verifique se a chave hold está na posição travada. A barra laranja deve estar visível, indicando que o modo hold está ativo.
 Pergunte ao FixBot
-
-
-
Insira uma palheta o máximo possível na fenda entre a parte frontal de plástico e o painel traseiro de metal, na borda direita do iPod.
-
Use a palheta para fazer alavanca contra o painel frontal de plástico e soltar cinco travas de retenção (vistas na terceira foto).
-
Deslize a palheta ao longo da borda do iPod e continue forçando para soltar o restante das travas de retenção.
-
Após soltar todas as cinco travas ao longo do lado direito, a carcaça deve abrir facilmente.
-
-
-
Abra o case como um livro, com o conector de dock no topo, e coloque o painel traseiro ao lado da metade frontal do iPod.
-
-
-
-
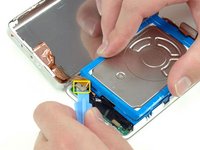
Use uma espátula de plástico ou as suas unhas para desconectar com cuidado o cabo plano alaranjado da entrada para fone de ouvido. Certifique-se de puxar o conector diretamente para cima, e não o cabo em si.
-
-
-
-
-
Levante o disco rígido com uma mão e desconecte cuidadosamente o cabo flat do disco rígido da placa lógica.
-
Retire o disco rígido do iPod.
-
-
-
Desconecte cuidadosamente o conector branco da bateria da placa lógica. Certifique-se de puxar apenas pelo conector e não pelos cabos.
-
-
-
Remova o parafuso Torx T6 preto próximo ao conector da bateria na placa lógica.
-
-
-
Passe cuidadosamente o cabo da bateria ao redor da extremidade da placa lógica. Tenha cuidado para não puxar muito a placa lógica ao soltar o cabo da bateria.
-
-


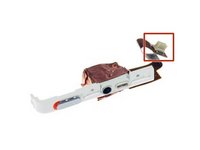


Para a remontagem de seu dispositivo, siga estas instruções na ordem inversa.
Cancelar: não concluí este guia.
333 outras pessoas executaram este guia.

20Comentários do guia
If you are real careful you don't have to remove the Torx screw to get the battery out.
I found this quite easy. The tools worked great. I agree with Andy, if you push the tool into the groove, then lift or pry it up so the tip of the tool is down inside the back cover, you should be able to slide it across to pop the clips quite easily. Once you get the first two sides open, it goes quick.
I also did this without having to remove the Torx screw. It helped to lift the battery up a bit to give the wires a little slack, and then just feed them around the corner of the motherboard. Putting the new battery in, I just fed the wires around the corner, and used the opening tool to push them the final bit of the way around the corner.
My old iPod is like new now! Hours and hours of battery life, when it would previously die after 5 minutes.
Changing the battery was simular to when I changed the HD in the same iPod. Quite easy. No need to remove the torx screw, Just be sure where the (lock) button (on the top) is when you close it, this time I didnt forget, as I did replacing the HD :)
I love iFixit!
I managed to bend the casing out when opening, but bent it back in shape after re-opening. The bend was small, but noticable. Worth reopening it.
One issue - the battery doesn't fully recharge in one go. I have to reconnect the iPod to get it to full charge.
Very simple and clear guide. I managed to replace the battery in the first try and it worked!
I was able to do it without disconnecting the headphone jack and without removing the Torx screw.
I found the replacement battery to be a little thicker than the original battery but there was no issue resealing the case.
