Essa tradução foi gerada por um programa e ainda não foi revisada por uma pessoa. Falas essa língua? Dá uma olhada.
Introdução
Remova o painel traseiro para acessar os componentes internos do seu iPhone 4.
O que você precisa
Vídeo de Apresentação
-
-
-
Desligue o seu iPhone antes de começar a desmontagem.
-
A tampa traseira do seu iPhone 4 pode ter dois parafusos Phillips #000 ou parafusos "Pentalobe" de 5 pontas da Apple (segunda imagem). Verifique quais parafusos você possui e certifique-se de também ter a chave correta para removê-los.
-
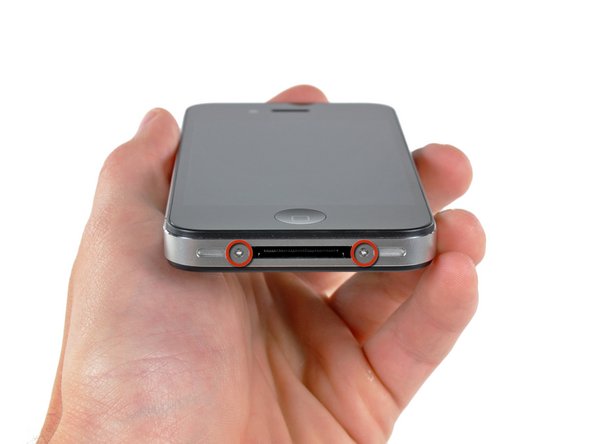
Remova os dois parafusos Pentalobe ou Phillips #000 de 3,6 mm ao lado do conector de dock.
 Pergunte ao FixBot
-
-
-
-
Empurre o painel traseiro em direção à borda superior do iPhone.
-
-
-
Pince o painel traseiro com os dedos e levante-o para longe do iPhone. Como alternativa, use uma ventosa de sucção (boca única).
-
-


Para a remontagem de seu dispositivo, siga estas instruções na ordem inversa.
Cancelar: não concluí este guia.
812 outras pessoas executaram este guia.
Documentos anexados

9Comentários do guia
sorry, I do this without entering the silent mode.
What problems might have
The replacement part for the iPhone 4 rear panel has two thin, clear overlays on the inside surface--a larger one that runs the full length, and a small one that only covers the lens. These should be removed prior to installation. Also, the first rear panel replacement I got from iFixit was not an exact fit and would not easily "click" into place. They replaced it for free and the second one clicked right in.
In the blog post about this item there is mention of removing the shielding, maybe this tutorial could go into detail about removing the shielding, with the appropriate, this will kill your iPhone warnings
On step 3 when replacing the back panel with a new one, they aren't kidding about removing ALL the protective slips. There's THREE of them.
1), the obvious back slip that protects the new back.
2). the one inside the back protecting the side with the camera lens
3). the little square one OVER the lens itself.
First time I tried to reinstall my back, that tiny little square over the lens prohibited my ability to actually get the back on completely. My husband jammed it for me, but the screws still wouldn't take. It's amazing that these things are so precise that the tiny little film on the lens would make it that much tighter.
Anyways, hope that helps somebody. :)
Easiest repair I've ever done. Thanks y'all!
