Introdução
Don't try this if you haven't experience !!!
How to replace / change broken glass / touch screen - Apple iPad2.
O que você precisa
Vídeo de Apresentação
-
-
Use the edge of a plastic opening tool to carefully flip up the retaining flaps on the two digitizer ribbon cable ZIF sockets.
-
-
-
Use the edge of a plastic opening tool to peel the digitizer cable off the shields on the logic board.
-
Carefully pull the digitizer cable off the adhesive securing it to the side of the rear case.
-
-
-
-
Pull the digitizer ribbon cable straight out of its two sockets on the logic board.
After I replaced the digitizer only half the screen is working. Any reason for this problem ?
When reassembling, don’t remove the adhesive strip until you’re sure the new cable is inserted correctly and locked in place. Place the LCD panel inside the case, and the screen inside the bezel, turn on the iPad. If you can drag an icon across the screen, from top to bottom, left to right, your screen is correctly installed and you can proceed removing the adhesive.
After I replaced the digitizer the volume button the side of my ipad will go down but not back up and it’s not powering off. Any ideas why this is happening?
-
-
-
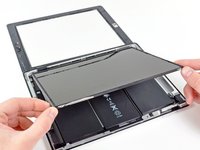
Lift the LCD from its long edge farthest from the digitizer cable and gently flip it toward the rear case—like closing a book.
-
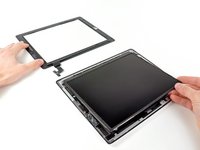
While holding the LCD up, gently slide the front panel away from the iPad. Be careful not to snag the digitizer cable on the rear case or LCD.
-
Set the LCD back into the body for safekeeping.
It should go without saying, but anytime you are handling the LCD, try to only touch the edges. Otherwise you'll be scrubbing fingerprints for 15 minutes. Not that I'm speaking from personal experience or anything.
random question...........1 problem i've ran into in the past is the digitizer cable is so long on aftermarket screens the adhesive isn't strong enough to hold the glass down around the digitizer area where it is folded.
would it help to have a 2nd person tilt glass straight up off table and tuck some extra cable under the lcd or will this cause a problem with the lcd itself?
-
To reassemble your device, follow these instructions in reverse order.
To reassemble your device, follow these instructions in reverse order.
Cancelar: não concluí este guia.
4 outras pessoas executaram este guia.
Um comentário
We replaced the screen successfully and it turns on all looks beautiful except the touch screen isn’t working at all—any thoughts? We are beginners


You should disconnect the battery before disconnecting any cables.
Gregg Stanley - Responder