Introdução
Use this guide to replace or upgrade your hard drive for more storage space.
O que você precisa
-
-
Lay your iMac front side down on a table with the lower edge facing yourself.
-
Loosen the single Phillips screw in the center of the access door.
-
Remove the access door from your iMac.
-
-
Ferramenta utilizada neste passo:Heavy-Duty Suction Cups (Pair)$16.95
-
Stick two suction cups to opposing corners of the glass panel.
-
-
-
Remove the following 12 screws securing the front bezel to the rear case:
-
Eight 13 mm T8 Torx.
-
Four 25 mm T8 Torx.
-
-
-
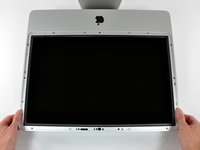
Gently lift the front bezel from its top edge off the rear case.
-
Once the top edge of the front bezel has cleared the rear case, rotate the front bezel toward the stand and lift it off the rear case.
-
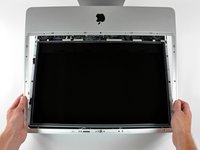
Rotate the front bezel away from the rest of the device and lay it above the top edge of the iMac.
-
-
-
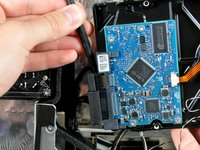
Pull the LCD temperature sensor connector straight up off its socket on the logic board.
-
(located at the top of the logic board on the 24")
-
-
-
-
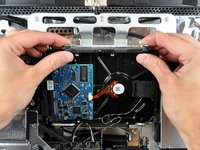
To remove the hard drive bracket, squeeze the middle against the side of the hard drive while rotating the top left edge toward yourself.
-
After the left edge has been freed, rotate the bracket toward the right edge of the hard drive.
-
Lift the hard drive bracket straight up off the chassis.
-
-
-
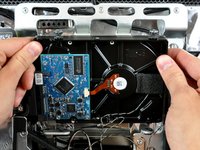
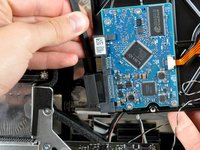
Insert the flat end of a spudger between the SATA data cable and the edge of the hard drive.
-
Twist the spudger to separate the SATA data cable from the hard drive.
-
Disconnect the SATA data cable from the hard drive.
-
Lift the hard drive out of your iMac, minding the thermal sensor cable that may get caught.
-
-
-
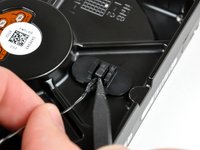
Remove the two T8 Torx screws and their attached rubber grommets from the hard drive.
-


To reassemble your device, follow these instructions in reverse order.
Cancelar: não concluí este guia.
247 outras pessoas executaram este guia.

19Comentários do guia
Because there are no instructions for the 24", I used these and they worked fine. I shelled out $10 for the suction cups ifixit provides, but honestly the glass is really thin and lightweight, so cheapo suction cups from Home Depot should work just fine.
I couldnt agree more. The "Glass" is of couse plastic. I bought some whimpy suction cups in multi pack from Target and after i stuckem to the glass, it came off almost to easy. I was expecting a fight, i didnt get one.
I am about as untechnically proficient as you can imagine, yet replacing the hard drive was not as daunting as it first seemed when following these FANTASTIC step by step instructions. I was forced to do this because of a lack of money, but having done it, I'm glad I did. Even if I had the money, it's not worth the $500 it costs to have an Apple dealer or Apple themselves replace the hard drive. Just take your time and don't force anything, and you should be done in no more than an hour. Kudos ifixit!
On my 24" iMac, I only needed to disconnect the first LCD Cable (before removing the LCD's torx screws), then I was able to pivot the LCD up 90 degrees, to get access to the hard disk. It was nice not having to disconnect (and reconnect the 2nd and 3rd cables. Now I have 3TB! (Seagate Barrracuda ST3000DM001). Note: I first tried putting the 3TB disk into an SATA USB enclosure, so I could transfer the data before opening up the iMac, but I found out the some of the older USB enclosures don't work with >2TB disks.
I followed the guide, and it worked fine. The new HD is working without problems. But now my Mac has a buzzing noise on it's top left part. What should I do?