Introdução
Neste guia, forneceremos os passos para remover e substituir o joystick esquerdo do seu controle sem fio ZD-N Plus. Pode ser necessário substituir o joystick se ele estiver apresentando drift ou se não estiver respondendo ao toque.
O que você precisa
-
-
-
Remova os sete parafusos JIS #00 de 12 mm que prendem o painel traseiro.
 Pergunte ao FixBot
-
-
-
Levante o painel traseiro do ZD-N Plus para removê-lo do restante do controle.
-
-
-
-
-
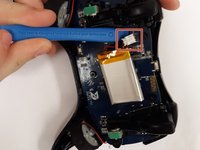
Use uma Ferramenta de abertura para erguer a bateria da sua posição original.
-
-
-
-
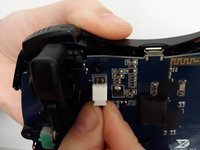
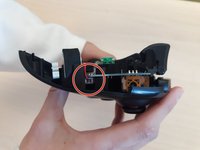
Use uma Ferramenta de abertura para destacar o conector dos dois pinos metálicos.
-
-
-
-
-
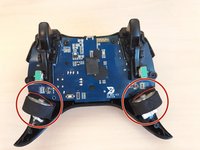
Remova o conector elétrico que prende cada motor de vibração ao controle.
-
Levante a seção circular do motor de vibração para removê-lo do controle.
-
-
-
-
-
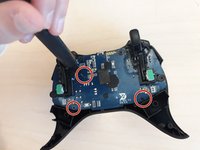
Remova os três parafusos JIS #00 de 1,2 mm que prendem a placa-mãe no lugar.
-
-
-
-
-
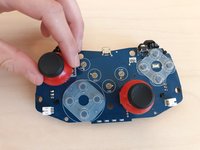
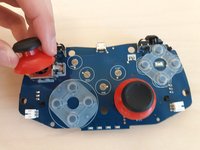
Puxe o joystick esquerdo para cima para removê-lo da placa-mãe. A peça de plástico se soltará facilmente.
-
-


Para a remontagem de seu dispositivo, siga estas instruções na ordem inversa.
Cancelar: não concluí este guia.
Uma outra pessoa concluiu este guia.
Um agradecimento especial a esses tradutores:
100%

Translation Bot está nos ajudando a consertar o mundo! Quer contribuir?
Comece a traduzir ›
Equipe

Grand Valley State University, Team S4-G1, DeVasto Fall 2019 Membro de Grand Valley State University, Team S4-G1, DeVasto Fall 2019
GVSU-DEVASTO-F19S4G1
4 Membros
Autoria de 77 guias