Esta versão pode conter edições incorretas. Mude para o último instantâneo verificado.
O que você precisa
Vídeo de Apresentação
-
Este passo não foi traduzido. Ajude a traduzi-lo
-
Use blunt tweezers to peel off the sticker covering the right-side screw on the back of the console.
-
-
Este passo não foi traduzido. Ajude a traduzi-lo
-
Use a T10 Torx screwdriver to remove the two 12.6 mm–long screws located on the back of the console.
-
-
Este passo não foi traduzido. Ajude a traduzi-lo
-
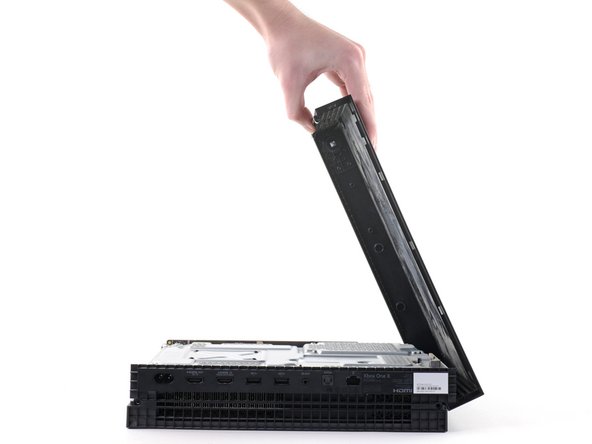
Rotate the console 90 degrees.
-
Pull the front of the upper plastic case horizontally toward the front of the console until it comes to a stop. This slides the clips out of the slots on the upper plastic case.
-
-
Este passo não foi traduzido. Ajude a traduzi-lo
-
Rotate the console 90 degrees so that the back is facing you.
-
Lift up the left side of the upper plastic case (as viewed from the back of the console), stopping when it won’t lift any further.
-
-
Este passo não foi traduzido. Ajude a traduzi-lo
-
While continuing to hold the left side of the upper plastic case, push up on the right side to move the right-side screw boss out of the way.
-
Swing the upper plastic case open to 75 degrees.
-
-
Este passo não foi traduzido. Ajude a traduzi-lo
-
Push the upper plastic case down and away from the console to remove it completely.
-
-
Este passo não foi traduzido. Ajude a traduzi-lo
-
Use the pointed end of a spudger, an opening tool, or your fingernail to flip down the small, hinged locking flap on the ribbon cable ZIF connector on the front circuit board.
-
-
Este passo não foi traduzido. Ajude a traduzi-lo
-
Use blunt tweezers to pull the ribbon cable down out of the connector.
-
-
-
Este passo não foi traduzido. Ajude a traduzi-lo
-
Use a T8 Torx screwdriver to remove the three 13.3 mm screws securing the front circuit board to the upper metal case.
-
-
Este passo não foi traduzido. Ajude a traduzi-lo
-
Pull the front circuit board straight out away from the upper metal case and set it aside.
-
-
Este passo não foi traduzido. Ajude a traduzi-lo
-
Use a T10 Torx screwdriver to remove the six 47.7 mm screws securing the upper metal case to the lower plastic case.
-
Use a T8 Torx screwdriver to remove the two 7.5 mm screws securing the press connector to the upper metal case.
-
-
Este passo não foi traduzido. Ajude a traduzi-lo
-
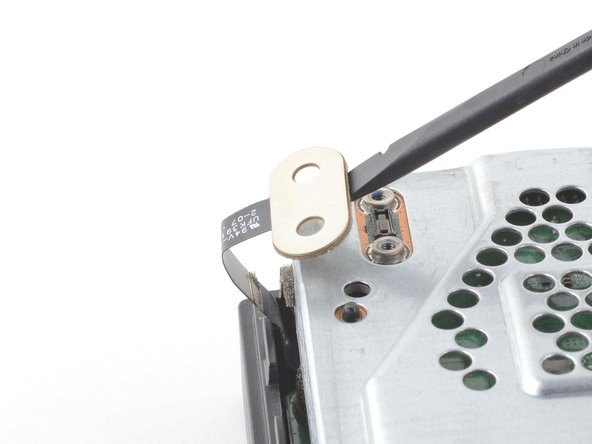
Insert the flat end of a spudger underneath the press connector on the side opposite of the ribbon cable.
-
Use the spudger to lift the press connector up and away from the upper metal case.
-
-
Este passo não foi traduzido. Ajude a traduzi-lo
-
Flip the console over.
-
Lift the lower plastic case up from the metal case and set it aside.
-
-
Este passo não foi traduzido. Ajude a traduzi-lo
-
Remove the two T10 Torx screws securing the lower metal case:
-
One 7.7 mm screw
-
One 11.4 mm screw
-
-
Este passo não foi traduzido. Ajude a traduzi-lo
-
Lift the lower metal case up off the upper metal case and internal components.
-
Set the lower metal case aside.
-
-
Este passo não foi traduzido. Ajude a traduzi-lo
-
Flip the console over.
-
Use a T10 Torx screwdriver to remove the following screws securing the power supply and fan to the upper metal case:
-
Two 11.4 mm screws
-
Two 11.4 mm screws
-
One 11.4 mm screw
-
-
Este passo não foi traduzido. Ajude a traduzi-lo
-
Flip the console over.
-
Lift the disc drive up so that its metal tab is unhooked from the power supply.
-
Place the disc drive on the upper metal case so that it sits over the hard drive. You'll need enough space to unplug the power supply from the motherboard.
-
-
Este passo não foi traduzido. Ajude a traduzi-lo
-
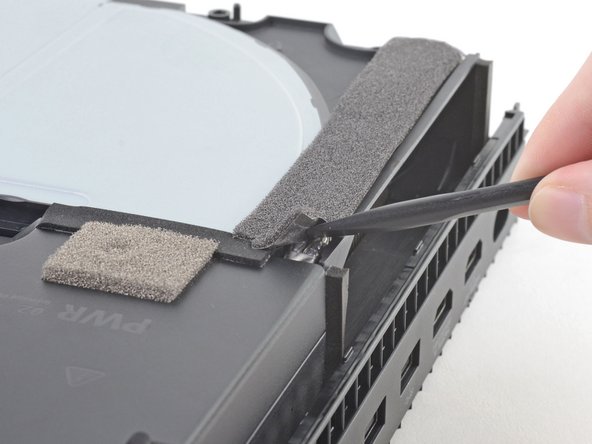
Insert the flat end of the spudger underneath the dark grey foam tape starting at the corner closest to the power supply and edge of the console.
-
Lift up the corner.
-
Slowly push the spudger through to the other side of the tape until you can see the flat end emerge.
-
-
Este passo não foi traduzido. Ajude a traduzi-lo
-
Lift the power supply directly upward to unplug it from the motherboard.
-
-
Este passo não foi traduzido. Ajude a traduzi-lo
-
Lift the power supply so that the cables are at a 90 degree angle.
-
-
Este passo não foi traduzido. Ajude a traduzi-lo
-
While holding the power supply above the console, move the two grey cables out of the plastic hook on the fan case.
-
-
Este passo não foi traduzido. Ajude a traduzi-lo
-
Unplug the bundled cable connector connecting the fan to the motherboard by pulling directly upward.
-
-
Este passo não foi traduzido. Ajude a traduzi-lo
-
Lift the fan case up to remove it from the console.
-


Cancelar: não concluí este guia.
18 outras pessoas executaram este guia.

2 comentários
Nice....danke....meine sah vom Rauchen aus wie Sau....Topp Erklärung....daaaanke
befürchte bei meiner series X wird's genau so sein.....😝