Ir para o conteúdo principal

X-Street STR Viper Motor Replacement

O que você precisa

  1. X-Street STR Viper Motor Replacement, X-Street STR Viper: passo 1, imagem 1 %32
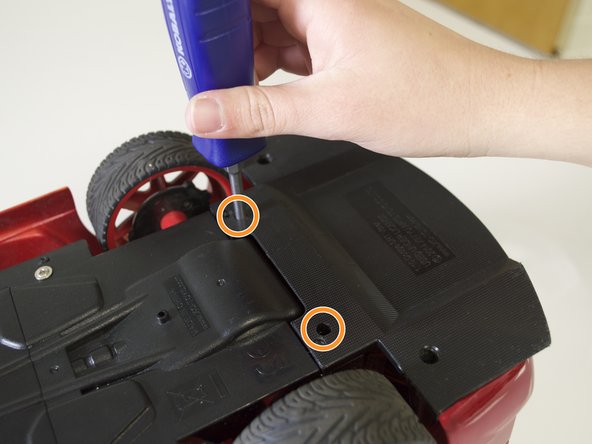
    • Remove the four 3 mm screws from the bottom panel using a 3 mm Philips #1 screwdriver.

  2. X-Street STR Viper Motor Replacement: passo 2, imagem 1 %32
    • Use the 3 mm Philips #1 screwdriver to remove the three 3 mm screws that connect the front panel with the main underside panel. Also remove the 6 mm front panel screw.

    • Remove the bottom panel by pulling the plastic tabs from either side of the car.

  3. X-Street STR Viper Motor Replacement: passo 3, imagem 1 %32 X-Street STR Viper Motor Replacement: passo 3, imagem 2 %32
    • Remove the two 6 mm screws and the two 3 mm screws that connect the back panel to the main underside panel.

    • Remove the two 6 mm screws that connect the rear panel to the body of the car.

  4. X-Street STR Viper Motor Replacement: passo 4, imagem 1 %32 X-Street STR Viper Motor Replacement: passo 4, imagem 2 %32 X-Street STR Viper Motor Replacement: passo 4, imagem 3 %32
    • Remove the two front 6 mm screws and the two middle 6 mm screws.

    • Remove the main underside panel carefully. Excessive force could damage or disconnect the fragile wires attached to this piece.

    • Remove the car shell and place it on the left side of the car.

  5. X-Street STR Viper Motor Replacement, Motor Replacement: passo 5, imagem 1 %32
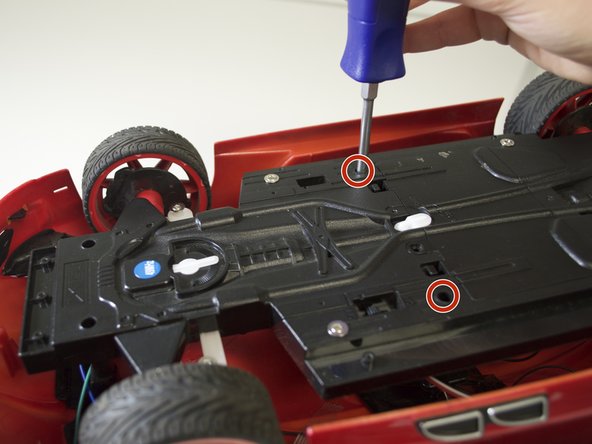
    • White connection removal. Begin by removing the two 6mm Phillips #2 screws that hold down the white connection from the underside panel to the rear wheel and motor assembly.

  6. X-Street STR Viper Motor Replacement: passo 6, imagem 1 %32
    • Disconnect battery before continuing this step to avoid shock.

    • Plastic safety cover removal. Remove plastic safety cover by removing the one 6mm Phillips #2 screw.

  7. X-Street STR Viper Motor Replacement: passo 7, imagem 1 %32
    • Desolder or cut the two wires that are connected to the motor. Use a soldering iron or wire cutters—not scissors as shown in the photo.

    • After completing this step, you will be able to remove the wheel and motor assembly from the car. There are two springs located in the rear of the car that could come loose if you do this step too quickly.

  8. X-Street STR Viper Motor Replacement: passo 8, imagem 1 %32 X-Street STR Viper Motor Replacement: passo 8, imagem 2 %32
    • Remove the motor from the housing. Dislodge the left back wheel and motor assembly.

    • This step can be tricky because the left side wheel is in the way.

    • Remove the wheel hub cap with a pry tool.

    • Remove the wheel. Take out the one 3mm Phillips #2 screw that connects the wheel to the wheel and motor assembly

  9. X-Street STR Viper Motor Replacement: passo 9, imagem 1 %32
    • Remove the five 6mm Phillips #2 head screws from the left side of the motor housing.

  10. X-Street STR Viper Motor Replacement: passo 10, imagem 1 %32 X-Street STR Viper Motor Replacement: passo 10, imagem 2 %32
    • Pull apart the motor housing gently.

    • Keep in mind there are loose, fragile components inside.

  11. X-Street STR Viper Motor Replacement: passo 11, imagem 1 %32 X-Street STR Viper Motor Replacement: passo 11, imagem 2 %32
    • Before you attempt this step, keep in mind that these gears have grease on them.

    • Remove the two smaller gears by gently pulling them out of the motor housing.

  12. X-Street STR Viper Motor Replacement: passo 12, imagem 1 %32 X-Street STR Viper Motor Replacement: passo 12, imagem 2 %32
    • Remove the two 6mm Phillips #2 screws located on either side of the small brass gear.

    • After removing the screws, remove motor by pulling it down and out of the housing.

  13. X-Street STR Viper Motor Replacement: passo 13, imagem 1 %32 X-Street STR Viper Motor Replacement: passo 13, imagem 2 %32
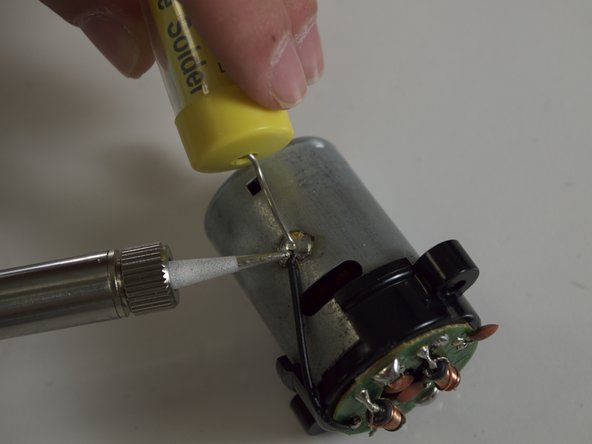
    • Detach the black wire that is attached to the outer shell of the motor itself. Use a soldering iron or wire cutters—not scissors as shown in photo.

    • Using these desoldering techniques, remove the solder.

  14. X-Street STR Viper Motor Replacement: passo 14, imagem 1 %32
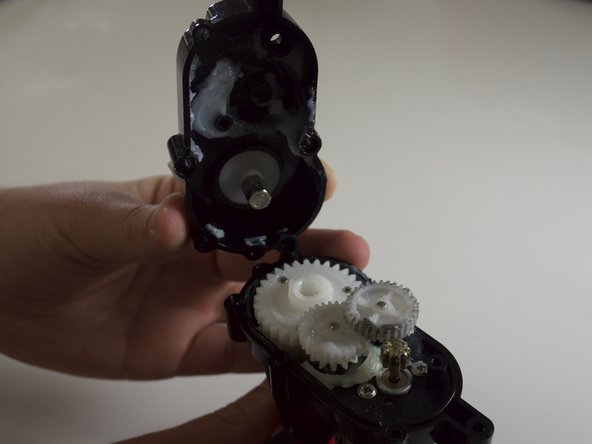
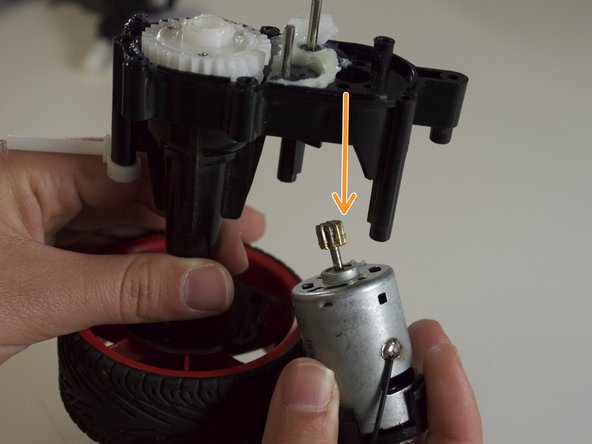
    • Pull apart the motor housing with care and clip off the wires that are soldered on to the motor.

    • Re-Solder the two wires back on to the motor when replaced. Refer to this How To Solder guide for more information.

    • Be sure to keep the circuit board and gear in order to re-attach them to the new motor.

Conclusão

To reassemble your device, follow these instructions in reverse order.

slcombs

Membro desde: 04/01/15

223 Reputação

Autoria de 2 guias

Equipe

Cal Poly, Team 12-6, Lancaster Spring 2015 Membro de Cal Poly, Team 12-6, Lancaster Spring 2015

CPSU-LANCASTER-S15S12G6

Membros da 4

Autoria de 6 guias

0 comentários

Adicione um comentário

Exibir estatísticas:

Últimas 24 horas: 1

Últimos 7 dias: 1

Últimos 30 dias: 3

Duração total: 367