Ir para o conteúdo principal

VTech Kidizoom Camera Connect Shutter Button Replacement

O que você precisa

  1. VTech Kidizoom Camera Connect Shutter Button Replacement, Front Case: passo 1, imagem 1 %32 VTech Kidizoom Camera Connect Shutter Button Replacement, Front Case: passo 1, imagem 2 %32
    • Remove batteries and SD card before beginning disassembly!

    • Locate the four plastic screw covers denoted by the markers and gently pry them up with the metal spudger.

  2. VTech Kidizoom Camera Connect Shutter Button Replacement: passo 2, imagem 1 %32 VTech Kidizoom Camera Connect Shutter Button Replacement: passo 2, imagem 2 %32
    • Remove all four (11mm) screws with the Philips #0 screwdriver.

  3. VTech Kidizoom Camera Connect Shutter Button Replacement: passo 3, imagem 1 %32 VTech Kidizoom Camera Connect Shutter Button Replacement: passo 3, imagem 2 %32 VTech Kidizoom Camera Connect Shutter Button Replacement: passo 3, imagem 3 %32
    • Remove the two battery cartridges located on the underside of the camera.

    • Once cartridges are removed, use the metal spudger to pry open the top, bottom, and both sides of the camera.

  4. VTech Kidizoom Camera Connect Shutter Button Replacement: passo 4, imagem 1 %32
    • Beware of the two black viewfinder lens falling out as you pry open the device!

    • The device should now be open and ready for further repair and/or replacement parts.

  5. VTech Kidizoom Camera Connect Shutter Button Replacement, Shutter Button: passo 5, imagem 1 %32
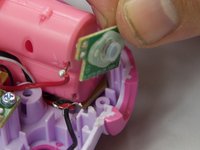
    • Remove the purple plastic that covers the button and circuit board. It should slide right out from the slot it sits in.

  6. VTech Kidizoom Camera Connect Shutter Button Replacement: passo 6, imagem 1 %32
    • Unsolder wires connected to the right side of the circuit board. Pull the wires to the side.

  7. VTech Kidizoom Camera Connect Shutter Button Replacement: passo 7, imagem 1 %32 VTech Kidizoom Camera Connect Shutter Button Replacement: passo 7, imagem 2 %32
    • The button/circuit board should be loose now. Gently pull out the button/circuit board to remove it from the device.

Conclusão

To reassemble your device, follow these instructions in reverse order.

Uma outra pessoa concluiu este guia.

Justin Sanchez

Membro desde: 02/08/16

520 Reputação

Autoria de 4 guias

Equipe

USF Tampa, Team 6-4, Eyestone Spring 2016 Membro de USF Tampa, Team 6-4, Eyestone Spring 2016

USFT-EYESTONE-S16S6G4

Membros da 4

Autoria de 5 guias

0 comentários

Adicione um comentário

Exibir estatísticas:

Últimas 24 horas: 1

Últimos 7 dias: 3

Últimos 30 dias: 15

Duração total: 883