Ir para o conteúdo principal

VTech InnoTab 2s Screen Replacement

O que você precisa

  1. VTech InnoTab 2s Screen Replacement, Back Panel: passo 1, imagem 1 %32
    • Turn your device to where the back panel is facing you.

  2. VTech InnoTab 2s Screen Replacement: passo 2, imagem 1 %32 VTech InnoTab 2s Screen Replacement: passo 2, imagem 2 %32
    • Lift the Leg all the way up and twist the bottom to remove.

    • Once the bottom part pops out the whole leg should just come off.

    • Remove any game cartridge from the device.

  3. VTech InnoTab 2s Screen Replacement: passo 3, imagem 1 %32 VTech InnoTab 2s Screen Replacement: passo 3, imagem 2 %32 VTech InnoTab 2s Screen Replacement: passo 3, imagem 3 %32
    • Remove all of the plastic tabs on the device. These are covering screws that will need to be removed.

    • These covers are made of hard plastic so they may be difficult to remove.

    • There is a special tab in the cartridge cover that is made of rubber, make sure to not break this tab.

  4. VTech InnoTab 2s Screen Replacement: passo 4, imagem 1 %32 VTech InnoTab 2s Screen Replacement: passo 4, imagem 2 %32
    • Remove all nine screws from the back of the device using a J0 bit.

    • Remove the small battery.

  5. VTech InnoTab 2s Screen Replacement: passo 5, imagem 1 %32 VTech InnoTab 2s Screen Replacement: passo 5, imagem 2 %32
    • Using a plastic opening tool, detach the backplate from the front piece.

    • Do not use excessive force. Double check that you removed all the screws if the panel is not coming off easily.

    • Once the backplate has been removed, you will have access to the circuit board.

  6. VTech InnoTab 2s Screen Replacement, Motherboard: passo 6, imagem 1 %32
    • First begin by removing the three cross-head screws using a J0 bit.

  7. VTech InnoTab 2s Screen Replacement: passo 7, imagem 1 %32
    • First remove the ribbon cables. There are two highlighted by the red squares

    • Do not apply too much pressure and make sure that the black plastic tabs are fully open before you pull the cable out.

  8. VTech InnoTab 2s Screen Replacement: passo 8, imagem 1 %32
    • Remove the camera from the assembly and put is a safe place so that it will not get damaged.

  9. VTech InnoTab 2s Screen Replacement: passo 9, imagem 1 %32
    • Remove the board from the main assembly.

    • Be careful not to pull too hard so that the cables aren't broken.

  10. VTech InnoTab 2s Screen Replacement: passo 10, imagem 1 %32
    • De-solder the points shown to fully remove the cables and free the board.

    • A soldering guide offered by IFIXIT can be found here Soldering Skills.

  11. VTech InnoTab 2s Screen Replacement, Screen: passo 11, imagem 1 %32 VTech InnoTab 2s Screen Replacement, Screen: passo 11, imagem 2 %32
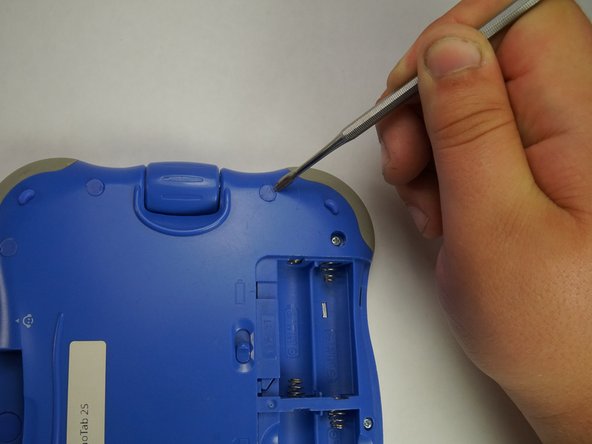
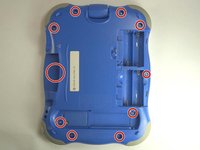
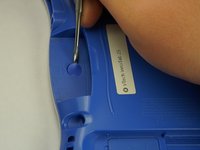
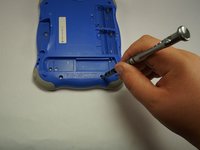
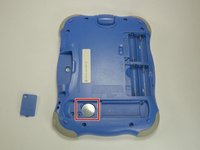
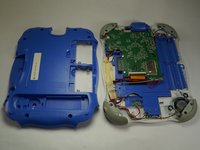
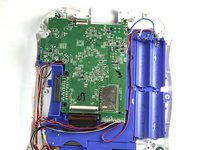
    • After removing the back plate and screws, all screws have been removed to separate the circuit board and wires from the front panel.

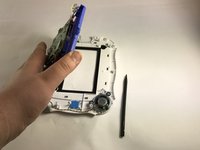
    • Remove the front panel from the device to expose the screen.

  12. VTech InnoTab 2s Screen Replacement: passo 12, imagem 1 %32
    • Using a heat gun, heat the glue that holds the screen to the rest of the device.

    • While heating, carefully pull screen from the device exposing the ribbon wire on the back of the screen, disconnect.

Conclusão

To reassemble your device, follow these instructions in reverse order.

Uma outra pessoa concluiu este guia.

Esthevan Romeiro

Membro desde: 10/06/16

261 Reputação

Autoria de 4 guias

Equipe

USF Tampa, Team 5-1, Lacy Fall 2016 Membro de USF Tampa, Team 5-1, Lacy Fall 2016

USFT-LACY-F16S5G1

Membros da 4

Autoria de 12 guias

0 comentários

Adicione um comentário

Exibir estatísticas:

Últimas 24 horas: 0

Últimos 7 dias: 0

Últimos 30 dias: 6

Duração total: 729