Ir para o conteúdo principal

The Claw Music Player Cleaning

O que você precisa

  1. The Claw Music Player Cleaning, Bottom Cover: passo 1, imagem 1 %32
    • Place The Claw in upright position with controls facing you.

  2. The Claw Music Player Cleaning: passo 2, imagem 1 %32
    • Gently flip The Claw machine upside down with the controls facing you.

  3. The Claw Music Player Cleaning: passo 3, imagem 1 %32
    • Remove all ten screws from the bottom cover using a Phillips #1 screwdriver.

    • You will need a screwdriver with a long thin neck to fit in the screw holes.

  4. The Claw Music Player Cleaning: passo 4, imagem 1 %32 The Claw Music Player Cleaning: passo 4, imagem 2 %32
    • Slide the bottom cover off to the side.

    • Do not completely remove bottom cover as it is still connected to wires.

  5. The Claw Music Player Cleaning: passo 5, imagem 1 %32
    • Complete removal of the bottom cover is not necessary, however if you feel you need to take the cover completely off the machine to complete your task it can be done by the following process.

    • You will need to cut the two green wires attached to the music player.

    • Then you will need to cut the white wire that leads to the battery compartment.

    • Finally you will need to cut the black wire leading to the battery compartment as well.

    • The complete removal of the bottom cover requires the cutting and soldering of wires. For help with soldering reference: Como soldar e dessoldar contatos.

  6. The Claw Music Player Cleaning, The Claw Music Player Cleaning: passo 6, imagem 1 %32
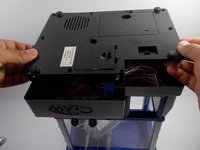
    • Once you have removed the bottom cover you should have clear access to the music player.

    • Locate the music player and check to see if it is visibly dirty or clogged.

    • If there is any amount of dust or dirt on the music player it should be cleaned.

    • Using the straw that comes with your air duster, aim the duster in a way that the air will push the dust away from the music player.

    • If cleaning the music player is not enough, you may need to refer to the Music Player Replacement Guide

  7. The Claw Music Player Cleaning: passo 7, imagem 1 %32
    • You DO NOT want to force the dust further into the music player by directing the air into the player.

    • If there are any large pieces of lint or dust in the sound port, those can be removed with your precision tweezers.

    • Once you are certain you have removed all of the dust and dirt from the music player you should reassemble the device and test it.

Conclusão

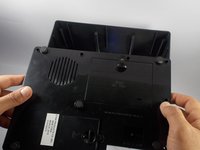
To reassemble your device, follow these instructions in reverse order.

Uma outra pessoa concluiu este guia.

Alain Pierre

Membro desde: 03/22/16

1.188 Reputação

Autoria de 9 guias

Equipe

UMass Dartmouth, Team 4-8, Catania Spring 2016 Membro de UMass Dartmouth, Team 4-8, Catania Spring 2016

UMASSD-CATANIA-S16S4G8

Membros da 3

Autoria de 18 guias

0 comentários

Adicione um comentário

Exibir estatísticas:

Últimas 24 horas: 0

Últimos 7 dias: 1

Últimos 30 dias: 6

Duração total: 628