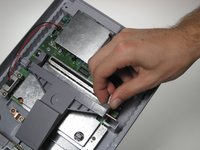
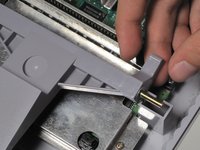
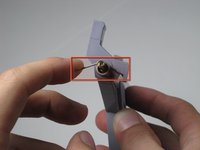
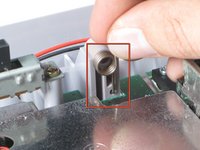
Ir para o conteúdo principal

Super Nintendo Eject Button Replacement

O que você precisa

  1. Super Nintendo Eject Button Replacement, Outer Case: passo 1, imagem 1 %32
    • Remove the six screws located on the underside of the system using the Gamebit 4.5mm screwdriver.

  2. Super Nintendo Eject Button Replacement: passo 2, imagem 1 %32 Super Nintendo Eject Button Replacement: passo 2, imagem 2 %32 Super Nintendo Eject Button Replacement: passo 2, imagem 3 %32
    • Carefully flip the unit back over.

    • Locate the seam. Lift and separate the upper half of the case from the lower half of the case.

  3. Super Nintendo Eject Button Replacement, Eject Button: passo 3, imagem 1 %32 Super Nintendo Eject Button Replacement, Eject Button: passo 3, imagem 2 %32
    • Lift the right side of the eject lever out of the housing.

  4. Super Nintendo Eject Button Replacement: passo 4, imagem 1 %32 Super Nintendo Eject Button Replacement: passo 4, imagem 2 %32 Super Nintendo Eject Button Replacement: passo 4, imagem 3 %32
    • Pull the metal bar out through the right side of the eject lever.

    • Make sure to keep track of the spring located on the left side of the lever as it may shoot off when removing the metal bar.

    • When reassembling, the procedure becomes more difficult due to the spring (marked red). We recommend that one person hold the spring in place (picture 3) while another person slides the metal bar back into the left housing, and slide the eject lever onto the metal bar.

Conclusão

To reassemble your device, follow the instructions in reverse order.

10 outras pessoas executaram este guia.

James Shirley

Membro desde: 10/03/10

967 Reputação

Autoria de 2 guias

Equipe

Cal Poly, Team 4-47, Amido Fall 2010 Membro de Cal Poly, Team 4-47, Amido Fall 2010

CPSU-AMIDO-F10S4G47

Membros da 4

Autoria de 25 guias

0 comentários

Adicione um comentário

Exibir estatísticas:

Últimas 24 horas: 3

Últimos 7 dias: 16

Últimos 30 dias: 100

Duração total: 18,247