Introdução
Siga este guia para substituir o disco rígido do seu iMac. A substituição do disco rígido requer a separação a tela e a remoção do alto-falante esquerdo.
Este guia também inclui passos para realizar o upgrade do disco rígido de seu iMac com um SSD. Ele descreve como instalar o sensor de temperatura do SSD de forma que as ventoinhas do Mac operem na velocidade correta.
Antes de começar os trabalhos no seu iMac: Tire o computador da tomada e pressione segurando o botão de liga/desliga por dez segundos para descarregar os condensadores da fonte de alimentação de energia.
Tenha muito cuidado para não tocar nos terminais do condensador ou juntas de solda expostas na traseira da fonte de alimentação.
O que você precisa
-
Ferramenta utilizada neste passo:iMac Intel 27" Cardboard Service Wedge$4.99
-
Com a dobradiça podendo se mover livremente, o iMac fica instável, o que torna o trabalho difícil. Os reparos podem ser executados com o iMac deitado, mas ficam mais rápidos e fáceis se você usar um suporte de reparos para iMac.
-
Se estiver usando o suporte de reparo de papelão da iFixit, siga estas instruções de montagem para instalá-lo.
-
-
-
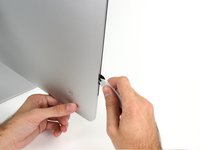
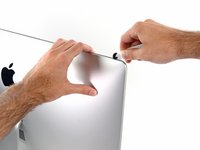
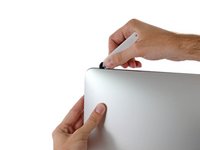
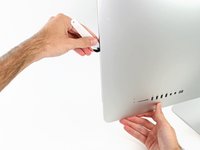
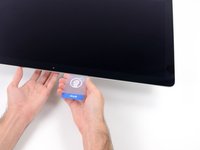
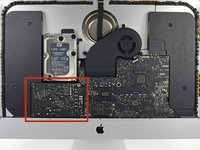
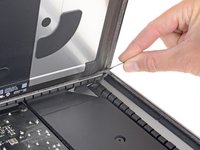
Começando pelo lado esquerdo da tela, próximo ao botão de liga/desliga, introduza a ferramenta de abertura para iMac no vão entre o painel de vidro e a estrutura traseira.
-
-
-
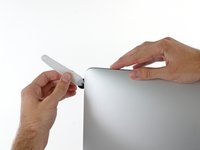
Use a ferramenta como um cortador de pizza - empurre-a por toda a extensão do vão e ela cortará o ponto central do adesivo de espuma.
-
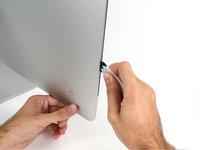
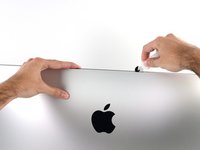
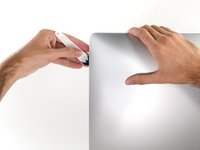
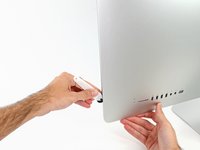
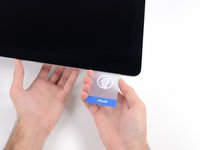
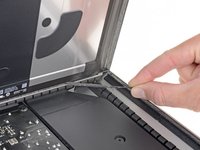
Passe a ferramenta por toda a extensão da lateral esquerda da tela.
-
-
-
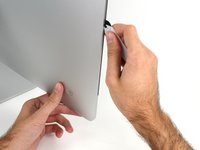
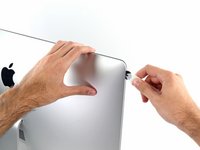
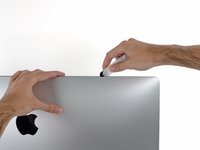
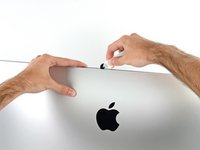
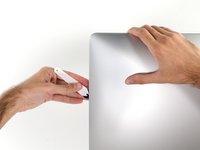
Continue rolando a ferramenta para cima, virando no canto esquerdo superior.
-
-
Ferramenta utilizada neste passo:Plastic Cards$2.99
-
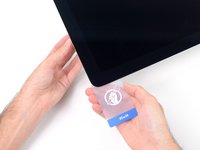
Coloque o iMac numa mesa com a tela virada para cima.
-
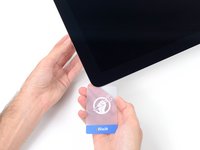
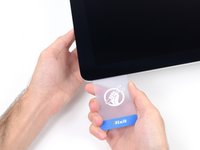
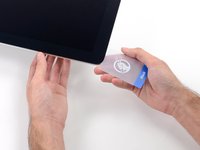
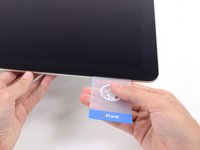
Começando pelo canto direito superior do iMac, introduza um cartão de plástico por entre a tela e a moldura.
-
-
-
-
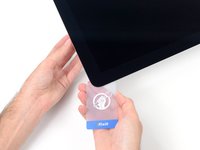
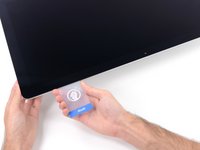
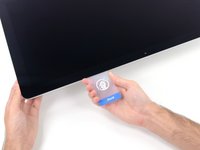
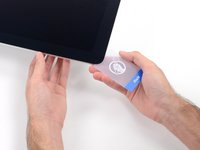
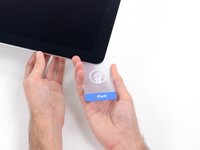
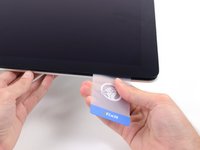
Com os cartões introduzidos próximo aos cantos, como mostra a figura, vire cuidadosamente os cartões para aumentar o vão entre a tela e a estrutura.
-
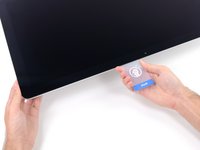
Se em algumas partes o adesivo ainda estiver colando e não puder ser separado, pare de fazer movimentos de vai-e-vem e use um dos cartões para cortar o adesivo nesta área.
-
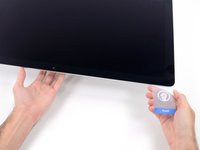
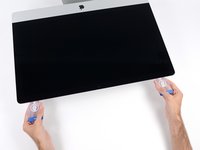
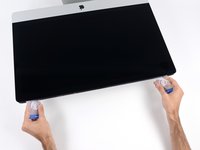
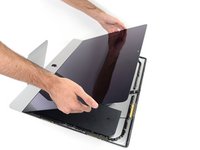
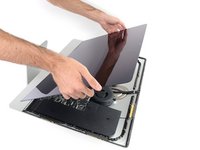
Comece a erguer a parte superior da tela para fora da moldura.
-
-
-
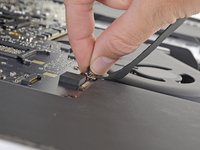
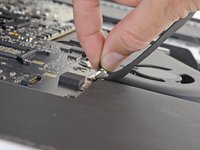
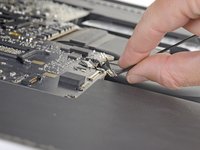
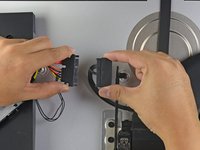
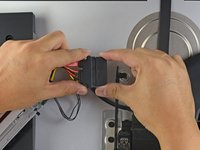
Enquanto segura a tela com uma mão, use a outra para desconectar o cabo de energia da tela.
Der Stecker muss seitlich wie die meisten anderen Stecker in diesem Modell komprimiert werden, um ihn aus der Buchse auf dem Logicboard zu ziehen. Die Zugrichtung ist parallel zum Logicboard in Richtung Oberkante des iMac. Ziehen ohne seitliches Zusammendrücken der Backen am Stecker könnte den Stecker oder die Buchse beschädigen.
These instructions are unclear. They imply the cable can just be pulled out but this step had me stuck for a bit. Searching the webs, I discovered that there are little tabs on either side of the connector. I used my prod tool and poked one side and the connector came out a little. I poked the other side the connector came out without a fight.
As others have mentioned later on, it is not necessary to fully remove the screen or disconnect these cables. I managed with just the screen held wedged open with a small cardboard box.
-
-
-
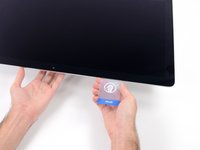
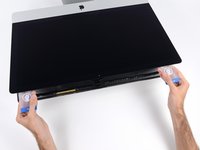
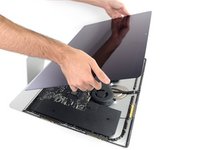
Erga a tela até ela quase alcançar uma posição vertical.
After rocking the display back and forth a bit, I found it helpful to use my iMac opening tool to gently slide ever so slightly underneath the bottom of the glass to cut the adhesive. This was with the display lowered back into it its normal position. I just worked about 1 millimetre deep at a time and eventually cut through the ~8” adhesive strip at the bottom centre.
It's possible to skip this step and go to step 24, leaving the display attached. You'll want to open the display just enough to replace the drive, with the machine upright and supported so the display doesn't swivel (I fold up a small pillow and wedge it in there). This way you don't have to worry about damaging the display when removing it, or aligning it when replacing it (which can be difficult to do solo as it's big and heavy).
Using a T8 with a short handle is helpful here, and make sure it's well magnetized so you don't drop the screws for the hard drive (just leave the other ones in the speakers).
-
-
-
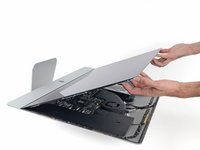
Agarre a pequena tira na extremidade de uma das fitas adesivas da tela na borda inferior e puxe o adesivo na direção da parte superior do iMac para removê-lo.
-
Repita esse passo com a outra faixa adesiva e remova-a.
-
-
-
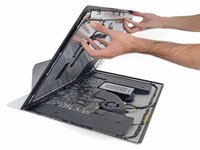
Erga a tela da moldura e remova-a do iMac. Deite a tela virada para baixo numa superfície plana e macia.
-
Pode ser que seja necessário erguê-la lentamente de um lado, para soltar o adesivo restante.
-
-
-
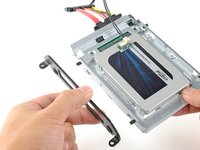
Com uma chave T10, remova os dois parafusos de 10 mm que fixam o alto-falante esquerdo.
-
-
-
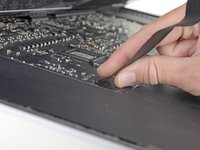
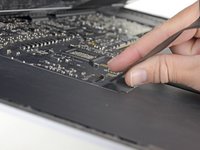
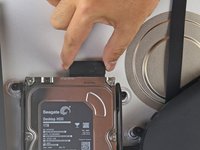
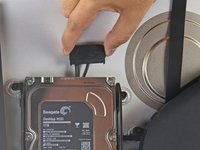
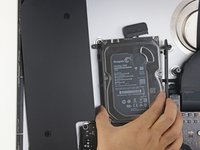
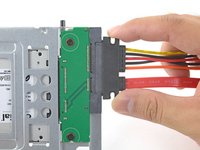
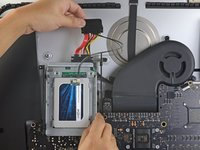
Puxe para cima em linha reta o cabo SATA combinado para desconectá-lo da unidade HD.
-
-
-
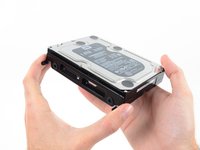
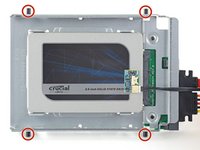
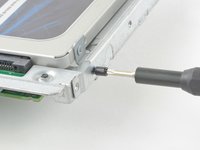
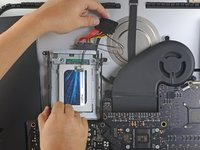
Com uma chave T8, remova os dois parafusos de 7,3 mm que fixam o suporte esquerdo do disco rígido na estrutura traseira.
-
-
-
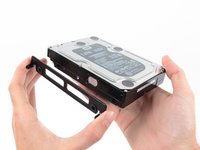
Remova os quatro pinos-parafusos T8 de 8,1 mm do disco rígido e transfira-os para o invólucro da unidade nova.
-
-
-
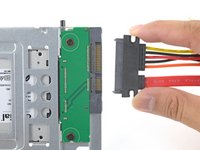
Alinhe os conectores do SSD com os soquetes do invólucro metálico.
-
Pressione a unidade contra os soquetes do invólucro, até que o SSD se assente firmemente.
what if I’m installing a hard drive?
Didn’t bother with the SSD caddy. Some 3M sticky pads did the trick!
Been using them for years...works great.
Two thoughts on SSD replacement/upgrade:
1) It would help if some references were made to help us determine what we need in terms form factors. I’ve never used an SSD and see a 2.5” one that would work, but I don’t know if 2.5” SSDs are different (in form factor) from 2.5” HDs. A lot of us are still learning about SSDs and isn’t that what this site is about? (Learning new things about hardware and using hardware?)
2) I’m not clear if I definitely need a new temperature sensor if I put in an SSD or if
Can I buy the kit without the SSD. I'm thinking of replacing my 3TB hard drive with a 4TB SSD.
Also, would you happen to know what the maximum hard drive dimension that can fit inside of this iMac? I may try a 14TB hard drive instead.
A 14Tb HDD does not represent any problem. But I will care about rising temperature. Must attach a heat sensor. If rise to high, it will suddenly shutdown to protect it.
Is it possible to have some reference of compatible SSD please?
I would like to replace the HDD from my Fusion drive, Imac 5K late 2014, by a SSD.
But i don't know which model should i take, and there is no recommandation on this website :(
thanks in advanceIs it possible to use an M.2 NVMe SSD with an adapter (mount) for a 2.5" SATA SSD instead of a SATA SSD?
Great tuning set and tutorial.
With the new SSD my late 2012 iMac feels like 10 years younger now! :-)The only things to mention:
- before starting read the whole tutorial very carefully!
- prepare your working place
- take enough time for each step!!
-
-
-
Conecte o cabo combinado habilitado a sensores à porta do invólucro.
Is the thermal sensor needed? I fitted a replacement SSD and it’s all back together and the iMac’s fans are fine. They don’t go into full max speed mode.
If you have a problem with the fans, you can always use Macs Fan Control (free) to set the speed. The sensor is not needed.
-
-
-
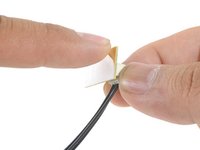
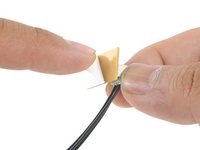
Remova a película branca da traseira da pequena placa de sensor de temperatura para expor o adesivo.
-
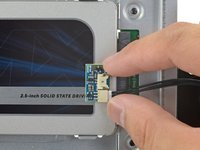
Cole a placa do sensor de temperatura numa superfície metálica exposta do SSD, próximo ao conector SATA.
-
Dobre o excesso dos fios do sensor de temperatura, de forma que eles não atrapalhem enquanto você instala o invólucro.
Great pics ! Is that “temp sensor board” is already on my HDD IMAC ?? Or must I buy one ?
Don’t bother with the thermal sensor. I didn’t fit one and the iMac is working fine and no fans are kicking in.
Instructions say to attach sensor to the SSD, but all pictures show it being attached to the SSD carrier. This may not represent accurate SSD temp as much of the carrier dissipates the heat absorbed from the SSD
Confirmed, no need for the extra temp sensor on Mid-2015 iMac. (EMC 2806, Mid-2015 27" iMac). Just changed the old 1TB HDD to SSD, no extra fan RPM after power on.
-
-
-
Fixe os suportes de montagem removidos do disco rígido velho no invólucro.
i don't have a combo cable.i also didn't have asata drive. just a blade ssd. i don't see wwhere i could add a cable
-
-
-
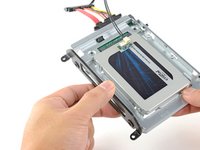
Empurre o invólucro do SSD no espaço ocupado anteriormente pelo disco rígido.
-
Disponha os cabos de tal forma que eles não interfiram nenhum outro componente.
The SATA cable on my Late 2012 was not long enough to comfortably attach to the end of the temperature sensor array after it was plugged into the new SSD. I had to fold the array and slide it under the SSD and housing. There was much resistance to the folding so I took it slowly to let the wires adjust gradually to the fold so they would not break.
Unfortunately, the adapter that comes with it isn't long enough to avoid pushing against the screen in the front. One week after upgrading to SSD my screen fell off shattering and breaking the power connector on the systems board. A new screen is ordered but I'm hoping the power connector isn't damaged beyond repair. I'm going to try to adhere the HD adapter to the back inside of the case with 3m adhesive to avoid pressure against the screen.
As a newbie, the only other upgrade I have done is to replace my iPhone 7 battery. I had trouble on reassembly.
This is a great upgrade guide, but it would be important to me to see the reassembly instructions including the cautions.
For example, I had issues with reattaching the plugs in the phone. I could see having an issue with them here, as well as repositioning the display back into the cabinet.
I do PCB board repair work and repair pinball machines. But I won’t try this.
Try 3m double sided tape from Amazon, it available in 3mm width which is ideal for iMac screen. It has a very thin foam and is much better quality than the cheap Chinese kits available on Amazon. You will have to trim it to size with a sharp craft blade as you fit. Don’t risk your screen falling off from using cheap tape in the so called fitting kits!
In my Late 2012 27" iMac I Scotch-taped the SATA connector to the case to stop it from pushing against the screen after reassembly.
Only 39 steps!
Is it possible to clone the internal disk and have the imac boot off the external SSD?
The extension cable is too long. I folded it over carefully & stuck it down to the case using a double sided sticky pad. Photo here
There is no need for a temperature sensor on a Late-2013 and later.
-


Compare a sua nova peça de reposição com a peça original - pode ser que você precise transferir componentes remanescentes ou remover suportes adesivos da nova peça antes de instalá-la.
Para a remontagem do seu dispositivo, siga essas instruções na ordem inversa.
Leve o seu lixo eletrônico para um ponto de recolha ou uma recicladora certificada.
O reparo não estão indo conforme o planejado? Confira a nossa comunidade do fórum Respostas para obter ajuda na solução de problemas.
Cancelar: não concluí este guia.
53 outras pessoas executaram este guia.
Um agradecimento especial a esses tradutores:
100%

Udo Baingo está nos ajudando a consertar o mundo! Quer contribuir?
Comece a traduzir ›

12 comentários
What’s the difference with this guide? Substituição do disco rígido do iMac Intel 27" com tela Retina 5K
Hello, I have an iMac (Retina 5K, 27-inch, 2017) and I would like to change my hard disk, which is a 3.5GHz 1TB Fusion Unit, for an SSD disk, would you recommend doing it? And if so, what reference or brand do you recommend to do it?
I can confirm the OWC thermal sensor cable is not needed for HDD to SSD upgrade. I successfully upgraded my 2017 5k iMac fusion drive’s HDD to WD blue 2TB SATA3 ssd without it and the fans speeds don’t ramp up at all. Anyhow thanks for your guides Ifixit on how to DIY. I successfully upgraded my 128gb NVME to a 1TB NVME and to a SATA3 ssd for storage. Transfer speeds are insane and my boot up time now only takes 12 seconds compared to 32 seconds previously. I also upgraded my cpu from the i5-7600k to the i7-7700k. My 2017 5k iMac is blazing fast now. Thanks again ifixit.
Successfully upgraded to a 2TB SSD from the 2TB Fusion drive. As soon as I turned on Bootcamp, the Fusion drive went nuts for a few weeks I think because it prioritized the Windows side onto the SSD and the Mac side onto the spinning drive. It eventually corrected itself but it was a helluva time. And it was time for a fresh hard drive anyway. $500 is much cheaper than a new iMac. Highly recommend this one. This was way easier than my upgrades to the 2009 and to a Mac Mini.
Excellent instructions. The process is straightforward - the only tricky bit is reinstalling the screen accurately. There seems to be some conflicting views on the internet about the best way to do it and which adhesive strips to use - the 2012-2015 strips now seem to be supplied for later models, and they worked fine on my 2017 iMac.
My advice is just to take take it all very steadily and always read one stage ahead before you start on your next stage just to know where you are going next. I installed a 2TB Crucial SSD and the results are very good.
ive been looking for info on the blade drive as wiping a newly installed SSD and installing OS works, but what is best practice for this? what do we use the blade for after, is it just wiped and left redundant? - as for the temp control, just install Macs Fan Control.
i did this but then my imac showed a folder with a question mark on it
Great guide! Amazing work here.
Noch nie zuvor hatte ich so eine professionelle Anleitung gelesen.
EINFACH SUPER
If adding a 2nd ssd (I am just learning that this ssd upgrade kit won’t actually replace my preinstalled ssd), how do I plug in the new ssd? There’s no sata cabled exposed.
Regarding some previous comments, this guide is for replacing a drive if the original has died or is to be upgraded. You will have to reinstall MacOS or transfer your data to the new drive. This won't help you install a second additional drive, and a brand new drive will not work on its own.
What’s the point of this? You run the wheel around the outside, and then you lay it down anyway to pull the glass and do the rest. The wedge is not needed.
ebay - Responder
I have a story to tell about this teardown. It all went wonderfully well until after I completed the process and attempted to format my new SSD drive only to discovery that the capacity of the drive was 256GB… not the 2TB I was sure I had ordered. iFixit was very supportive and helpful in sending me a new set of sticky tape strips and and RMA to return the SSD and some of the other parts.
I finally had received my new set of strips and the 2TB SSD…. I figured, piece of cake… I already know how to do this… but I watched the video again and started following the teardown…
…apparently the new sticky tape strips was way more powerful that the original tape and while using the pizza cutter tool and not advancing much, I proceeded to use one of the iFixit credit card style wedges…. I now have 2 pretty severe cracks on the glass of my display, which as clearly explained by @mayer can only be replaced by an entire display… which runs at about $500. Cosmetically it looks horrible, but it works… for now.
Erich Hentschel - Responder