Introdução
A remoção da tela do iMac do final de 21,5" requer cortar o adesivo com uma ferramenta de abertura especial para o iMac.
O que você precisa
-
Ferramenta utilizada neste passo:iMac Intel 21.5" Cardboard Service Wedge$4.99
-
Antes de começar os trabalhos no seu iMac: Tire o computador da tomada e pressione segurando o botão de liga/desliga por dez segundos para descarregar os condensadores da fonte de alimentação de energia.
-
-
-
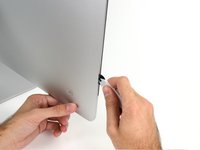
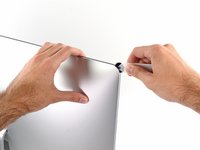
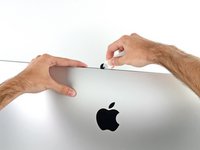
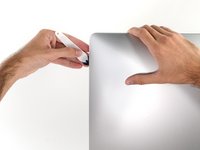
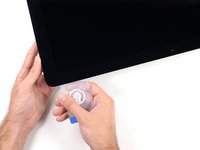
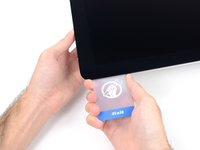
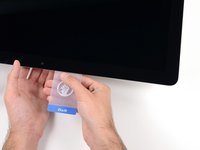
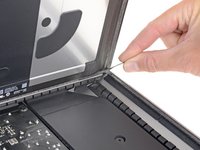
Começando pelo lado esquerdo da tela, próximo ao botão de liga/desliga, introduza a ferramenta de abertura para iMac no vão entre o painel de vidro e o invólucro traseiro.
Don’t get too worried about starting exactly where the picture says. The glue is stronger in some parts so just start wherever is easier and then work slowly and patiently around in the direction shown.
As this guide doesn’t cover replacing the adhesive strips, I found referring to the following was useful (noting that it’s not for the same model of iMac, so the modification they mention wasn’t necessary): iMac Intel 21.5" EMC 2544 Adhesive Strips Replacement
This part of the exercise should be done with extreme patience. I took my sweet time with the opening tool, rolling it through the entire panel and enclosure gap over and over again, until I was very sure no parts were sticking together anymore. And when I thought I was I done, I decided to do it over again.
You can "warm up" the adhesive before try to cut it with the tool using a hair dryer. Heat the edges for about a minute, keep moving it so you don't cause stress in the glass. Also the above note.. use the tool and then the cards. Do not use a guitar pick or other objects as the thickness will cause you to break the front glass, which is a bonded part of the display (expensive).
Merci pour ce conseil
-
-
-
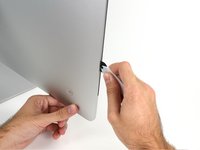
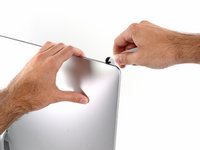
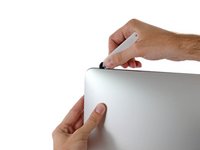
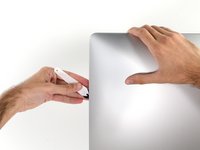
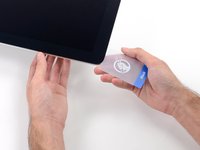
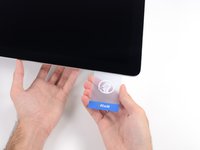
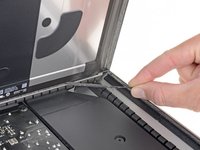
Use a ferramenta como um cortador de pizza - empurre-a por toda a extensão do vão e ela cortará o ponto central do adesivo de espuma.
-
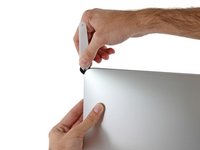
Passe a ferramenta por toda a extensão da lateral esquerda da tela.
If re-opening a screen that was opened and re-attached using iFixit’s adhesive strips, I would strongly recommend heating it first with an iOpener, heat gun or hair dryer. 20 minutes after attaching with the iFixit adhesive I tried to open it again with the pizza slicer to fix something and cracked the screen on the left-hand side.
-
-
-
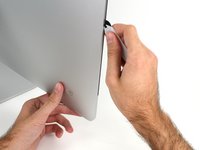
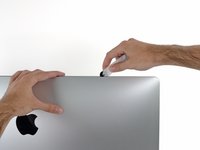
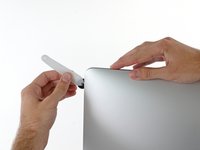
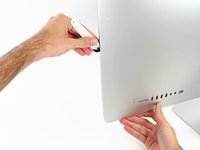
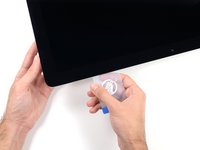
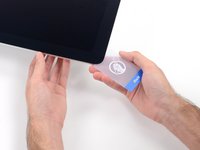
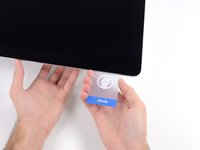
Continue na parte superior da tela.
In this step can I cut along the display without make any damage to the front camera?
Hi! Actually - there is no need to cut the tape around the camera area - there is no tape to cut at all! And so, the way go is easy - just pass 10 mm to the left and to the right from camera and start cutting!
P.S. Just did the whole procedure to replace a RAM and to add SSD on PSIe an hour ago! Seems to be different reading the instructions... you know - 2/10 and so on. But it's really not that hard, trust me. I'll give it 5/10.
P.P.S. By the way there is one trick to pass the difficult steps. Any action which requires pulling smth (motherboard, speaker, power supply unit) from the narrow crack (or should i say - slit?) at the bottom of your Imac is really not so easy.
And the trick is to first remove a thin metal stripe with some kind of insulation on it which held by 5 small (very small!!) screws at the bottom of your Imac. After you done it - it's easy to pull everything! Pay attention to the fact that one of this 5 screws at the center are more shortly than others.
If you're changing cracked EMC 2638 display to new assembly, there's two more steps:
Step 24: Use the tip of a spudger to flip up the metal retaining bracket on the display data cable.
Carefully pull the display data cable from its socket on the display assembly.
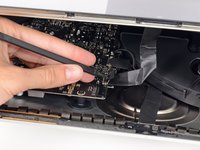
Step 25: Use the tip of a spudger to unplug bracket of the thermal sensor small cable near display data cable.
Carefully remove scotch tape covering thermal sensor. Using iSesamo or flat tip of the spudger carefully peel the thermal sensor away.
omg - forgot to switch the termal sensor from the old display...
now fan runs like crazy...
-
-
-
-
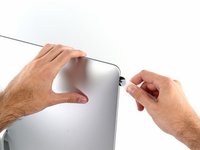
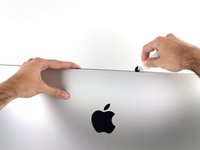
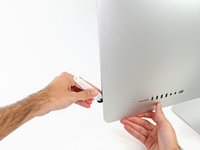
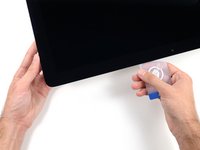
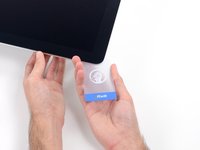
Finalize empurrando a ferramenta de abertura para a parte inferior na lateral direita da tela.
Yes, do it many times to loosen the adhesive.
Would be good data to show the 3 areas (wifi antennas where the "tape" is larger and covers them. The rest of the "tape" is 1.4" and easy. Also after removing the display, be sure to remove the old "tape" from both the display and the rubber parts of the case. Use the spudger to start an end and it should pull off easily. Careful on the baackside of the display as you can scratch off the black paint/covering.
Wrong iMac model
-
-
Ferramenta utilizada neste passo:Plastic Cards$2.99
-
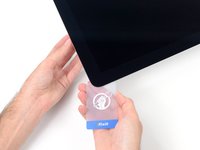
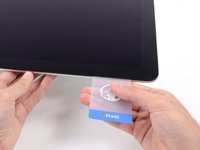
Começando pelo canto direito superior do iMac, force um cartão de plástico por entre a tela e a moldura.
this step is extremely important NOT to stick in the cards too far….. doing so, you risk a 600 euro replacement as I experienced………
I drew a 3/8” line on my cards with a marker first.
I’m reading this on the EU store, please change all measurements to cm/mm.
@ifixit The next batch of cards you create should have a line printed on the card 3/8” in from the edges. Would make a nice reference.
Better to remove stand wedge at this point? Can’t see from pics
-
-
-
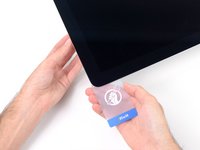
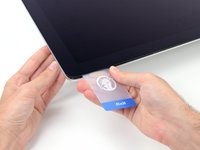
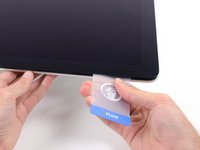
Com um movimento leve, vire o cartão lateralmente, para formar um espaço entre a tela e a moldura.
-
Mova lentamente e tenha cuidado para não tensionar demais o vidro da tela, você só precisa fazer um vão de aproximadamente 6,3 mm.
This part must be done very carefully or you can damage the flat cable from display, despite it was under a iron cover.
-
-
-
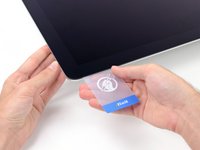
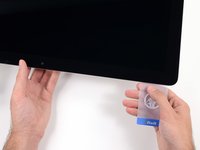
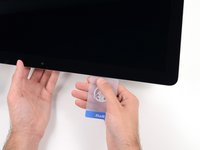
Passe o cartão em direção ao centro da tela, para cortar todo adesivo restante na extensão do canto direito superior do iMac.
-
-
-
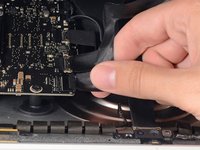
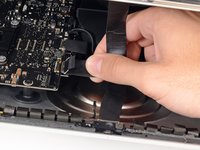
Enquanto segura a tela com uma mão, use a outra mão para desconectar o cabo de alimentação da tela.
I had a small flight light ready so I could see. Follow the directions - don’t blindly pull.
Head lamp gives you the best hands free view!
bstaud - The display power cable has two squeezable levers on each end of the cable’s width.
Squeeze the left lever with your thumb while you simultaneously squeeze the right lever with your
index finger, and gently pull the cable straight back and out, and the cable comes out very easily.
When reassembling, make sure you get a “click” confirmation that both the levers have locked AND the pins have seated on this connector. I was treated to a black screen upon startup, and had to re-cut my newly installed adhesive strips to get back in to firm up this connection. Better would be power up with the bottom adhesive in place, screen resting in place and held on top with blue painter tape to confirm connections, THEN pull off screen-side adhesive tape covers for final re-bonding.
Can someone post a link to actually purchase these cables?
-
-
-
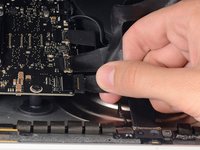
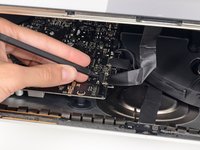
Com a ponta pontiaguda de uma espátula, vire para cima o suporte metálico com trava do cabo de dados da tela.
-
Cuidadosamente, puxe o cabo de dados da tela de seu soquete na placa lógica.
Sure could use a magnified picture of this connector and socket, especially the first time you go in. And it is the most critical step of the whole operation — bung it up and we’re toast.
Hi bstaud! If you hover over the image you can click on the magnifying glass and get a large image of any guide photo. Hope that helps!
To clarify, the connector pulls out in the plane of the logic card, not perpendicular.
-
-
-
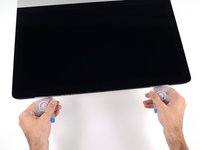
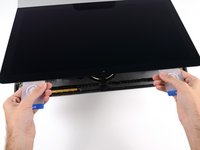
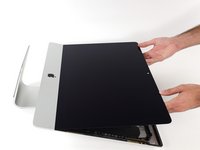
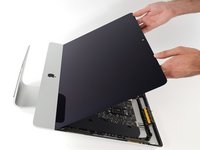
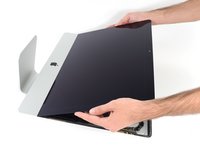
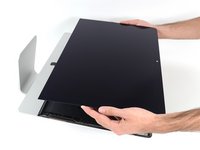
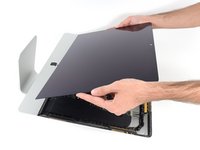
Erga a tela até ela quase alcançar uma posição vertical.
Where can I find a replacement display for my iMac?
iFixit has listings for replacements. Go to the Parts section
-
-
Ferramenta utilizada neste passo:Plastic Cards$2.99
-
Agarre a pequena tira na extremidade de uma das fitas adesivas da tela na borda inferior e puxe o adesivo na direção da parte superior do iMac para removê-lo.
-
Repita esse passo com a outra faixa adesiva e remova-a.
cutting through the adhesive is unnecessary if it's not been opened before (outside of an apple store) there will be a tab at the end of each VHB strip that you can use to simply pull the vhb strips off.
YES, exactly the same here. more but more simple.
To save a few steps and a bit of time, if you have a helper, they can hold the display at a 90° angle while you unscrew the brackets and remove/replace the hard drive rather than remove the display entirely. Also reduces the likelihood of damaging the display as you remove and handle it.
The proper way to remove the display according to the Macintosh tech manual and videos is as Rory McKenna and Lucio Alves have learned is to pull the tab at the end of each VHB strip until it is off.
This worked great! look for small left over adhesive on either edge of the bottom of the screen and pull each one towards the center. Screen assembly removes after that with no fuss.
-


Para a remontagem de seu dispositivo, siga essas instruções na ordem inversa.
Para a remontagem de seu dispositivo, siga essas instruções na ordem inversa.
Cancelar: não concluí este guia.
60 outras pessoas executaram este guia.
Um agradecimento especial a esses tradutores:
100%

Udo Baingo está nos ajudando a consertar o mundo! Quer contribuir?
Comece a traduzir ›


6 comentários
I put off replacing my hdd with an ssd on my late 2013 iMac because it looked a bit tricky. This guide and an iMac opening tool made the job really strait-forward. Just be gentle and patient and the screen comes off with very little bother. Thanks ifixit!
Used this and the adhesive guide to replace the cracked display on a relative’s 21.5 inch iMac. Thank you, iFixit! These guides and the toolkit I purchased from iFixit years ago have saved me roughly $200.00 vs. having a repair shop do it. I still have a 2008 24inch iMac up and running thanks to this website!
I used this guide and successfully replaced the stock HDD with a Crucial 1TB SDD MX500 and upgraded the RAM to 16GB, blew out all the internal dust and now it runs beautifully and didn’t have to buy an entirely new iMac.
Hay forma de solo cambiar el cristal roto?
The wedge is an extremely tight fit for this model. I was worried that the amount of force needed to use it as shown might damage the stand, so I used it with the long side down instead. It worked fine that way and didn’t need anywhere near as much force to insert.
roberttrevellyan - Responder
Here’s a good YouTube vid on upgrading the RAM: Can a Normal Person Upgrade the RAM in the 2017 21.5" iMac?
Dan - Responder
Here are a couple tips from me:
1) Expose the adhesive to extreme temperatures. I did this by transporting my iMac in my car, screen-down on a piece of cardboard on a cold February morning (in Chicago). When I went to pick up the iMac, the screen practically fell off the chassis. I would have been distraught by this if I hadn’t already planned this replacement. So it was a happy accident.
2) Remember to expell the residual power from the power supply by pushing the power button while the iMac is unplugged. This does NOT guarantee it’s safe to touch, but when I accidentally brushed the solder and exposed capacitors, I didn’t get shocked.
jerrid_foiles - Responder
Instead of using the wedge, I placed the iMac faced up with the top side (web cam) facing me while I ran the pizza roller around. It worked out great!
Sam Fung - Responder
“All iMacs also come with a traditional hard drive” mine doesn’t!! it’s HDD bay is completely empty, no SATA cable or anything. I guess I’ll have to upgrade the PCIe SSD instead.
Chris Hughes - Responder
There is no replacement glass for this model, it is part of the LCD and impossible to remove or replace- the entire LCD has to be replaced unfortunately if the glass is cracked or damaged. You will have to Google search for a replacement. Also be careful with some of the lock tight tork screws as I broke one of my screw mounts taking one out.
Phil Tesone - Responder
I used this service wedge but also found it a very tight fit. The same stabilization can be achieved by using a big rolled up towel.
Ernst - Responder
While this is a good instruction guide, I recommend to also look at OWC’s instruction video about drive installation, before starting the exercise. Those install videos are very detailed and useful.
Ernst - Responder
Main advice: TAKE YOUR TIME with the pizza roller.
Make several passes, until you really feel like there's no more sticker in the way. Stay away from the camera though (approx. 1inch / 2.5cm on both sides). This will reduce the work left with the plastic card. Adhesive is really on the edge of the screen so there is absolutely no need to go any further than the recommended 1cm / 3/8inch depth.
Where are the sensitive parts?
Facing your iMac, imagine you're looking at a watch. There are antennas on 1, 2 and 4 o'clock. Do not insert any metal piece there (nor anywhere else, btw). Other than that AND the screen cables underneath the camera, not much danger.
Froggy Manny - Responder