Esta versão pode conter edições incorretas. Mude para o último instantâneo verificado.
O que você precisa
-
Este passo não foi traduzido. Ajude a traduzi-lo
-
Use the small suction cup to lift the back panel:
-
Press the small suction cup on to the middle of the back panel.
-
-
Este passo não foi traduzido. Ajude a traduzi-lo
-
While holding the Sony Xperia Z ultra down with your left hand, slightly pull the small suction cup upwards to create a small opening between the back panel and the front panel.
-
While continuing to pull the small suction cup upwards, insert the spudger in the small opening.
-
Pry the front panel downwards with the spudger while continuing to pull the small suction cup upwards.
-
-
Este passo não foi traduzido. Ajude a traduzi-lo
-
Remove the back panel by pulling the small suction cup upwards.
-
-
Este passo não foi traduzido. Ajude a traduzi-lo
-
Remove the following six screws with a Phillips #000 screwdriver:
-
five silver 2.1 mm screws
-
one gold 3.1 mm screw
-
-
Este passo não foi traduzido. Ajude a traduzi-lo
-
Pry the plastic motherboard shield open by placing the spudger under the shield and running it along the edges.
-
-
Este passo não foi traduzido. Ajude a traduzi-lo
-
Remove the motherboard shield by lifting the lower end upwards first.
-
-
Este passo não foi traduzido. Ajude a traduzi-lo
-
Detach the battery connection cable by prying it upward with the spudger.
-
-
Este passo não foi traduzido. Ajude a traduzi-lo
-
Pry the upper end of the antenna upwards with the spudger.
-
-
-
Este passo não foi traduzido. Ajude a traduzi-lo
-
Detach the antenna by pulling the upper end upwards and outwards.
-
-
Este passo não foi traduzido. Ajude a traduzi-lo
-
Insert the spudger underneath the battery and run it back and forth to remove any adhesive.
-
-
Este passo não foi traduzido. Ajude a traduzi-lo
-
Detach the headphone jack connection by prying it upwards with the spudger.
-
-
Este passo não foi traduzido. Ajude a traduzi-lo
-
Detach the earphone jack connection by prying it upwards with the spudger.
-
-
Este passo não foi traduzido. Ajude a traduzi-lo
-
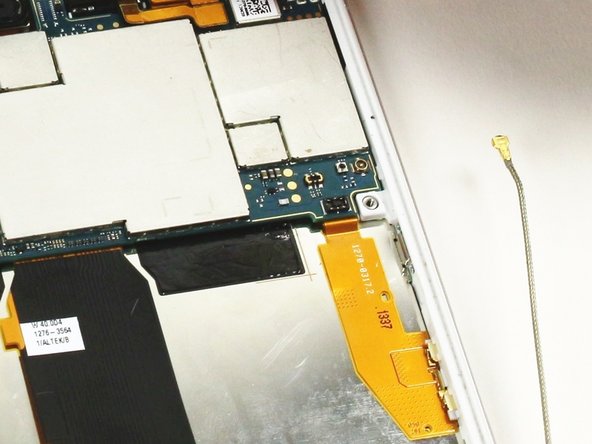
Disconnect the ribbon cable at the bottom right of the motherboard. (It's shown tucked under the motherboard in this photo, which is incorrect—don't do this!)
-
-
Este passo não foi traduzido. Ajude a traduzi-lo
-
Detach the upper end of the motherboard by pulling the top end upwards.
-
-
Este passo não foi traduzido. Ajude a traduzi-lo
-
Remove the yellow clip that secures the headphone jack slot with a pair of tweezers.
-
-
Este passo não foi traduzido. Ajude a traduzi-lo
-
Push the red stopper of the headphone jack connection through the plastic tunnel with the spudger.
-
While holding the back end of the headphone jack connection, grasp the headphone jack connection with the pair of tweezers and guide it through the plastic tunnel.
-
Remove the headphone jack connection from the device.
-
-
Este passo não foi traduzido. Ajude a traduzi-lo
-
Using the spudger, detach the listening speaker from the motherboard by prying it upwards.
-
-
Este passo não foi traduzido. Ajude a traduzi-lo
-
Slide the spudger below the orange ribbon to remove it from the reflective backing.
-
-
Este passo não foi traduzido. Ajude a traduzi-lo
-
Use iOpener on the screen of your device to loosen the adhesive below the screen.
-
-
Este passo não foi traduzido. Ajude a traduzi-lo
-
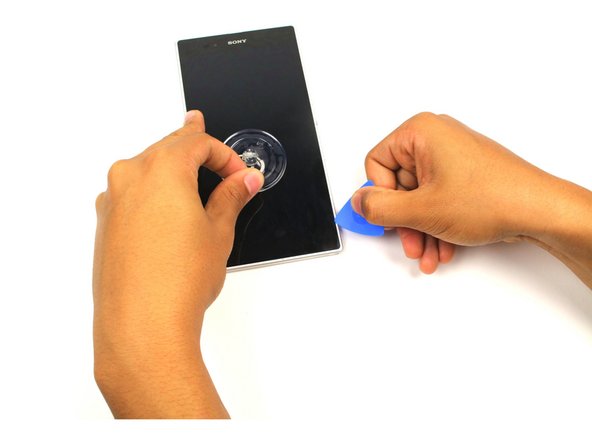
Once the screen is heated sufficiently, press the small suction cup to the center of the screen.
-
-
Este passo não foi traduzido. Ajude a traduzi-lo
-
Beginning at the corner of the screen, insert the opening pick into the space between the screen and casing.
-
While pulling on the small suction cup, gradually slide the pick along the edges of the screen until it is separated from the casing.
-


Cancelar: não concluí este guia.
30 outras pessoas executaram este guia.
Equipe

Cal Poly, Team 4-6, Maness Fall 2015 Membro de Cal Poly, Team 4-6, Maness Fall 2015
CPSU-MANESS-F15S4G6
Membros da 4
Autoria de 10 guias
14 comentários
The directions are wrong. The steps are not in order. The ribbon cable will rip on you when you remove the battery. Do not attempt.
Ribbon cable will not be ripped when removing battery, check to make sure you have carefully broken the adhesive seal between the battery and phone housing.
There is absolutely no reason to take out anything other than the battery and the small parts at the bottom of the phone if you are replacing the display assembly on this device. Taking out anything at the top is a waste of time, and a risk to the motherboard. The metal shield at the bottom is really the only thing you need to remove to get to the digitizer connector. Taking anything else out results in wasted time and additional risk to damage of other components.
A hundred times this. The button flex cables on Sony phones are very easy to damage, and there is absolutely no reason to remove them just to replace the display. Unless your display assembly came with a complete frame. Then you have bigger worries, and this guide is incomplete.
Great instructions thanks and it would be even greater if you mentioned that you didnt have to remove flex cables for volume keys or even motherboard