Ir para o conteúdo principal

Sony Xperia XA1 USB-C Module Replacement

O que você precisa

  1. Sony Xperia XA1 USB-C Module Replacement, Phone Back Cover: passo 1, imagem 1 %32 Sony Xperia XA1 USB-C Module Replacement, Phone Back Cover: passo 1, imagem 2 %32 Sony Xperia XA1 USB-C Module Replacement, Phone Back Cover: passo 1, imagem 3 %32
    • Using a hair dryer, apply heat evenly around the edges of the back of the phone. This will loosen the adhesive and allow you to remove the back panel.

    • As you're heating up the phone, begin to pry open the back starting from the middle, and going to the corners.

    • Do not apply heat in one area for too long.

  2. Sony Xperia XA1 USB-C Module Replacement, Speaker: passo 2, imagem 1 %32 Sony Xperia XA1 USB-C Module Replacement, Speaker: passo 2, imagem 2 %32 Sony Xperia XA1 USB-C Module Replacement, Speaker: passo 2, imagem 3 %32
    • Use a plastic opening tool to lift the battery connector.

    • Lift the flaps on both sides of the battery.

  3. Sony Xperia XA1 USB-C Module Replacement: passo 3, imagem 1 %32 Sony Xperia XA1 USB-C Module Replacement: passo 3, imagem 2 %32 Sony Xperia XA1 USB-C Module Replacement: passo 3, imagem 3 %32
    • Pinch the pull tab at the bottom of the battery.

    • Gently lift the battery out.

    • Handle the battery with caution. It is very fragile.

  4. Sony Xperia XA1 USB-C Module Replacement: passo 4, imagem 1 %32 Sony Xperia XA1 USB-C Module Replacement: passo 4, imagem 2 %32
    • Use a Phillips #000 screwdriver to remove the four 3 mm screws that secure the bottom component.

  5. Sony Xperia XA1 USB-C Module Replacement: passo 5, imagem 1 %32 Sony Xperia XA1 USB-C Module Replacement: passo 5, imagem 2 %32 Sony Xperia XA1 USB-C Module Replacement: passo 5, imagem 3 %32
    • Insert a spudger into the opening above the charging port, and apply gentle pressure to free the speaker piece.

    • Once the piece is loose, use your hand to remove the speaker from the phone.

  6. Sony Xperia XA1 USB-C Module Replacement, USB-C Module: passo 6, imagem 1 %32 Sony Xperia XA1 USB-C Module Replacement, USB-C Module: passo 6, imagem 2 %32 Sony Xperia XA1 USB-C Module Replacement, USB-C Module: passo 6, imagem 3 %32
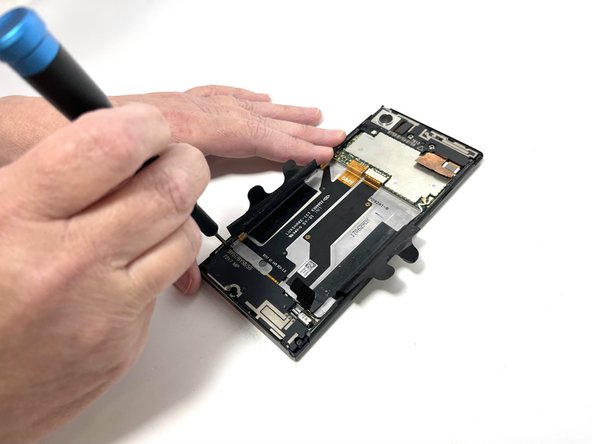
    • Locate the connecting cable and use a spudger or iFixit Opening Tool to remove the connector.

    • Disconnect the wifi/Bluetooth antenna wire, located at the top right of the USB-C charger board.

  7. Sony Xperia XA1 USB-C Module Replacement: passo 7, imagem 1 %32 Sony Xperia XA1 USB-C Module Replacement: passo 7, imagem 2 %32 Sony Xperia XA1 USB-C Module Replacement: passo 7, imagem 3 %32
    • After removing the connector and antennas, you are able to pry the USB-C board using a plastic spudger.

    • Be cautious, little effort is required to lift up the board, if too much force is applied this could damage the board.

Conclusão

To reassemble your device, follow these instructions in reverse order.

sebastianh034

Membro desde: 02/14/23

253 Reputação

Autoria de 3 guias

Equipe

0 comentários

Adicione um comentário

Exibir estatísticas:

Últimas 24 horas: 0

Últimos 7 dias: 0

Últimos 30 dias: 11

Duração total: 244