Ir para o conteúdo principal

Samsung Series 9 NP900X3A Laptop Battery Replacement

O que você precisa

  1. Samsung Series 9 NP900X3A Laptop Battery Replacement, Back Panel: passo 1, imagem 1 %32
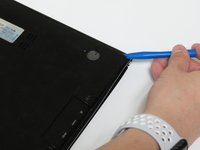
    • Locate the rubber feet at every corner of the laptop back panel. Use the ifixit prying tool, and break the adhesive between the rubber feet, and the case.

    • Screws securing the back panel underneath the adhesive will be exposed.

    • Removing the rubber feet will weaken the adhesive making reassembly difficult. Apply new adhesive if you choose to place the rubber feet back on to the device.

  2. Samsung Series 9 NP900X3A Laptop Battery Replacement: passo 2, imagem 1 %32
    • Use a Phillips #0 screwdriver to remove the ten 0.2mm screws from the bottom cover.

    • Keep track of the screws and their placement on the laptop. This will help make reassembly easier and more organized.

  3. Samsung Series 9 NP900X3A Laptop Battery Replacement: passo 3, imagem 1 %32 Samsung Series 9 NP900X3A Laptop Battery Replacement: passo 3, imagem 2 %32 Samsung Series 9 NP900X3A Laptop Battery Replacement: passo 3, imagem 3 %32
    • Find an opening on the back of the laptop. Use the plastic prying tool to help pry open the back panel of the laptop.

    • Use both hands when removing the back case cover. Too much force will bend the cover making it difficult to reassemble.

  4. Samsung Series 9 NP900X3A Laptop Battery Replacement, Laptop Battery: passo 4, imagem 1 %32 Samsung Series 9 NP900X3A Laptop Battery Replacement, Laptop Battery: passo 4, imagem 2 %32 Samsung Series 9 NP900X3A Laptop Battery Replacement, Laptop Battery: passo 4, imagem 3 %32
    • Remove the last three remaining 0.1mm screws attached to the battery.

    • Keep track of the screws and remember their placement. This will make it easier to replace the battery.

  5. Samsung Series 9 NP900X3A Laptop Battery Replacement: passo 5, imagem 1 %32 Samsung Series 9 NP900X3A Laptop Battery Replacement: passo 5, imagem 2 %32 Samsung Series 9 NP900X3A Laptop Battery Replacement: passo 5, imagem 3 %32
    • Remove the battery from the laptop by prying it out from its compartment.

    • The battery should be loose and can move for the next step.

    • You will need to use force to pry open the battery.

  6. Samsung Series 9 NP900X3A Laptop Battery Replacement: passo 6, imagem 1 %32 Samsung Series 9 NP900X3A Laptop Battery Replacement: passo 6, imagem 2 %32
    • Find the battery's output plug, and use a spudger or pointed precision tool to press on the indention in the middle of the plug to unlock.

    • Do not press too hard unlocking the plug or you will puncture plug's pins ruining the connector.

  7. Samsung Series 9 NP900X3A Laptop Battery Replacement: passo 7, imagem 1 %32 Samsung Series 9 NP900X3A Laptop Battery Replacement: passo 7, imagem 2 %32
    • Remove the connection from the motherboard and the battery, by carefully placing both hands on the wires and tug on the wires.

    • You will need to use some force, be cautious when removing this component. Pull the plug out slowly while applying pressure with the tool in necessary.

  8. Samsung Series 9 NP900X3A Laptop Battery Replacement: passo 8, imagem 1 %32 Samsung Series 9 NP900X3A Laptop Battery Replacement: passo 8, imagem 2 %32 Samsung Series 9 NP900X3A Laptop Battery Replacement: passo 8, imagem 3 %32
    • Remove the battery and place it from the laptop. At this point you can replace the battery with a new one.

Conclusão

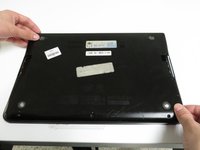
To reassemble your device, follow these instructions in reverse order.

Uma outra pessoa concluiu este guia.

0 comentários

Adicione um comentário

Exibir estatísticas:

Últimas 24 horas: 1

Últimos 7 dias: 8

Últimos 30 dias: 42

Duração total: 3,815