Esta versão pode conter edições incorretas. Mude para o último instantâneo verificado.
O que você precisa
-
Este passo não foi traduzido. Ajude a traduzi-lo
-
Heat an iOpener and apply it to a long edge of the S8 for about 2 minutes.
-
-
Este passo não foi traduzido. Ajude a traduzi-lo
-
In the following steps you will be cutting through the adhesive around the edge of the rear glass panel.
-
The adhesive on the rear case is laid out as seen in the first image.
-
The prying pattern as seen from the outside of the phone is as follows:
-
Thick portions of adhesive
-
Thin areas of adhesive
-
Avoid prying here, to protect the fingerprint sensor.
-
-
Este passo não foi traduzido. Ajude a traduzi-lo
-
Once the back panel is warm to the touch, apply a suction cup as close to the heated edge of the phone as you can while avoiding the curved edge.
-
Lift on the suction cup, and insert an opening pick under the rear glass.
-
-
Este passo não foi traduzido. Ajude a traduzi-lo
-
Once you have the tool firmly inserted into the glass, reheat and reapply the iOpener to soften the adhesive.
-
-
Este passo não foi traduzido. Ajude a traduzi-lo
-
Slide the opening pick down the side of the phone, separating the adhesive.
-
-
-
Este passo não foi traduzido. Ajude a traduzi-lo
-
Repeat the previous heating and cutting procedure for the remaining three sides of the phone.
-
Leave an opening pick on each side as you continue to the next to prevent the adhesive from resealing.
-
-
Este passo não foi traduzido. Ajude a traduzi-lo
-
Use the opening picks to slice through any remaining adhesive and open the phone slightly.
-
Remove the glass from the phone.
-
-
Este passo não foi traduzido. Ajude a traduzi-lo
-
Use tweezers to peel away any remaining adhesive from the phone's chassis. Then clean the adhesion areas with high concentration isopropyl alcohol (at least 90%) and a lint-free cloth to prep the surface for the new adhesive.
-
Peel the adhesive backing off of the new rear glass, carefully line up one edge of the glass against the phone chassis, and firmly press the glass onto the phone.
-
-
Este passo não foi traduzido. Ajude a traduzi-lo
-
Prepare an iOpener and apply it to the rear camera bezel at the top of the rear glass for at least two minutes.
-
You may need to reheat and reapply the iOpener several times to get the phone warm enough. Follow the iOpener instructions to avoid overheating.
-
-
Este passo não foi traduzido. Ajude a traduzi-lo
-
Insert an opening pick under top edge of the rear camera bezel.
-
Slide the opening pick around the edges of the camera bezel to separate the adhesive securing it to the rear glass.
-
Do not pry on the side that sits against the fingerprint sensor.
-
-
Este passo não foi traduzido. Ajude a traduzi-lo
-
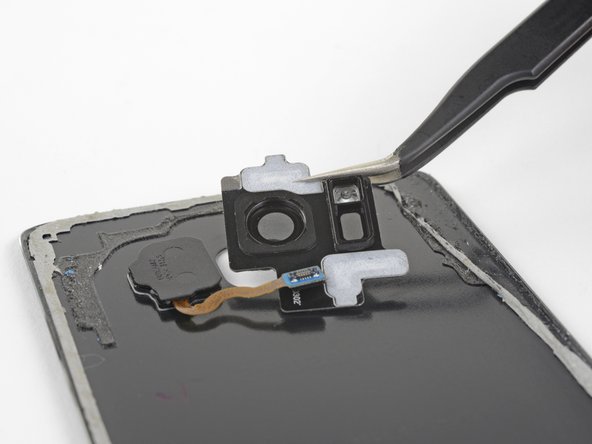
Use an opening pick or tweezers to lift the camera bezel away from the rear glass.
-
Take care to avoid catching the camera bezel on the fingerprint cable as you remove it.
-
If you encounter resistance, use an opening pick to cut any remaining adhesive.
-
-
Este passo não foi traduzido. Ajude a traduzi-lo
-
Use a spudger to scrape away any adhesive where the camera bezel adheres to the rear glass.
-
Clean the adhesion area with high concentration isopropyl alcohol (at least 90%) and a lint-free cloth. Swipe in one direction only, not back and forth. This will help prep the surface for the new adhesive.
-
-
Este passo não foi traduzido. Ajude a traduzi-lo
-
Peel away the clear backing from the camera bezel adhesive strip, exposing the adhesive on one side.
-
Very carefully line up the rear camera and flash cutouts on inside of the rear glass with the same cutouts on the adhesive strip.
-
Set the adhesive strip on the rear glass and make sure it does not overlap the edges of the camera or flash cutouts at all.
-
Use your fingers or the flat edge of a spudger to press the adhesive down so that it bonds to the glass.
-
-
Este passo não foi traduzido. Ajude a traduzi-lo
-
Peel the green backing away from the adhesive strip. Make sure the adhesive does not come off of the glass with the backing.
-
-
Este passo não foi traduzido. Ajude a traduzi-lo
-
Line up the rear camera bezel with the cutouts on the rear glass, then set it down on the adhesive. Make sure the side with the camera lens cover protruding is facing the rear glass.
-
Make sure the camera lens cover is completely seated in the rear glass's camera cutout so that the bezel lays flat against the glass.
-
Use your fingers to apply even pressure to the bezel for 30 seconds to make sure the adhesive bonds properly.
-
Right before you install the rear glass and seal the phone, peel off the black backing covering the camera glass.
-


Cancelar: não concluí este guia.
3 outras pessoas executaram este guia.
