Esta versão pode conter edições incorretas. Mude para o último instantâneo verificado.
O que você precisa
-
Este passo não foi traduzido. Ajude a traduzi-lo
-
Begin by taking off the earbud's rubber wingtip:
-
Grab the tip (where the "R" label is) and gently pull upward on it while slipping it off the bud.
-
-
Este passo não foi traduzido. Ajude a traduzi-lo
-
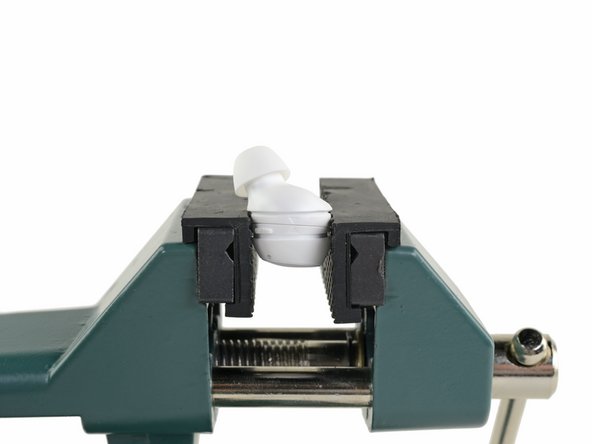
Place the bud horizontally into a rubber-guarded vice or a pair of blunt pliers.
-
Apply steady, even pressure to either side of the bud along the main housing seam (the seam between the two arrows). The pressure should break the seal.
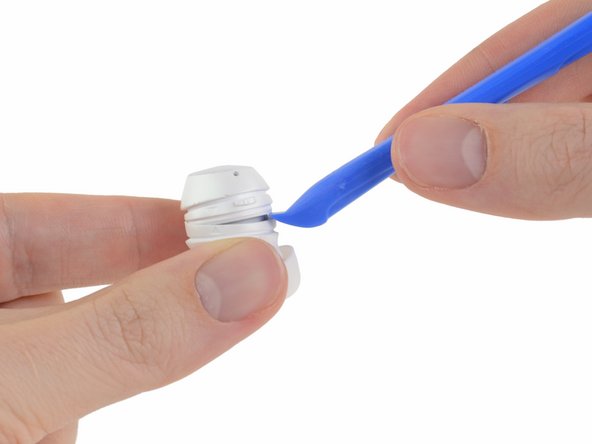
You can avoid vise-marks if you use a plastic opening tool, I was able to do it pretty easily. First I applied pressure with my fingernail which created a slight rift, at which point I realized I had a plastic opening tool, so I was able to use that to pry the halves apart, and hold the small opening with my fingernail while I ran the plastic opening tool along the rest of the seam.
-
-
Este passo não foi traduzido. Ajude a traduzi-lo
-
Once you have created a gap between the two halves of the bud, gently pry them apart with a plastic opening tool.
-
You may need to work your way around the entire earbud with the opening tool. Take your time and do your best not to deform the plastic.
-
Carefully remove the top half of the bud.
-
-
Este passo não foi traduzido. Ajude a traduzi-lo
-
Use a spudger to lift up and disconnect the press connector connecting the battery/board assembly to the speaker drivers and the other sensors in the case.
-
Once the cable is disconnected, remove the assembly from the bud.
-
-
-
Este passo não foi traduzido. Ajude a traduzi-lo
-
Pry up and remove the plastic cap from the bottom of the battery/board assembly.
-
-
Este passo não foi traduzido. Ajude a traduzi-lo
-
Use an opening tool to gently pry up one of the boards along its edge, away from the flex cable.
-
-
Este passo não foi traduzido. Ajude a traduzi-lo
-
Carefully unwrap and remove the motherboard from the battery housing.
-
-
Este passo não foi traduzido. Ajude a traduzi-lo
-
Use a plastic opening tool to pry up and remove the crescent-shaped cap on the top side of the battery housing.
Hi...
My galaxy buds two pro having issue its damaged by some heavy objest fell one thats buds..now its not working coud you please help me to solve that
-
-
Este passo não foi traduzido. Ajude a traduzi-lo
-
The bottom of the battery housing has holes, which allow you to push the battery out. The flat side of a spudger fits perfectly through the widest opening, marked here in red.
-
Insert the flat end of a spudger (or another plastic prying tool) into the bottom of the battery housing and push the battery out the other side.
-
-
Este passo não foi traduzido. Ajude a traduzi-lo
-
Remove the battery from the battery housing.
Gracias por la información, me gustaría saber en donde se consiguen esas baterías, gracias
My right side shows it's charging but doesn't power on is it a touch issue or battery
-


Cancelar: não concluí este guia.
38 outras pessoas executaram este guia.

20 comentários
How to fix not working mic on my galaxy bud
Requiere un cambio de pieza electronica correspondiente al microfono, ya que pudo haberse mojado
My Galaxy buds had the newer CP1254 A3 battery. My Buds were purchased new in August 2019.
My earbuds touchpad is not working after take shower , can you help how can i repair it
Where can I buy a replacement battery in Cape Town South Africa . Its a varta 3.7 v coin battery
With step 8 be careful because the plastic is VERY thin and easy to bend but apart from that it is very easy to do and well worth a try.
Excelente explicación, pude cambiar la batería de mis audífonos.
is the battery CP1254 and LIR1254 interchangeable? Notice the screenshot of the repair guide is CP1254 with 3.7v and the replacement battery in the part list is LIR1254 that’s 3.6v.
Hi CK,
Yes, the two are interchangeable! CP most likely stands for Varta's "Coin Power®" name, while LIR likely stands for a more generic "Lithium Ion Rechargeable".
In case if anyone run into the same issue as I did. After I replaced the battery, the touch control and mic wasn't working until I went to the Galaxy Wearable app and reset the earbud. Also, on the Galaxy Bud+, you don't need to open up the earbud like in this instruction. You can quite easily pry it open with your finger nails.
Hi Patrick, I noticed you have the Galaxy Bud + I have these too, did you use the LIR1254 battery in this? I noticed some steps were a little different but I cannot seem to source a CP1454 battery to replace the earbud and was hoping the LIR 1254 will work in it's place?
Sabrina -
Worked great, thanks a lot. I had the feeling it went even easier with the Galaxy Bud+.
@arthurshi Hey Arthur, I ordered LIR1254H battery but when I got to the battery inside the earbud it was a Varta CP1454 A3... I'm waiting for the LIR1254 to be delivered, but will this work? Should I try it? I don't want to fry the earbud
What is the correct charging voltage and battery model number for the Galaxy Live Buds? I bought an extra pair that were sitting for an extended time (couple of years in an unopened box) went to give them to my GF when her other buds died and I cannot get the brand new never previously used or opened buds to charge because they must be in a LVC (low voltage cutoff state).
Thoughts?