Ir para o conteúdo principal

Samsung Galaxy A50 Battery Replacement

O que você precisa

  1. Samsung Galaxy A50 Battery Replacement, Samsung Galaxy A50 SIM Tray Replacement: passo 1, imagem 1 %32 Samsung Galaxy A50 Battery Replacement, Samsung Galaxy A50 SIM Tray Replacement: passo 1, imagem 2 %32 Samsung Galaxy A50 Battery Replacement, Samsung Galaxy A50 SIM Tray Replacement: passo 1, imagem 3 %32
    • Insert a SIM card eject tool, a SIM eject bit or a straightened paper clip into the hole on the SIM tray located at the left side of the phone.

    • Press firmly to eject the tray.

    • Remove the SIM card tray.

    • When reinserting the cards, make sure to properly orient them in the tray.

  2. Samsung Galaxy A50 Battery Replacement, Back Cover: passo 2, imagem 1 %32
    • Start by switching off your phone.

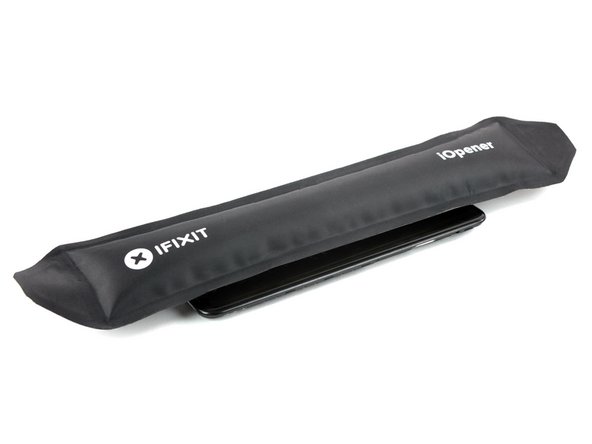
    • Heat an iOpener and apply it to the back cover to soften the adhesive.

    • The adhesive of the Samsung Galaxy A50 is very strong. A hair dryer, heat gun, or hot plate may also be used if you aren't able to open the device with the iOpener. Be careful not to overheat the phone—the AMOLED display and internal battery are both susceptible to heat damage.

  3. Samsung Galaxy A50 Battery Replacement: passo 3, imagem 1 %32 Samsung Galaxy A50 Battery Replacement: passo 3, imagem 2 %32 Samsung Galaxy A50 Battery Replacement: passo 3, imagem 3 %32
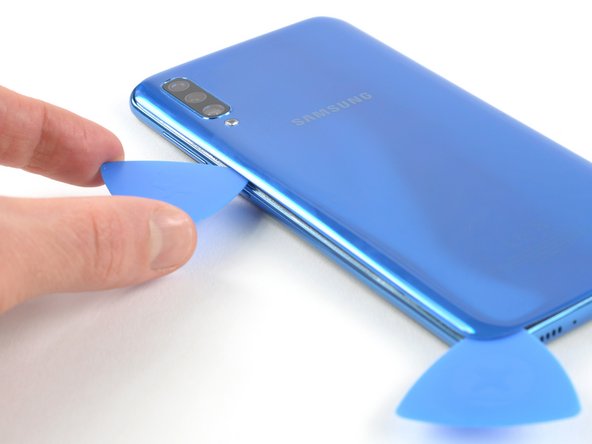
    • Insert an opening pick at the bottom of your phone near the USB-C port.

    • If you can't get between the back cover and midframe with your opening pick, you can use a suction handle or strong tape to pull up the back cover to create a gap.

    • Slide the opening pick to the bottom left corner.

  4. Samsung Galaxy A50 Battery Replacement: passo 4, imagem 1 %32 Samsung Galaxy A50 Battery Replacement: passo 4, imagem 2 %32
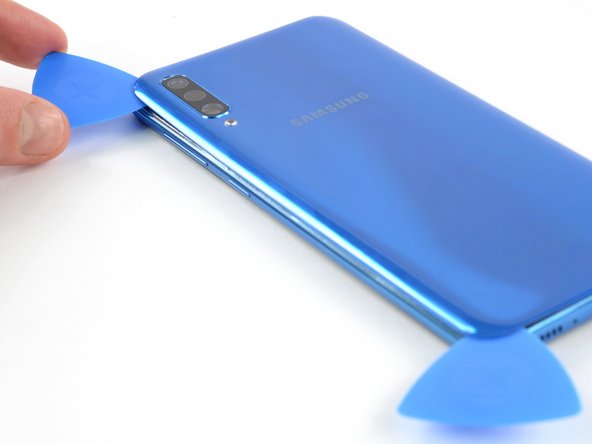
    • Insert a second opening pick and slide it from the bottom to the top left corner to cut the adhesive.

    • If you have trouble, apply more heat to further soften the adhesive. Follow the iOpener instructions to avoid overheating.

    • Leave the opening picks in place to prevent the adhesive from resealing.

  5. Samsung Galaxy A50 Battery Replacement: passo 5, imagem 1 %32 Samsung Galaxy A50 Battery Replacement: passo 5, imagem 2 %32 Samsung Galaxy A50 Battery Replacement: passo 5, imagem 3 %32
    • Insert a third opening pick under the top left corner of the back cover.

    • Slide the opening pick along the top edge of the phone.

    • Leave the opening pick in the top right corner to prevent the adhesive from resealing.

  6. Samsung Galaxy A50 Battery Replacement: passo 6, imagem 1 %32 Samsung Galaxy A50 Battery Replacement: passo 6, imagem 2 %32 Samsung Galaxy A50 Battery Replacement: passo 6, imagem 3 %32
    • Insert a fourth opening pick under the top right corner of the back cover.

    • Slide the tip of the opening pick along the side of the phone to the bottom right corner to cut the adhesive.

    • Leave the opening pick in the bottom right corner to prevent the adhesive from resealing.

  7. Samsung Galaxy A50 Battery Replacement: passo 7, imagem 1 %32
    • Remove the back cover.

    • After installing the back cover, apply strong, steady pressure to your phone for several minutes to help the adhesive form a good bond—a stack of heavy books works well.

  8. Samsung Galaxy A50 Battery Replacement, Midframe: passo 8, imagem 1 %32
    • Remove the 13 Phillips #00 screws (4 mm length).

  9. Samsung Galaxy A50 Battery Replacement: passo 9, imagem 1 %32 Samsung Galaxy A50 Battery Replacement: passo 9, imagem 2 %32 Samsung Galaxy A50 Battery Replacement: passo 9, imagem 3 %32
    • Insert an opening pick between the display and the midframe at the bottom of your phone above the USB-C port.

    • Slide the pick along the bottom edge to release the clips.

  10. Samsung Galaxy A50 Battery Replacement: passo 10, imagem 1 %32 Samsung Galaxy A50 Battery Replacement: passo 10, imagem 2 %32 Samsung Galaxy A50 Battery Replacement: passo 10, imagem 3 %32
    • Continue sliding the pick along the left edge of the phone to release the clips.

  11. Samsung Galaxy A50 Battery Replacement: passo 11, imagem 1 %32 Samsung Galaxy A50 Battery Replacement: passo 11, imagem 2 %32
    • Slide the opening pick along the top edge.

  12. Samsung Galaxy A50 Battery Replacement: passo 12, imagem 1 %32 Samsung Galaxy A50 Battery Replacement: passo 12, imagem 2 %32 Samsung Galaxy A50 Battery Replacement: passo 12, imagem 3 %32
    • Slide your opening pick along the right edge towards the bottom right corner.

  13. Samsung Galaxy A50 Battery Replacement: passo 13, imagem 1 %32 Samsung Galaxy A50 Battery Replacement: passo 13, imagem 2 %32
    • Make sure you free all the clips securing the midframe.

    • Separate the midframe from the phone.

  14. Samsung Galaxy A50 Battery Replacement, Battery Disconnect: passo 14, imagem 1 %32 Samsung Galaxy A50 Battery Replacement, Battery Disconnect: passo 14, imagem 2 %32
    • Use a spudger to disconnect the battery by prying the connector straight up from its socket.

  15. Samsung Galaxy A50 Battery Replacement, Battery: passo 15, imagem 1 %32 Samsung Galaxy A50 Battery Replacement, Battery: passo 15, imagem 2 %32 Samsung Galaxy A50 Battery Replacement, Battery: passo 15, imagem 3 %32
    • Use the flat end of a spudger to pry up and disconnect the interconnect and display flex cables from the motherboard.

  16. Samsung Galaxy A50 Battery Replacement: passo 16, imagem 1 %32 Samsung Galaxy A50 Battery Replacement: passo 16, imagem 2 %32 Samsung Galaxy A50 Battery Replacement: passo 16, imagem 3 %32
    • Use the flat end of a spudger to pry up and disconnect the charging port and display flex cables from the daughterboard.

  17. Samsung Galaxy A50 Battery Replacement: passo 17, imagem 1 %32 Samsung Galaxy A50 Battery Replacement: passo 17, imagem 2 %32
    • The adhesive that holds down the battery in the Samsung Galaxy A50 is extremely strong.

    • Apply some isopropyl alcohol under each corner of the battery and allow it to penetrate for several minutes to help weaken the adhesive.

    • Alternatively, apply a heated iOpener to the display directly behind the battery for two minutes to help soften the adhesive. Repeat the process as necessary.

  18. Samsung Galaxy A50 Battery Replacement: passo 18, imagem 1 %32 Samsung Galaxy A50 Battery Replacement: passo 18, imagem 2 %32 Samsung Galaxy A50 Battery Replacement: passo 18, imagem 3 %32
    Ferramenta utilizada nesse passo:
    Plastic Cards
    $2.99
    Comprar
    • Try your best not to deform the battery during this process. Soft-shell lithium-ion batteries can leak dangerous chemicals, catch fire, or even explode if damaged. Do not use excessive force or pry at the battery with metal tools.

    • Insert a plastic card underneath the bottom edge of the battery and carefully slide it underneath the battery.

    • Continue sliding the plastic card underneath the battery to loosen the battery adhesive.

  19. Samsung Galaxy A50 Battery Replacement: passo 19, imagem 1 %32 Samsung Galaxy A50 Battery Replacement: passo 19, imagem 2 %32
    • Remove the battery.

    • Do not reinstall a damaged or deformed battery, as doing so is a potential safety hazard. Replace it with a new battery.

    • Before installing a new battery, remove any remaining adhesive from the phone, and clean the glued areas with isopropyl alcohol and a lint-free cloth.

Conclusão

If possible, turn on your device and test your repair before installing new adhesive and resealing.

Secure the new battery with pre-cut adhesive or double-sided adhesive tape. In order to position it correctly, apply the new adhesive into the device at the places where the old adhesive was located, not directly onto the battery. Press the new battery firmly into place.

To reassemble your device, follow these instructions in reverse order. Apply new adhesive where necessary after cleaning the relevant areas with isopropyl alcohol (>90%).

For optimal performance, calibrate your newly installed battery: Charge it to 100% and keep charging it for at least 2 more hours. Then use your device until it shuts off due to low battery. Finally, charge it uninterrupted to 100%.


Take your e-waste to an R2 or e-Stewards certified recycler.

Repair didn’t go as planned? Try some basic troubleshooting, or ask our Answers community for help.

40 outras pessoas executaram este guia.

Adriana Zwink

Membro desde: 12/18/19

47.656 Reputação

Autoria de 167 guias

Equipe

iFixit Membro de iFixit

Staff

Membros da 136

Autoria de 16.573 guias

14 comentários

Great guide.. One tip… ALWAYS make sure to decharge the battery so it have no power before you do anything… example turn on wifi and stream a movie and when phone is out of power you can remove the battery.. never bend it, use heat, use fluid to desolve the glue behind battery.. never cut/damage or bend the battery and use safety glasses just in case. Battery in a mobile phone is NOT a toy

Peder - Responder

Teşekkürler. Çok açıklayıcı ve anlaşılır biçimde hazırlanan değerli bir rehber olmuş. Gerçekten başarılı.

Ahmet Külahlıoğlu - Responder

My a50 just got a black screen, I have tried the forced reboot for a couple of time it opened but returns to black screen, now I can't open it with force reboot, is this battery or something else

allan_heyz - Responder

I have same problem in same time. On the screen, I only have a circle charging sign, but not a percentage of battery charge when it's charging normally. I think the battery's dead.

inaumoski -

Hi Allan, It's difficult to remotely identify what's wrong with your A50. Let us know what the reason is if you can figure it out.

Adriana Zwink -

Adicione um comentário

Exibir estatísticas:

Últimas 24 horas: 59

Últimos 7 dias: 412

Últimos 30 dias: 1,686

Duração total: 69,258