Ir para o conteúdo principal
Participe da comunidade de reparos - Criar conta

Ring Floodlight Cam Camera Module Replacement

O que você precisa

  1. Ring Floodlight Cam Camera Module Replacement, Motherboard: passo 1, imagem 1 %32 Ring Floodlight Cam Camera Module Replacement, Motherboard: passo 1, imagem 2 %32
    • Remove the external cover with a Jimmy tool.

    Pergunte ao FixBot

    Comentar

  2. Ring Floodlight Cam Camera Module Replacement: passo 2, imagem 1 %32 Ring Floodlight Cam Camera Module Replacement: passo 2, imagem 2 %32
    • Remove the four outer cover 4.5mm screws with a Philips 1 screwdriver.

    Pergunte ao FixBot

    Comentar

  3. Ring Floodlight Cam Camera Module Replacement: passo 3, imagem 1 %32
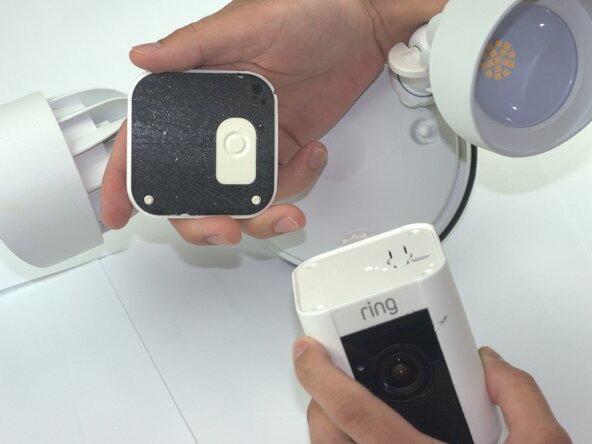
    • Remove the internal cover.

    Pergunte ao FixBot

    Comentar

  4. Ring Floodlight Cam Camera Module Replacement: passo 4, imagem 1 %32
    • Disconnect the flexible flat cable (FFC) from the motherboard.

    Pergunte ao FixBot

    Comentar

  5. Ring Floodlight Cam Camera Module Replacement: passo 5, imagem 1 %32
    • Remove the three-prong connector with angled tweezers.

    Pergunte ao FixBot

    Comentar

  6. Ring Floodlight Cam Camera Module Replacement: passo 6, imagem 1 %32
    • Remove the 2mm screws with a Phillips #00 screwdriver.

    Pergunte ao FixBot

    Comentar

  7. Ring Floodlight Cam Camera Module Replacement: passo 7, imagem 1 %32 Ring Floodlight Cam Camera Module Replacement: passo 7, imagem 2 %32
    • Remove the power supply.

    • Disconnect the power supply from the device.

    Pergunte ao FixBot

    Comentar

  8. Ring Floodlight Cam Camera Module Replacement: passo 8, imagem 1 %32
    • Remove the 2mm screws with a Phillips 00 screwdriver from the base connector.

    • From this step forward use a low profile wrench instead of a screwdriver with the correct bit size to remove screws non-destructively.

    Pergunte ao FixBot

    Comentar

  9. Ring Floodlight Cam Camera Module Replacement: passo 9, imagem 1 %32 Ring Floodlight Cam Camera Module Replacement: passo 9, imagem 2 %32
    • Drill holes into the exterior with a 1/16 drill bit.

    • Skip this step unless you lack the specialized tools or other attempts to remove screws non destructively were unsuccessful.

    Pergunte ao FixBot

    Comentar

  10. Ring Floodlight Cam Camera Module Replacement: passo 10, imagem 1 %32
    • Unscrew the 2mm screws on the metal baseplate with a Phillips 00 screwdriver.

    Pergunte ao FixBot

    Comentar

  11. Ring Floodlight Cam Camera Module Replacement: passo 11, imagem 1 %32
    • Remove the metal baseplate.

    Pergunte ao FixBot

    Comentar

  12. Ring Floodlight Cam Camera Module Replacement: passo 12, imagem 1 %32
    • Remove the power connector from the motherboard using angled tweezers.

    Pergunte ao FixBot

    Comentar

  13. Ring Floodlight Cam Camera Module Replacement: passo 13, imagem 1 %32
    • Remove the front-end flexible flat cable (FFC) with angled tweezers.

    Pergunte ao FixBot

    Comentar

  14. Ring Floodlight Cam Camera Module Replacement: passo 14, imagem 1 %32
    • Remove the motion sensor flat flexible cable (FFC).

    Pergunte ao FixBot

    Comentar

  15. Ring Floodlight Cam Camera Module Replacement: passo 15, imagem 1 %32 Ring Floodlight Cam Camera Module Replacement: passo 15, imagem 2 %32
    • Remove the motherboard module.

    Pergunte ao FixBot

    Comentar

  16. Ring Floodlight Cam Camera Module Replacement, Camera Module: passo 16, imagem 1 %32
    • Drill holes with a 1/16 drill bit.

    Pergunte ao FixBot

    Comentar

  17. Ring Floodlight Cam Camera Module Replacement: passo 17, imagem 1 %32 Ring Floodlight Cam Camera Module Replacement: passo 17, imagem 2 %32
    • Remove the 2mm screws with an iFixit PH00 screwdriver.

    Pergunte ao FixBot

    Comentar

  18. Ring Floodlight Cam Camera Module Replacement: passo 18, imagem 1 %32
    • Peel the copper strip from camera module.

    • Remove the metal baseplate.

    Pergunte ao FixBot

    Comentar

  19. Ring Floodlight Cam Camera Module Replacement: passo 19, imagem 1 %32 Ring Floodlight Cam Camera Module Replacement: passo 19, imagem 2 %32
    • Unplug the WiFi antenna cables with angled tweezers.

    Pergunte ao FixBot

    Comentar

  20. Ring Floodlight Cam Camera Module Replacement: passo 20, imagem 1 %32 Ring Floodlight Cam Camera Module Replacement: passo 20, imagem 2 %32
    • Remove 2mm screws with a PH00 screwdriver.

    Pergunte ao FixBot

    Comentar

  21. Ring Floodlight Cam Camera Module Replacement: passo 21, imagem 1 %32
    • Remove the 3 pin power connector from the camera module.

    Pergunte ao FixBot

    Comentar

  22. Ring Floodlight Cam Camera Module Replacement: passo 22, imagem 1 %32 Ring Floodlight Cam Camera Module Replacement: passo 22, imagem 2 %32 Ring Floodlight Cam Camera Module Replacement: passo 22, imagem 3 %32
    • Remove the camera module.

    Pergunte ao FixBot

    Comentar

Conclusão

To reassemble your device, follow these instructions in reverse order and before inserting power supply fill the drill holes with plastic putty.

Cancelar: não concluí este guia.

Samuel Garcia

Membro desde: 02/04/26

381 Reputação

Autoria de 2 guias

Equipe

Texas Tech, Team 41-3, Johansen Spring 2026 Membro de Texas Tech, Team 41-3, Johansen Spring 2026

TTU-JOHANSEN-S26S41G3

4 Membros

Autoria de 5 guias

0Comentários do guia

Comentar

Visualizações:

Últimas 24 horas: 1

Últimos 7 dias: 12

Últimos 30 dias: 38

Ao todo: 111