Ir para o conteúdo principal
Participe da comunidade de reparos - Criar conta

Ricoh Super 8 800z Handle Assembly Replacement

O que você precisa

  1. Ricoh Super 8 800z Handle Assembly Replacement, Handle Assembly: passo 1, imagem 1 %32 Ricoh Super 8 800z Handle Assembly Replacement, Handle Assembly: passo 1, imagem 2 %32 Ricoh Super 8 800z Handle Assembly Replacement, Handle Assembly: passo 1, imagem 3 %32
    • Open the handle's battery compartment and remove the batteries from the handle.

    Pergunte ao FixBot

    Comentar

  2. Ricoh Super 8 800z Handle Assembly Replacement: passo 2, imagem 1 %32 Ricoh Super 8 800z Handle Assembly Replacement: passo 2, imagem 2 %32 Ricoh Super 8 800z Handle Assembly Replacement: passo 2, imagem 3 %32
    • Using the Phillips #000 screwdriver, remove the three screws on the round plate on the right side of the camera handle. This is the side with the handle lock release button.

    Pergunte ao FixBot

    Comentar

  3. Ricoh Super 8 800z Handle Assembly Replacement: passo 3, imagem 1 %32 Ricoh Super 8 800z Handle Assembly Replacement: passo 3, imagem 2 %32 Ricoh Super 8 800z Handle Assembly Replacement: passo 3, imagem 3 %32
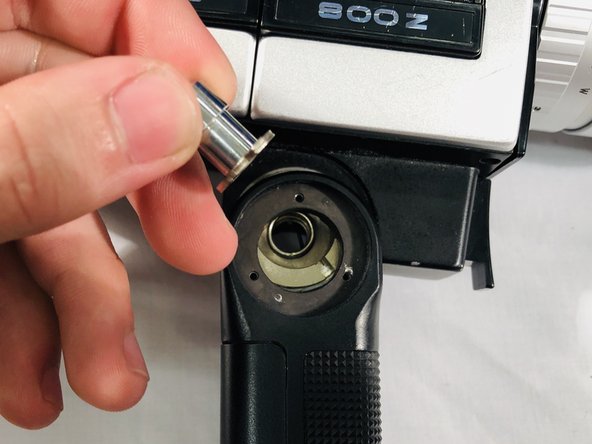
    • Remove the round metal plate.

    • Then, shift the handle so you have clearance to pass one of the legs of the button through the opening.

    Pergunte ao FixBot

    Comentar

  4. Ricoh Super 8 800z Handle Assembly Replacement: passo 4, imagem 1 %32 Ricoh Super 8 800z Handle Assembly Replacement: passo 4, imagem 2 %32 Ricoh Super 8 800z Handle Assembly Replacement: passo 4, imagem 3 %32
    Ferramenta utilizada neste passo:
    Tweezers
    $4.99
    • Pull the button out at an angle.

    • Remove the spring beneath it with a pair of tweezers.

    Pergunte ao FixBot

    Comentar

  5. Ricoh Super 8 800z Handle Assembly Replacement: passo 5, imagem 1 %32 Ricoh Super 8 800z Handle Assembly Replacement: passo 5, imagem 2 %32 Ricoh Super 8 800z Handle Assembly Replacement: passo 5, imagem 3 %32
    • Flip the camera to the other side and remove the screws from the other round metal plate with a Phillips #000 screwdriver.

    • When replacing this plate, make sure the cutout in the plate surrounds the wiring in the handle. You may break the wiring if the plates are not seated well or if placed incorrectly.

    Pergunte ao FixBot

    Comentar

  6. Ricoh Super 8 800z Handle Assembly Replacement: passo 6, imagem 1 %32 Ricoh Super 8 800z Handle Assembly Replacement: passo 6, imagem 2 %32 Ricoh Super 8 800z Handle Assembly Replacement: passo 6, imagem 3 %32
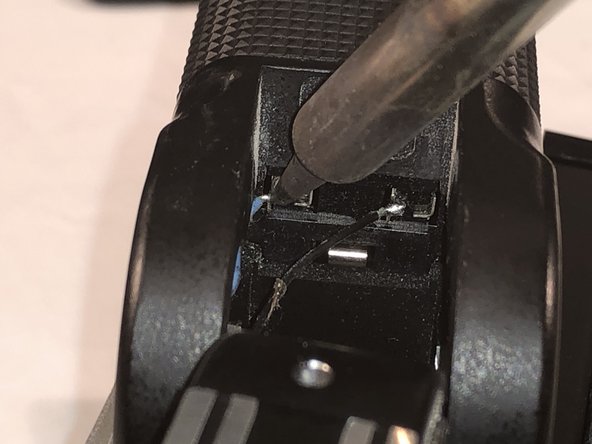
    • Pull the handle slowly away from the camera and shift the handle to allow access to the wire connections.

    • Desolder these wires carefully and you can now remove the handle.

    • For a informative guide on how to Solder/Desolder check out this guide.

    Pergunte ao FixBot

    Comentar

Conclusão

To reassemble your device, follow these instructions in reverse order.

Cancelar: não concluí este guia.

0Comentários do guia

Comentar

Visualizações:

Últimas 24 horas: 0

Últimos 7 dias: 5

Últimos 30 dias: 33

Ao todo: 614