Essa tradução foi gerada por um programa e ainda não foi revisada por uma pessoa. Falas essa língua? Dá uma olhada.
Introdução
Utilize este guia de reparo para substituir o direcional (D-pad) em um console de jogo portátil Retroid Pocket Flip. O D-pad é usado para entrada direcional durante o jogo e navegação em menus. Se o D-pad parar de responder, registrar entradas incorretas ou parecer irregular ao ser pressionado, pode ser necessária a sua substituição.
Este reparo exige experiência técnica moderada, pois componentes internos devem ser removidos para acessar o D-pad.
Antes de começar, desligue o dispositivo completamente e remova o cartão microSD. A remoção da bateria, do joystick e da placa-mãe é necessária antes de acessar o D-pad. Siga as orientações de Electrostatic Discharge ao trabalhar dentro do dispositivo para evitar danos a componentes sensíveis.
O que você precisa
-
-
-
Remova os quatro parafusos de 5,9 mm da placa traseira do dispositivo com uma chave de fenda hexagonal de 1,3 mm.
-
Use uma palheta de abertura para separar cuidadosamente a capa traseira do dispositivo.
 Pergunte ao FixBot
-
-
-
Use uma espátula de plástico para levantar cuidadosamente o conector da bateria e desconectá-lo.
-
Use uma pinça para desconectar o conector do seu soquete.
-
-
-
-
-
Remova os dois parafusos de 3,2 mm que prendem a parte superior da blindagem com uma chave JIS #000.
-
Remova os cinco parafusos de 3,2 mm que prendem a blindagem isolante de plástico à placa-mãe.
-
-
-
-
Com cuidado, levante e descole o módulo do ventilador usando uma espátula, depois remova-o.
-
Remova os conectores de fita adesiva em cada lado da placa com uma espátula.
-
Use uma espátula para separar cuidadosamente a blindagem da placa.
-
-
-
Use uma pinça para soltar e remover os dois cabos planos em cada módulo de joystick.
-
Use uma espátula para levantar e remover os módulos de joystick; eles estão fixados com fita dupla face.
-
-
-
-
-
Use uma espátula de plástico para desconectar o conector deslizante, empurrando a aba para deslizá-lo para fora do seu soquete.
-
Use uma pinça para desconectar os cabos planos da placa.
-
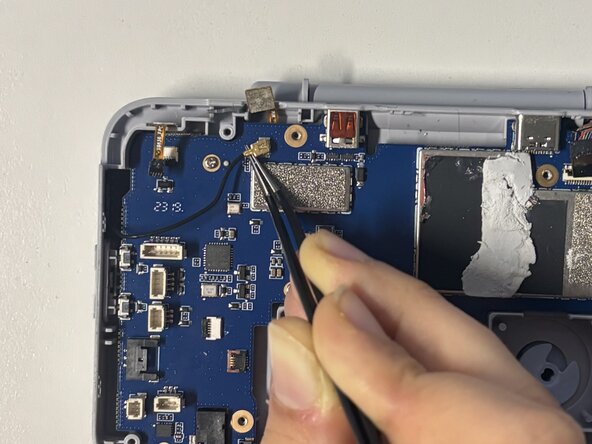
Desconecte o conector coaxial à esquerda da placa-mãe posicionando uma pinça sob o pescoço metálico do conector para levantá-lo verticalmente.
-
-
-
Remova os seis parafusos de 5,8 mm da placa-mãe usando uma chave JIS #00.
-
Com cuidado, retire a placa-mãe do dispositivo.
-
-
-
-
-
Retire a peça de borracha que fica atrás do D-pad do dispositivo.
-
Levante o D-pad para fora do dispositivo.
-
-




Para a remontagem de seu dispositivo, siga estas instruções na ordem inversa.
Um agradecimento especial a esses tradutores:
100%

Translation Bot está nos ajudando a consertar o mundo! Quer contribuir?
Comece a traduzir ›

Equipe

Université Paris Cité, Team 2-2, Grohan Winter 2026 Membro de Université Paris Cité, Team 2-2, Grohan Winter 2026
UPARIS-GROHAN-W26S2G2
4 Membros
Autoria de 66 guias
