Introdução
This guide shows you how to open your Time Capsule for the first time. Take your time with the first step, especially if your Time Capsule is of some age; the adhesive can become quite hard.
O que você precisa
-
-
Open the Time Capsule by exposing the screws that hold the device together. The screws are concealed by the rubber base, which is the bottom surface of the device.
-
Use a heat gun or hair dryer to heat the rubber base, which softens the adhesive holding it on.
-
Starting in a corner, carefully lift the rubber base to prevent tearing. You can use a guitar pick or a small, plastic ruler to help separate the rubber from the metal.
-
-
-
-
Once the rubber base is separated from the device, remove the 8 Phillips PH00 screws that attach the metal bottom of the case to the plastic top of the case.
Instead of removing the rubber floor, I cut windows in the rubber base at the designated places and dug them out. To do this, I had rectified the photo and printed it out as a square with an edge length of 19.8 cm and used it as a stencil.
Statt den Gummiboden zu entfernen, habe ich an den bezeichneten Stellen Fenster in die Gummiplatte geschnitten und ausgehoben. Dazu hatte ich das Foto entzerrt und als Quadrat mit der Kantenlänge 19,8 cm ausgedruckt und als Schablone benutzt.
-
-
Ferramenta utilizada neste passo:Tweezers$4.99
-
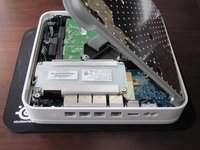
Lift up the left side of the metal plate and slowly flip it over the right edge of the device.
-
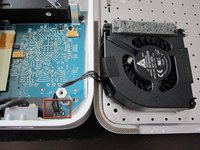
Since many people have had serious problems with the fan power connnector breaking, it is advisable to NOT try to disconnect the fan power connector. Be VERY careful with this connector. It is extremely fragile. If you absolutely have to disconnect the fan from the logic board, VERY carefully use a spudger or tweezers to do so.
I'd destroyed the connection between my fan and logic board by trying to remove the fan. This is a bigger problem than a broken hard drive. DO NOT TRY TO DISCONNECT THE FAN. Instead be careful with the base (making sure not to stretch the fan wire) as your proceed to step four.
I wish I had read the comments too!! DO NOT try to disconnect the fan!!!! The connector broke off with out a lot of force. Now I have a worthless piece of metal and plastic!!!!
This is not my guide, but in order to try to prevent future damage, I've edited the guide to warn against disconnecting the fan from the logic board. Hopefully the update will be approved soon :0\
Jeff G -
I had no issues removing the fan plug from the board.
It seems to me that the fan on the lid is not installed correctly. The air intake is blocked by a lid. The exhaust rests against the hard drive. It is more logical to turn the fan over, then the air intake will open, and the air flow will be along the components of the motherboard
-
To reassemble your device, follow these instructions in reverse order.
To reassemble your device, follow these instructions in reverse order.
Cancelar: não concluí este guia.
53 outras pessoas executaram este guia.
7Comentários do guia
I accidentally edited this page, instead of the fan. Could anyone tell me how to reverse that/reverse it for me? Thanks!
Just un-edit the page to what it used to be.
My TC was made lot of noise and warming. (I thonk was the HDD problem) When I opened and tried disconnect the fan it broken the board plug… Today I use without fan, the noise is over (was the fan) and it continue warming same way…


Slowly start peeling at one corner... worked better than shown on the pictures.
Markus - Responder
Slow down particularly near the bottom label where it is stiffer. Either that or I needed to give it more heat. Going too fast can risk tearing the rubber base if the adhesive is strong.
ElvinC - Responder
If you are wondering if the Time Capsule will still work as a router if you remove the HDD and leave it out, the answer (according to another webpage I read) is YES, it will still work. Apparently, you get a warning with the AIrPort Utility about a missing HDD, but it still works. I wanted to keep and reuse the 1TB Hitachi HDD for offsite data backup.
CraigH - Responder
Use an iron instead of a heating gun or hairdryer!
Gradually raise the temperature while checking for separation, while moving over the rubber. I first cleaned the rubber with some soap, to avoid scorching dust or grease. The setting for synthetic fabrics seemed to do the job with my Tefal iron; probably a little over 100 degrees centigrade. No steam off course!
Worked like a charm without leaving almost any residual glue.
Sticking the rubber sole back after the repair was also successful.
Frits de Bruijn - Responder
Thanks for sharing this.
kenatkenichikato - Responder
Adhesive tape used is Nitto No. 5015. I found a piece of a back-paper left underneath the rubber…
vesa - Responder
Is there a possibility to change an already changed 2TB SATA to a bigger one? Mine is full. because I added another MacBook Pro, but I’d rather not buy a newer TimeCapsule
Bette Rose - Responder
I have a heater plate from my beer fermenting days. Sat the router on this rubber side down for an hour or so and the rubber came off easily and cleanly. A pet bed heater may work just as nicely.
publiclee - Responder