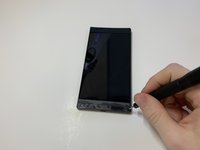
Ir para o conteúdo principal
Participe da comunidade de reparos - Criar conta

Razer Phone Charging Port Replacement

O que você precisa

  1. Razer Phone Charging Port Replacement, Display Assembly: passo 1, imagem 1 %32 Razer Phone Charging Port Replacement, Display Assembly: passo 1, imagem 2 %32 Razer Phone Charging Port Replacement, Display Assembly: passo 1, imagem 3 %32
    • Remove the plastic speaker grills by using the metal spudger to pry underneath the strips.

    • Peel off the plastic speaker grill to reveal the screws.

    • Heating up the plastic grills make them easier to remove.

    • Peeling off the plastic speaker grill will ruin the adhesive used to keep it in place. A new adhesive must be used to put the grill back on the device.

    Pergunte ao FixBot
  2. Razer Phone Charging Port Replacement: passo 2, imagem 1 %32 Razer Phone Charging Port Replacement: passo 2, imagem 2 %32
    • Pry the top plastic grill off with the metal spudger and reveal the screws.

    Pergunte ao FixBot
  3. Razer Phone Charging Port Replacement: passo 3, imagem 1 %32 Razer Phone Charging Port Replacement: passo 3, imagem 2 %32 Razer Phone Charging Port Replacement: passo 3, imagem 3 %32
    • Remove five (two bottom, three top) 2.5 mm screws with the Phillips #000 screwdriver.

    • Remove five (four bottom, one top) 5.5 mm screws with the Torx Head T5 screwdriver.

    Pergunte ao FixBot
  4. Razer Phone Charging Port Replacement: passo 4, imagem 1 %32 Razer Phone Charging Port Replacement: passo 4, imagem 2 %32
    • Remove the display assembly by using the Jimmy to separate the assembly from the phone's frame.

    • Lift the display assembly away from the other half of the phone.

    Pergunte ao FixBot
  5. Razer Phone Charging Port Replacement: passo 5, imagem 1 %32 Razer Phone Charging Port Replacement: passo 5, imagem 2 %32 Razer Phone Charging Port Replacement: passo 5, imagem 3 %32
    Ferramenta utilizada neste passo:
    Tweezers
    $4.99
    • Remove one 2.5 mm screw holding down the metal bracket connector using the Phillips #000 screwdriver.

    • Peel back the metallic shielding over the connector using tweezers.

    • Remove the metal bracket connector.

    Pergunte ao FixBot
  6. Razer Phone Charging Port Replacement: passo 6, imagem 1 %32 Razer Phone Charging Port Replacement: passo 6, imagem 2 %32
    • Grab hold of the the screen ribbon with the tweezers and remove it from the rest of the phone to free the assembly display.

    Pergunte ao FixBot
  7. Razer Phone Charging Port Replacement, Battery: passo 7, imagem 1 %32 Razer Phone Charging Port Replacement, Battery: passo 7, imagem 2 %32 Razer Phone Charging Port Replacement, Battery: passo 7, imagem 3 %32
    Ferramenta utilizada neste passo:
    Tweezers
    $4.99
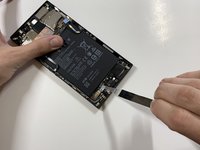
    • Grab hold of the connector on the right side of the phone (just above the battery) using the tweezers.

    • Remove the connector.

    Pergunte ao FixBot
  8. Razer Phone Charging Port Replacement: passo 8, imagem 1 %32 Razer Phone Charging Port Replacement: passo 8, imagem 2 %32
    • Remove the 2.5 mm screw holding down the bracket with a Phillips #000 screwdriver.

    • Grab the bracket with the tweezers and remove it.

    Pergunte ao FixBot
  9. Razer Phone Charging Port Replacement: passo 9, imagem 1 %32 Razer Phone Charging Port Replacement: passo 9, imagem 2 %32 Razer Phone Charging Port Replacement: passo 9, imagem 3 %32
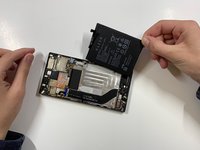
    • Peel off and pull out the elastic tabs at the bottom of the battery.

    Pergunte ao FixBot
  10. Razer Phone Charging Port Replacement: passo 10, imagem 1 %32 Razer Phone Charging Port Replacement: passo 10, imagem 2 %32
    • Carefully use the Jimmy to wedge the battery out of the phone.

    Pergunte ao FixBot
  11. Razer Phone Charging Port Replacement, Charging Port: passo 11, imagem 1 %32 Razer Phone Charging Port Replacement, Charging Port: passo 11, imagem 2 %32
    • Using a Phillips #000 screwdriver, take out the seven 1 mm screws on the bottom panel of the device.

    • There are a few gold brackets under some of the screws. Make sure to remove these and keep them for reassembly.

    Pergunte ao FixBot
  12. Razer Phone Charging Port Replacement: passo 12, imagem 1 %32 Razer Phone Charging Port Replacement: passo 12, imagem 2 %32
    Ferramenta utilizada neste passo:
    Tweezers
    $4.99
    • Grab hold of the blue connector on the upper left side of the phone with the tweezers.

    • Remove the connector.

    Pergunte ao FixBot
  13. Razer Phone Charging Port Replacement: passo 13, imagem 1 %32 Razer Phone Charging Port Replacement: passo 13, imagem 2 %32
    • Use the tweezers to grab hold of the connector for the blue wire (bottom of the device), and remove the connector.

    • Use the tweezers to grab hold of the connector for the white wire, and remove the connector.

    Pergunte ao FixBot
  14. Razer Phone Charging Port Replacement: passo 14, imagem 1 %32
    • Using the tweezers, grab the detached charging port and ribbon.

    Pergunte ao FixBot
Conclusão

To reassemble your device, follow these instructions in reverse order.

14 outras pessoas executaram este guia.

Bryan

Membro desde: 01/24/19

777 Reputação

Autoria de 2 guias

Equipe

Cal Poly, Team S19-G6, White Winter 2019 Membro de Cal Poly, Team S19-G6, White Winter 2019

CPSU-WHITE-W19S19G6

4 Membros

Autoria de 10 guias

10Comentários do guia

Who i can find one replacement…pls a link

Flims LP - Responder Compartilhar

Search it on Amazon.c

HolaSoy Guapo - Responder Compartilhar

hi how much you guys charge for the charging port thanks

johnny rodas - Responder Compartilhar

Does this tutorial also work for the Razer phone 2?

Derrick - Responder Compartilhar

Nah, even step one looks different for me.

Edsknife - Responder Compartilhar

Comentar

Visualizações:

Últimas 24 horas: 0

Últimos 7 dias: 26

Últimos 30 dias: 143

Ao todo: 26,833