Ir para o conteúdo principal

Este guia tem alterações mais recentes. Mudar para a última versão não verificada.

Raleigh M20 Chain Guard Replacement

O que você precisa

  1. Raleigh M20 Chain Guard Replacement, Raleigh M20 Pedal Removal: passo 1, imagem 1 %32
    • Use an 8" adjustable crescent wrench to fit it into the base of the pedal.

  2. Raleigh M20 Chain Guard Replacement: passo 2, imagem 1 %32 Raleigh M20 Chain Guard Replacement: passo 2, imagem 2 %32
    • Twist the the wrench in a counter -clockwise direction to unscrew the right-side pedal (The chain side).

    • Repeat the process on the other side with a clockwise direction.

  3. Raleigh M20 Chain Guard Replacement: passo 3, imagem 1 %32
    • Turn the wrench continuously until the pedal detaches from the crank arm.

  4. Raleigh M20 Chain Guard Replacement, Chain Guard: passo 4, imagem 1 %32 Raleigh M20 Chain Guard Replacement, Chain Guard: passo 4, imagem 2 %32
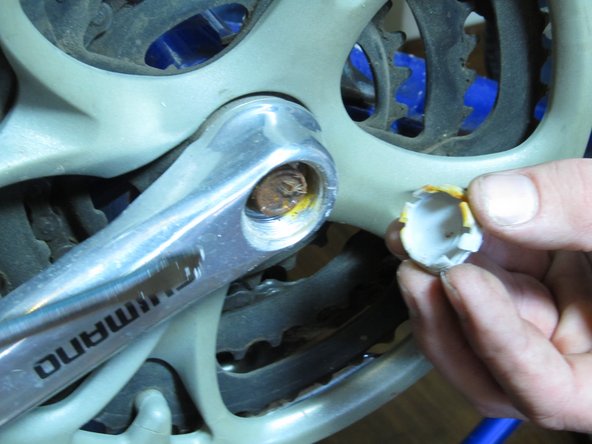
    • Use a flathead screwdriver to remove the cap over the screw.

    • Do this for both sides.

  5. Raleigh M20 Chain Guard Replacement: passo 5, imagem 1 %32 Raleigh M20 Chain Guard Replacement: passo 5, imagem 2 %32
    • To unscrew crank-arms, position socket wrench onto screw.

    • Twist the socket wrench clockwise until the screw has been removed.

  6. Raleigh M20 Chain Guard Replacement: passo 6, imagem 1 %32 Raleigh M20 Chain Guard Replacement: passo 6, imagem 2 %32 Raleigh M20 Chain Guard Replacement: passo 6, imagem 3 %32
    • Insert the crank arm puller into the hole that the screw was occupying.

    • Use a crescent wrench to tighten the crank arm puller by twisting clockwise until the puller cannot be tightened further.

    • Do not over tighten the crank arm puller. Once it begins to become hard to tighten, stop.

  7. Raleigh M20 Chain Guard Replacement: passo 7, imagem 1 %32 Raleigh M20 Chain Guard Replacement: passo 7, imagem 2 %32 Raleigh M20 Chain Guard Replacement: passo 7, imagem 3 %32
    • Turn the crank arm puller clockwise until the crankarm pops off.

    • There will be some resistance when taking the crank arm off.

    • Repeat steps 2-4 on the other side of the bike to remove the other crank arm.

  8. Raleigh M20 Chain Guard Replacement: passo 8, imagem 1 %32 Raleigh M20 Chain Guard Replacement: passo 8, imagem 2 %32
    • Flip the crank arm, that has the chain-guard on it, over so that the chainring shows.

    • Locate the four screws on the back of the chain ring.

  9. Raleigh M20 Chain Guard Replacement: passo 9, imagem 1 %32 Raleigh M20 Chain Guard Replacement: passo 9, imagem 2 %32 Raleigh M20 Chain Guard Replacement: passo 9, imagem 3 %32
    • Use a Phillips head screwdriver to remove the four screws on the back of the chain ring.

  10. Raleigh M20 Chain Guard Replacement: passo 10, imagem 1 %32
    • Flip chain guard back over so that the chain guard faces you.

  11. Raleigh M20 Chain Guard Replacement: passo 11, imagem 1 %32 Raleigh M20 Chain Guard Replacement: passo 11, imagem 2 %32
    • Grasp the crankarm in one hand and the chain guard in the other.

    • Gently, pull out and up on the chain guard until the guard pops off.

Conclusão

To reassemble your device, follow these instructions in reverse order.

If you are replacing the chain guard, use the new chain guard when reassembling the device.

Uma outra pessoa concluiu este guia.

Carl Lind

Membro desde: 09/26/12

55 Reputação

Autoria de 1 guia

Equipe

Cal Poly, Team 7-49, Forte Fall 2012 Membro de Cal Poly, Team 7-49, Forte Fall 2012

CPSU-FORTE-F12S7G49

Membros da 5

Autoria de 5 guias

0 comentários

Adicione um comentário

Exibir estatísticas:

Últimas 24 horas: 1

Últimos 7 dias: 14

Últimos 30 dias: 23

Duração total: 3,890