Introdução
In order to replace a broken front or rear camera, you will need to follow this guide. There are several steps and you will need to be careful when taking apart this device.
O que você precisa
-
-
Make sure the device is off to reduce the chance of an electrical shock. To turn off the device, press and hold the power button.
-
Use a Phillips #00 Screwdriver to unscrew the 4mm (5/32 in.) screws from the back cover of the tablet.
 Pergunte ao FixBot
-
-
-
Use a spudger to pry the back cover. Start from one edge of the back cover and slide across until the cover is lifted from the tablet body. Repeat for all edges.
-
-
-
Use a spudger to flip up the flap of the ZIF connector that holds the keyboard wire ribbon.
-
Remove the wire ribbon from clamp.
-
-
-
-
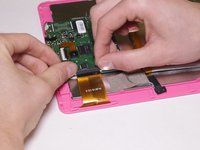
Attached to the motherboard you will see two orange ribbons connected to black tabs.
-
Using both hands, place your thumbs gently on the black tab attached to the top and gently lift it.
-
Proceed to slide the orange colored ribbon out from underneath until it is detached from the black tab.
-
-
-
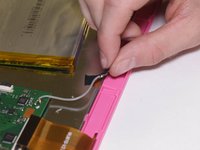
Use a spudger to pry and slide underneath the battery to unstick it from the LCD metal plate. It may take a good amount of force to remove.
-
Try to decrease battery deformation by using a spudger rather than prying with your hands.
-
-
-
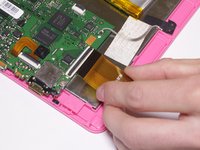
Gently remove the grey tape that's covering the grey colored wire until it is completely peeled off.
-
Peel off the black piece of tape to remove the antenna.
-
-
-
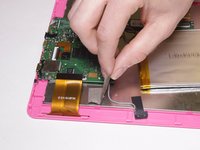
Unscrew three of the 4 mm screws on the motherboard using a Phillips #00 screwdriver.
-
After removing the screws, detach the motherboard from the rest of the tablet. Use a spudger to gently remove it, if necessary.
-
-
-
Locate the rear camera and use a prying tool to gently lift the rear camera off of the motherboard.
-
-
-
Detach the camera ribbon wire by lifting the tab and pulling the wire. This will leave you with the camera assembly.
-


To reassemble your device, follow these instructions in reverse order.
Cancelar: não concluí este guia.
Uma outra pessoa concluiu este guia.
Equipe

UC Davis, Team 1-2, Oliver Fall 2016 Membro de UC Davis, Team 1-2, Oliver Fall 2016
UCD-OLIVER-F16S1G2
5 Membros
Autoria de 4 guias