Ir para o conteúdo principal
Participe da comunidade de reparos - Criar conta
Protocol Slipstream WiFi Propeller Motor Replacement

Protocol Slipstream WiFi Propeller Motor Replacement

John Burkee

John Burkee e 3 outros colaboradores

Última atualização em 7 de mar de 2024

15 - 20 minutos
Difícil

Introdução

Ir para o passo 1

If your Protocol Slipstream WiFi (model number 6182-3MXB) has a broken propeller motor on it, use this guide to replace the propeller motor. The propeller motor is what spins the propeller that actually produces the air that lifts the device off the ground. If the propeller motor is broken the propeller will not spin at all causing the drone not to lift off the ground correctly and immediately crash. Be careful not to replace the propeller motor with the device turned on. The propeller spins very fast and can be potentially harmful. The Slipstream WiFi has 4 propeller motors on it. Each motor has 2 wires and those wires connect to different spots on the device’s computer. Do not attempt to change more than one motor at a time. It is very easy to get the wires mixed up and forget where they go. Make sure to always label what color wire goes where before you pull the motor off the device. The repair guide includes soldering on a very small computer, so proficient soldering skills are a plus.

O que você precisa

Ferramentas

Exibir mais…

  1. Protocol Slipstream WiFi Propeller Motor Replacement, Propeller: passo 1, imagem 1 %32
    • Remove the 4.5 mm Philips #00 screw that holds the propeller in place.

  2. Protocol Slipstream WiFi Propeller Motor Replacement: passo 2, imagem 1 %32
    • Lift the propeller off the device

    • Note: When sliding on the new propeller, make sure to align the groove on the propeller with the shaft of the gear. If aligned correctly the propeller should slide on smoothly.

    • There are two different propellers that go on the device. Each propeller has a 3 or 4 written on it. Be sure to replace the propeller with a new propeller with the matching number.

  3. Protocol Slipstream WiFi Propeller Motor Replacement, Propeller Guards: passo 3, imagem 1 %32
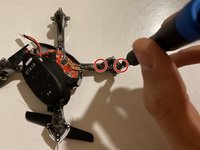
    • There are 3 points where the propeller guard attaches to the device.

    • Place one finger on the body (black object) of the device and one finger under the propeller guard (silver object) and gently but firmly push the propeller guard up until it disconnects from the body at the 3 points circled in red.

    • There are two propeller guards on the device. One for each set of propellers. Each propeller guard has two locations that you have these 3 tabs to remove until you can replace it.

  4. Protocol Slipstream WiFi Propeller Motor Replacement, Propeller Motor: passo 4, imagem 1 %32 Protocol Slipstream WiFi Propeller Motor Replacement, Propeller Motor: passo 4, imagem 2 %32
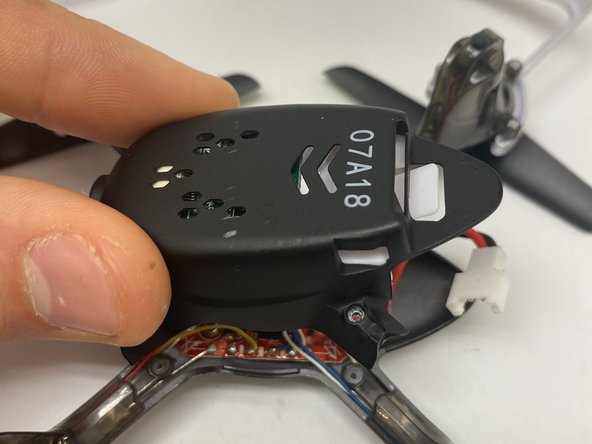
    • Remove the four 5.5 mm Philips #00 screws that hold the lower canopy to the upper canopy.

    • Gently pull the lower canopy up and towards the back of the drone. The lower canopy will still be attached to the upper canopy by 3 wires. Just set the lower canopy aside and continue with the repair.

    • Be very careful when pulling the lower canopy apart from the upper canopy. There are 3 wires that will still be attached between the lower and upper canopies.

  5. Protocol Slipstream WiFi Propeller Motor Replacement: passo 5, imagem 1 %32 Protocol Slipstream WiFi Propeller Motor Replacement: passo 5, imagem 2 %32
    • Remove the two 4.5 mm Philips #00 screws that hold the motor cover onto the upper canopy.

    • Gently pull up on the motor cover until it disconnects from the upper canopy.

  6. Protocol Slipstream WiFi Propeller Motor Replacement: passo 6, imagem 1 %32 Protocol Slipstream WiFi Propeller Motor Replacement: passo 6, imagem 2 %32
    • Grab the motor and pull the motor out of the upper canopy slot.

    • Be careful pulling the motor out of the slot in the upper canopy. The motor will still be attached to the main computer by 2 wires.

  7. Protocol Slipstream WiFi Propeller Motor Replacement: passo 7, imagem 1 %32
    • At this point, pay attention to where each color wire attaches to the computer. Write down which color wire goes where.

    • It is very important that you connect the new motor wires in the same location as the old wires and pay attention to which color wire attaches to each location.

  8. Protocol Slipstream WiFi Propeller Motor Replacement: passo 8, imagem 1 %32
    Ferramenta utilizada neste passo:
    Desoldering Pump
    $3.99
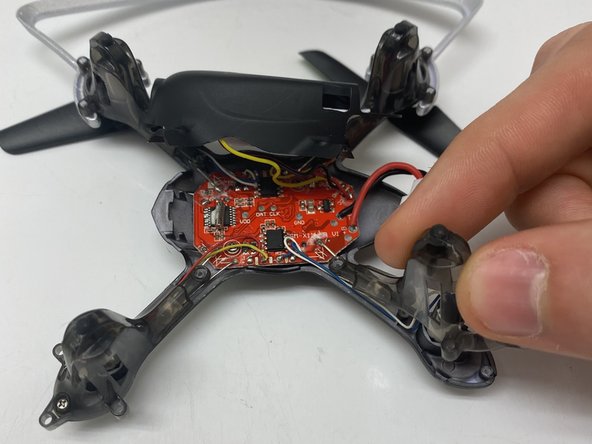
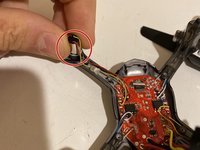
    • Use your soldering iron and heat up the solder that holds the two wires from the motor to the main computer. Once the solder melts use your desoldering pump to desolder the wires to the main computer.

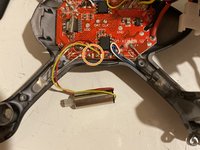
    • At this point the motor can be completely removed. You will need to solder the new motor wires in the same spot as the old motor wires.

    • For more information on soldering and desoldering connections, please read the How to Solder and Desolder Connections guide.

Conclusão

To reassemble your device, follow these instructions in reverse order.

Gear Up For Future Repairs

Shop all

0Comentários do guia

Comentar

Visualizações:

Últimas 24 horas: 0

Últimos 7 dias: 2

Últimos 30 dias: 14

Ao todo: 428