Introdução
The PRAM battery on your PowerBook gives the RAM power to store startup information when you shut off your computer. Luckily, it is easily accessible.
O que você precisa
-
-
Use a coin to turn the battery locking screw 90 degrees clockwise.
-
Lift the battery out of the computer.
-
-
-
Remove the following 10 screws:
-
Two 3 mm Phillips in the battery compartment, on either side of the battery contacts.
-
Four 3 mm Phillips around the memory compartment.
-
Four 16 mm Phillips along the hinge.
-
-
-
Remove the memory compartment cover.
-
Remove the two 12 mm Phillips screws on the Aluminum bracket at the top of the memory compartment.
I have an Aluminum PowerBook G4 1.67Ghz since 2006.
3/4 (from bottom to top) of the LCD becomes either black or is jumbled each time I turn on the MAC or move the screen. I need to press the LCD at several locations in order for this problem to go.... any advice ?
-
-
-
-
Rotate the computer 90 degrees clockwise so the ports face you.
-
Remove the three 3 mm Phillips screws along the edge of the lower case.
-
When replacing these screws, you must install them in the correct order. Begin by installing the screw closest to the display hinge, then work your way toward the front of the computer. Also, be careful not to put the screws in the two holes on either side of the video out port.
-
-
-
Rotate the upper case up and toward the screen, so that the upper case rests against it.
First of all, awesome guide. I am using it in July 2015, and there is no way I could have successfully navigate the typical Apple laptop Rubik's cube of Powerbook maintenance.
Second, there is a REAL trick to removing the upper case here, and it involves knowing what those stupid internal metal catches look like so you can free them without folding your aluminum case into a pretzel.
-
-
-
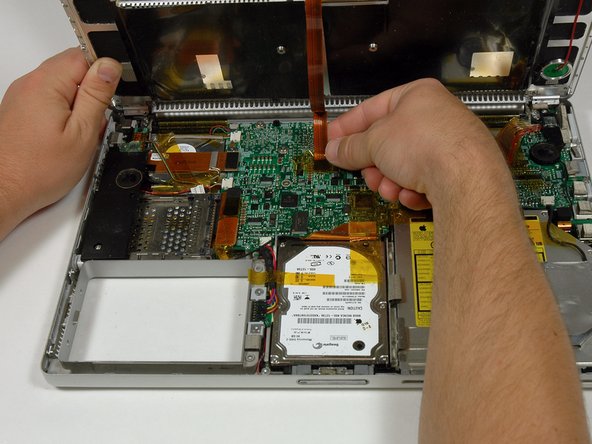
Remove the amber tape securing the trackpad ribbon to the logic board.
-
Disconnect the trackpad ribbon from the logic board by pulling up on the connector.
-
Remove the upper case from the computer.
-
-
-
Disconnect the PRAM battery cable from the logic board and remove the PRAM battery.
This step is unnecessary, the drive can be removed without disconnecting the PRAM battery. Simply fold the battery back onto the logic board.
-


To reassemble your device, follow these instructions in reverse order.
To reassemble your device, follow these instructions in reverse order.
Cancelar: não concluí este guia.
10 outras pessoas executaram este guia.
Documentos anexados

4 comentários
It would be helpful to know whether a new PRAM battery unit needs charging as in this article
https://discussions.apple.com/thread/239...
or whether it is assumed that it will start charging in the course of normal use.
It is not standard but you can change it anyway...
The Apple part number (MPN) for the board that this PRAM is connected to inside an A1138 PowerBook is 820-1819-A.
The MPN for the board inside an A1107 PowerBook is 820-1814-A.
The only available Li-Po battery replacement I can find with the required 2-pin connector already attached to the wires is the CS-AP1107SL by Cameron Sino. However, this battery is marketed as compatible with the A1107 or more generally with the 17-inch PowerBooks.
I wonder why it is not also marketed as compatible with the A1138. According to https://www.smallbattery.company.org.uk/... the LP302030 battery is used on both 820-1819-A and 820-1814-A boards.
While the boards may be different, I think that the rectangular 3.7 V Li-Po battery packs can be used in any 15-inch and 17-inch PowerBook.