Ir para o conteúdo principal

PowerBook G4 Aluminum 15" 1.5-1.67 GHz Hard Drive Replacement

O que você precisa

  1. PowerBook G4 Aluminum 15" 1.5-1.67 GHz Hard Drive Replacement, Battery: passo 1, imagem 1 %32
    • Use a coin or a spudger to turn the battery locking screw 90 degrees clockwise.

    • Lift the battery out of the computer.

  2. PowerBook G4 Aluminum 15" 1.5-1.67 GHz Hard Drive Replacement, Upper Case: passo 2, imagem 1 %32
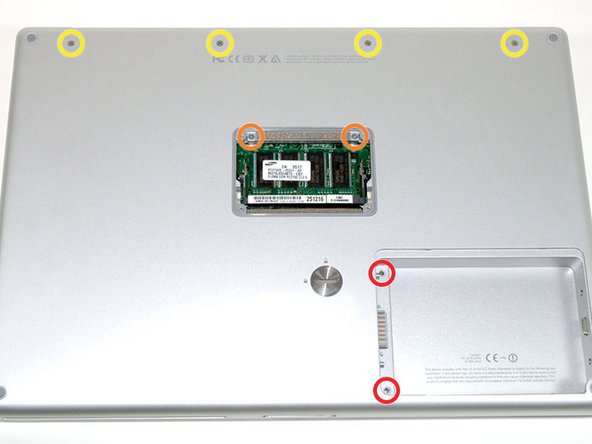
    • Remove the four Phillips screws from the memory door.

    • Slide the memory door away from the memory compartment.

  3. PowerBook G4 Aluminum 15" 1.5-1.67 GHz Hard Drive Replacement: passo 3, imagem 1 %32
    • Remove the following 8 screws:

    • Two 3 mm Phillips in the battery compartment, on either side of the battery contacts.

    • Two 12 mm Phillips on either side of the memory compartment.

    • Four 16 mm Phillips along the hinge.

  4. PowerBook G4 Aluminum 15" 1.5-1.67 GHz Hard Drive Replacement: passo 4, imagem 1 %32
    • Rotate the computer 90 degrees clockwise, so that the power receptacle faces you.

    • Remove the three 3 mm Phillips screws.

    • When replacing these screws, you must place each screw in the correct order. Begin by installing the screw closest to the display hinge, and go out from there.

  5. PowerBook G4 Aluminum 15" 1.5-1.67 GHz Hard Drive Replacement: passo 5, imagem 1 %32
    • Turn the computer 90 degrees clockwise so that the hinge faces you.

    • Remove the bottom 5 mm Phillips screw on either side of the hinge (two total).

  6. PowerBook G4 Aluminum 15" 1.5-1.67 GHz Hard Drive Replacement: passo 6, imagem 1 %32
    • Rotate the computer 90 degrees clockwise, so that the ports face you.

    • Remove the three 3 mm Phillips screws.

    • When replacing these screws, you must place each screw in the correct order. Begin by installing the screw closest to the display hinge, and go out from there.

  7. PowerBook G4 Aluminum 15" 1.5-1.67 GHz Hard Drive Replacement: passo 7, imagem 1 %32
    • Turn the computer over and open the display.

    • Remove the two 1.5 mm hex screws in either corner, next to the display (a T6 Torx driver will work, but repeated use will strip the screws).

  8. PowerBook G4 Aluminum 15" 1.5-1.67 GHz Hard Drive Replacement: passo 8, imagem 1 %32
    • Grasp the back corners of the upper case and pull up. Do not pull the upper case off yet; you still need to disconnect the keyboard and trackpad cable.

    • Lift the back of the case up and work your fingers along the sides, freeing the case as you go. Once you have freed the sides, you may need to rock the case up and down to free the front of the upper case.

  9. PowerBook G4 Aluminum 15" 1.5-1.67 GHz Hard Drive Replacement: passo 9, imagem 1 %32
    • Rotate the upper case up and toward the screen, so that the upper case rests against it.

  10. PowerBook G4 Aluminum 15" 1.5-1.67 GHz Hard Drive Replacement: passo 10, imagem 1 %32
    • Remove the orange tape securing the trackpad ribbon to the logic board.

    • Disconnect the trackpad ribbon from the logic board.

    • Remove the upper case from the computer.

  11. PowerBook G4 Aluminum 15" 1.5-1.67 GHz Hard Drive Replacement, Hard Drive: passo 11, imagem 1 %32
    • Remove the three long silver Phillips screws from the retaining bracket on the left side of the optical drive.

    • Remove the retaining bracket.

  12. PowerBook G4 Aluminum 15" 1.5-1.67 GHz Hard Drive Replacement: passo 12, imagem 1 %32
    • Disconnect the large orange hard drive cable from the logic board, removing tape as necessary.

  13. PowerBook G4 Aluminum 15" 1.5-1.67 GHz Hard Drive Replacement: passo 13, imagem 1 %32
    • Lift the hard drive up from the right side and remove it from the computer.

  14. PowerBook G4 Aluminum 15" 1.5-1.67 GHz Hard Drive Replacement, Hard Drive: passo 14, imagem 1 %32
    • Remove the two silver Phillips screws and black rubber bumpers from either side of the hard drive (four sets of screws and bumpers total).

    • There is a black pad on one end of the hard drive that you should peel off and transfer to your new hard drive.

    • Lift the plastic shield off of the hard drive.

  15. PowerBook G4 Aluminum 15" 1.5-1.67 GHz Hard Drive Replacement: passo 15, imagem 1 %32
    • Disconnect the hard drive cable from the hard drive by applying even pressure on both sides while maintaining a firm grip on the drive itself. You may need to remove a piece of orange tape attaching the ribbon cable to the hard drive.

    • This is a bit tricky. Try holding the drive against your body while pushing the cable away from you, or rocking the cable gently from side to side while applying even pressure, or both. If you bend the pins, do your best to straighten them, using the hard drive cable as a guide.

    • If you are installing a new hard drive, we have an OS X install guide to get you up and running.

    • When re-installing the adapter cable, be sure to place it over the large field of pins so that the small connector lines up with the motherboard.

Conclusão

To reassemble your device, follow these instructions in reverse order.

69 outras pessoas executaram este guia.

Documentos anexados

iRobot

Membro desde: 09/24/09

1 Reputação

Autoria de 636 guias

2 comentários

Thankyou for this guide i fixed my powerbook by replacing the harddisk and it is working great again!

Twetter - Responder

Very well done, clear and precise. Thank you/

Pamela Angelini - Responder

Adicione um comentário

Exibir estatísticas:

Últimas 24 horas: 2

Últimos 7 dias: 8

Últimos 30 dias: 54

Duração total: 81,588