Ir para o conteúdo principal
Participe da comunidade de reparos - Criar conta

Power Mac G5 RAM Replacement

  1. Power Mac G5 RAM Replacement, Side Panel: passo 1, imagem 1 %32
    • To avoid electrocution, shut down the computer. Do not open the computer or attempt to install any items inside it while the computer is on.

    • To avoid being burned, wait at least 10 minutes to allow the computer's internal components to cool.

    Pergunte ao FixBot

    Comentar

  2. Power Mac G5 RAM Replacement: passo 2, imagem 1 %32
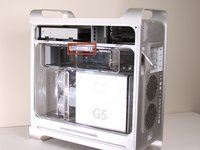
    • Remove all the cables, including the power cables before opening the unit.

    Pergunte ao FixBot

    Comentar

  3. Power Mac G5 RAM Replacement: passo 3, imagem 1 %32 Power Mac G5 RAM Replacement: passo 3, imagem 2 %32
    • Lift the tab to unlock the side panel.

    • The panel should fall out. If the panel does not fall out by itself pull a little from the edges.

    Pergunte ao FixBot

    Comentar

  4. Power Mac G5 RAM Replacement: passo 4, imagem 1 %32 Power Mac G5 RAM Replacement: passo 4, imagem 2 %32 Power Mac G5 RAM Replacement: passo 4, imagem 3 %32
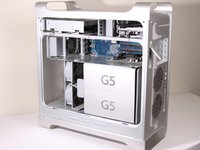
    • Remove the air deflector (the clear plastic cover) by pulling on the handle.

    Pergunte ao FixBot

    Comentar

  5. Power Mac G5 RAM Replacement, Front Fan Assembly: passo 5, imagem 1 %32
    • Locate the front fan assembly.

    Pergunte ao FixBot

    Comentar

  6. Power Mac G5 RAM Replacement: passo 6, imagem 1 %32
    • Pull the fan assembly out; it should slide out easily.

    Pergunte ao FixBot

    Comentar

  7. Power Mac G5 RAM Replacement, RAM: passo 7, imagem 1 %32
    • Locate the RAM on the Power Mac G5.

    Pergunte ao FixBot

    Comentar

  8. Power Mac G5 RAM Replacement: passo 8, imagem 1 %32 Power Mac G5 RAM Replacement: passo 8, imagem 2 %32 Power Mac G5 RAM Replacement: passo 8, imagem 3 %32
    • Use your thumbs to push the RAM ejector pins to the sides.

    • The RAM module should pop up slightly.

    Pergunte ao FixBot

    Comentar

  9. Power Mac G5 RAM Replacement: passo 9, imagem 1 %32
    • Remove the RAM module from the DIMM slot.

    • The RAM modules must be installed in pairs, with one module per bank (top and bottom).

    • When reinstalling the RAM, make sure to note the notch on the DIMM slot. This notch needs to line up with the corresponding gap on the RAM module.

    Pergunte ao FixBot

    Comentar

Conclusão

To reassemble your device, follow these instructions in reverse order.

Cancelar: não concluí este guia.

61 outras pessoas executaram este guia.

Equipe

Cal Poly, Team 5-8, Forte Winter 2010 Membro de Cal Poly, Team 5-8, Forte Winter 2010

CPSU-FORTE-W10S5G8

7 Membros

Autoria de 30 guias

2Comentários do guia

Major thing to note, you must install RAM in pairs. You can't just install one card on the top and not one on the bottom. Pairs start from the center and move outwards.

Red Rabbit 90 - Responder Compartilhar

Very helpful

Kaiden Young - Responder Compartilhar

Comentar

Visualizações:

Últimas 24 horas: 0

Últimos 7 dias: 18

Últimos 30 dias: 124

Ao todo: 42,385