Ir para o conteúdo principal
Participe da comunidade de reparos - Criar conta

Pentax PZ-10 Back Cover Locking Switch Spring Replacement

O que você precisa

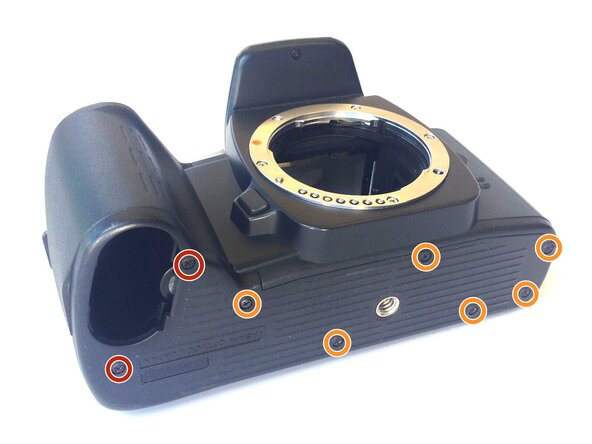
  1. Pentax PZ-10 Back Cover Locking Switch Spring Replacement, Removing the Bottom Cover: passo 1, imagem 1 %32
    • With the lens face up and the bottom panel of the camera facing you, remove the two 7mm screws on the left using the J0 screwdriver.

    • Remove the six 4.3mm screws in the middle and right of the panel using the J0 screwdriver.

    • Pull off the bottom casing to remove.

    Pergunte ao FixBot
  2. Pentax PZ-10 Back Cover Locking Switch Spring Replacement, Removing Bottom Casing: passo 2, imagem 1 %32
    • With the screws removed, the bottom casing should come off very easily by pulling on the casing.

    Pergunte ao FixBot
  3. Pentax PZ-10 Back Cover Locking Switch Spring Replacement, Removing the Back Cover: passo 3, imagem 1 %32
    • Place the camera on its side so the lens is facing left.

    • Press down on the locking switch on the side panel facing you.

    Pergunte ao FixBot
  4. Pentax PZ-10 Back Cover Locking Switch Spring Replacement: passo 4, imagem 1 %32
    • With the door unlocked, rotate the device to access the bottom.

    Pergunte ao FixBot
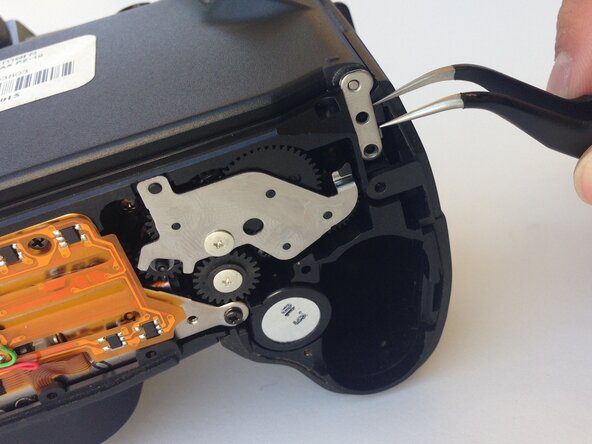
  5. Pentax PZ-10 Back Cover Locking Switch Spring Replacement: passo 5, imagem 1 %32
    Ferramenta utilizada neste passo:
    Tweezers
    $4.99
    • Using a pair of tweezers, gently remove the metal tab securing the back door axle.

    • The door will come loose at this point, watch for any loose parts that may also come out.

    Pergunte ao FixBot
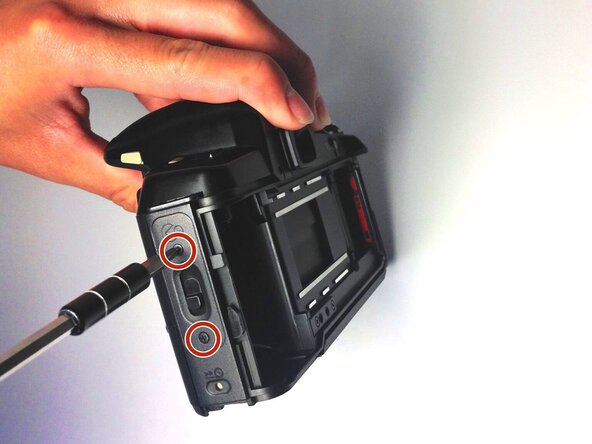
  6. Pentax PZ-10 Back Cover Locking Switch Spring Replacement, Removing the Side Panel: passo 6, imagem 1 %32
    • Once the back cover is fully removed, remove the two 4.35mm screws attaching the cover of the unlocking switch, and remove the plate.

    Pergunte ao FixBot
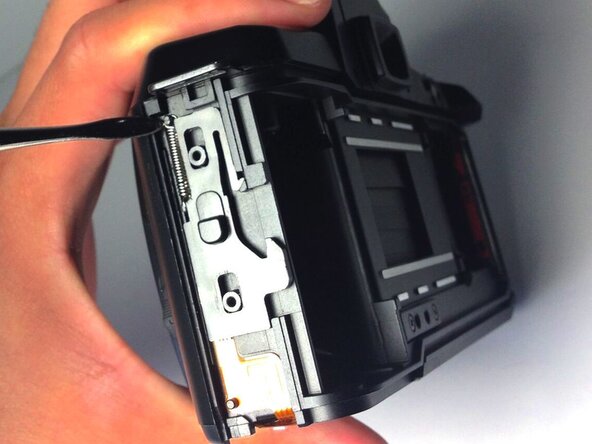
  7. Pentax PZ-10 Back Cover Locking Switch Spring Replacement, Removing the Spring: passo 7, imagem 1 %32
    • Locate the spring at the upper left corner of the face, and pull the rings of the spring off of the pins to remove it using plastic opening tools.

    • You are now ready to replace the spring.

    Pergunte ao FixBot
Conclusão

To reassemble your device, follow these instructions in reverse order.

Uma outra pessoa concluiu este guia.

Ryan Su

Membro desde: 04/20/15

107 Reputação

Autoria de 1 guia

0Comentários do guia

Comentar

Visualizações:

Últimas 24 horas: 1

Últimos 7 dias: 7

Últimos 30 dias: 33

Ao todo: 685