Ir para o conteúdo principal
Participe da comunidade de reparos - Criar conta

Panasonic Lumix DMC-FX01 Rear Casing Replacement

O que você precisa

    1. Panasonic Lumix DMC-FX01 Rear Casing Replacement, Battery: passo 1, imagem 1 %32
      • Locate the memory card and battery card latch on the bottom of the camera.

      • Slide the latch to the open position.

      Pergunte ao FixBot

      Comentar

    2. Panasonic Lumix DMC-FX01 Rear Casing Replacement: passo 2, imagem 1 %32
      • Open the battery latch, and slide the battery release lever to the right.

      Pergunte ao FixBot

      Comentar

    3. Panasonic Lumix DMC-FX01 Rear Casing Replacement: passo 3, imagem 1 %32
      • Remove the battery from the camera.

      Pergunte ao FixBot

      Comentar

    1. Panasonic Lumix DMC-FX01 Rear Casing Replacement, Rear Casing: passo 4, imagem 1 %32
      • Remove the three 4.6 mm screws on the bottom of the camera using a Phillips #00 screwdriver.

      Pergunte ao FixBot

      Comentar

    2. Panasonic Lumix DMC-FX01 Rear Casing Replacement: passo 5, imagem 1 %32
      • Remove the single 3.2 mm screw on the left side of the camera using a Phillips #00 screwdriver.

      Pergunte ao FixBot

      Comentar

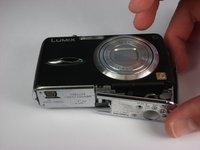
    3. Panasonic Lumix DMC-FX01 Rear Casing Replacement: passo 6, imagem 1 %32 Panasonic Lumix DMC-FX01 Rear Casing Replacement: passo 6, imagem 2 %32
      • Remove the left side casing.

      Pergunte ao FixBot

      Comentar

    4. Panasonic Lumix DMC-FX01 Rear Casing Replacement: passo 7, imagem 1 %32
      • Remove the two 3.2 mm screws on the right side of the camera using a Phillips #00 screwdriver.

      Pergunte ao FixBot

      Comentar

    5. Panasonic Lumix DMC-FX01 Rear Casing Replacement: passo 8, imagem 1 %32
      • Remove the bottom right panel.

      Pergunte ao FixBot

      Comentar

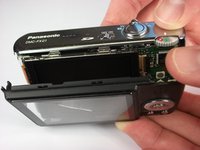
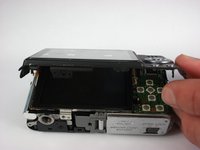
    6. Panasonic Lumix DMC-FX01 Rear Casing Replacement: passo 9, imagem 1 %32 Panasonic Lumix DMC-FX01 Rear Casing Replacement: passo 9, imagem 2 %32
      • Gently remove the back casing.

      • Start at the bottom and carefully pry towards the top to get this piece free.

      Pergunte ao FixBot

      Comentar

Conclusão

To reassemble your device, follow these instructions in reverse order.

Cancelar: não concluí este guia.

Uma outra pessoa concluiu este guia.

Andrew

Membro desde: 10/11/10

396 Reputação

Autoria de 4 guias

Equipe

Cal Poly, Team 9-22, Regan Fall 2010 Membro de Cal Poly, Team 9-22, Regan Fall 2010

CPSU-REGAN-F10S9G22

4 Membros

Autoria de 24 guias

0Comentários do guia

Comentar

Visualizações:

Últimas 24 horas: 2

Últimos 7 dias: 10

Últimos 30 dias: 32

Ao todo: 3,834