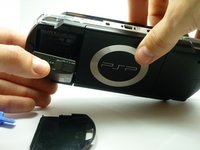
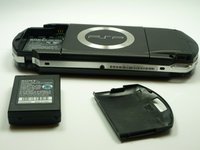
Ir para o conteúdo principal

PSP 1000 Buttons Replacement

O que você precisa

  1. PSP 1000 Buttons Replacement, Battery: passo 1, imagem 1 %32
    • Turn the PSP over so its back is facing you.

  2. PSP 1000 Buttons Replacement: passo 2, imagem 1 %32 PSP 1000 Buttons Replacement: passo 2, imagem 2 %32
    • Locate the battery casing button on the rear-left side of the PSP.

    • Press down the button and remove the battery cover.

  3. PSP 1000 Buttons Replacement: passo 3, imagem 1 %32 PSP 1000 Buttons Replacement: passo 3, imagem 2 %32
    • Using your finger, remove the battery upwards from the system as shown.

  4. PSP 1000 Buttons Replacement, Front Casing: passo 4, imagem 1 %32 PSP 1000 Buttons Replacement, Front Casing: passo 4, imagem 2 %32
    • Remove the four screws shown with a Phillips #00 screwdriver.

    • You will have to peel back the guarantee sticker to access the screw on the lower left.

  5. PSP 1000 Buttons Replacement: passo 5, imagem 1 %32
    • Remove the screw from the bottom side of the PSP. Keep it separated from the rest of the screws.

    • Remove screws from back righthand side within the holes.

  6. PSP 1000 Buttons Replacement: passo 6, imagem 1 %32 PSP 1000 Buttons Replacement: passo 6, imagem 2 %32
    • Gently separate the outer plastic casing from the rest of the system as shown.

  7. PSP 1000 Buttons Replacement, Buttons: passo 7, imagem 1 %32 PSP 1000 Buttons Replacement, Buttons: passo 7, imagem 2 %32 PSP 1000 Buttons Replacement, Buttons: passo 7, imagem 3 %32
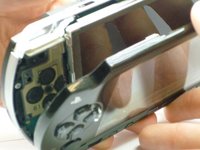
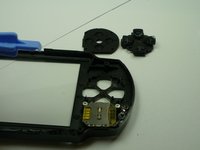
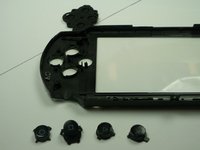
    • If the Arrow Buttons are not functioning properly, flip over the outer casing and locate the inside of the buttons, as shown

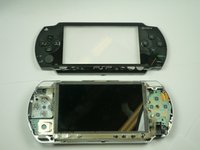
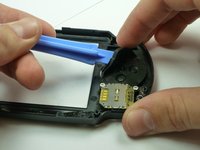
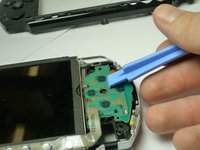
    • Carefully remove the black rubber backing off of the buttons.

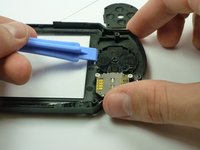
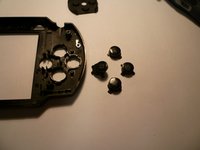
    • Clean the inside of the rubber and the outside of the buttons with a cloth.

  8. PSP 1000 Buttons Replacement: passo 8, imagem 1 %32 PSP 1000 Buttons Replacement: passo 8, imagem 2 %32
    • If needed, replace the old buttons with a new set (which can be purchased from Sony or other electronics stores).

    • Carefully re-insert the buttons. This should not require excess force, as the buttons should fit if they are arranged correctly.

    • Gently re-apply the back rubber to the back of the buttons.

  9. PSP 1000 Buttons Replacement: passo 9, imagem 1 %32 PSP 1000 Buttons Replacement: passo 9, imagem 2 %32
    • If function buttons (x, square, circle, triangle) need to be replaced, find the corresponding black rubber backing on the inside of the casing.

    • Carefully remove the back rubber to expose the rear side of the buttons as shown. (This can be done using your hands.)

  10. PSP 1000 Buttons Replacement: passo 10, imagem 1 %32 PSP 1000 Buttons Replacement: passo 10, imagem 2 %32
    • Next, carefully clean the receiving end of the buttons on the motherboard (shown on picture) with a cloth.

    • If the buttons are clearly damaged, then they need to be replaced.

    • Add the new ones in the form, with the correct button order. (The correct button order has the Triangle on the top, Square on the right, Circle on the left, and X on the bottom).

    • Be very careful! The buttons only go in one way. If you have trouble fitting them in, rotate them in their given spots until they fit in easily. Do NOT force them. Forcing the buttons in may cause damage.

  11. PSP 1000 Buttons Replacement: passo 11, imagem 1 %32
    • Once buttons are correctly replaced, the back rubbers are fit back onto the buttons, refer back to Replacing the Housing to reattach the casing.

Conclusão

To reassemble your device, follow these instructions in reverse order.

32 outras pessoas executaram este guia.

Henry Lee

Membro desde: 01/14/10

794 Reputação

Autoria de 4 guias

Equipe

Cal Poly, Team 5-6, Forte Winter 2010 Membro de Cal Poly, Team 5-6, Forte Winter 2010

CPSU-FORTE-W10S5G6

Membros da 5

Autoria de 22 guias

12 comentários

It's a helpful guide,thx

Zero Knight - Responder

Great guide. I highly Recomend this to anyone that needs to replace their PSP buttons

unashamed45 - Responder

Otimo guia recomendo.

richardmosman - Responder

use magnetised screwdriver i had a normal one and it was a pain in the ass to put those tiny little bastards back

Nagy Dániel - Responder

Thank you this was a great guide

BLAISE of BASH - Responder

Adicione um comentário

Exibir estatísticas:

Últimas 24 horas: 17

Últimos 7 dias: 109

Últimos 30 dias: 486

Duração total: 82,246