Ir para o conteúdo principal
Participe da comunidade de reparos - Criar conta

Optoma HD20 Fan Replacement

O que você precisa

  1. Optoma HD20 Fan Replacement, Disassembling Optoma HD20 Cover: passo 1, imagem 1 %32 Optoma HD20 Fan Replacement, Disassembling Optoma HD20 Cover: passo 1, imagem 2 %32
    • Twist the focal cap clockwise until it is fully extended.

    • Remove the focal cap by pulling it straight out.

    Pergunte ao FixBot

    Comentar

  2. Optoma HD20 Fan Replacement: passo 2, imagem 1 %32
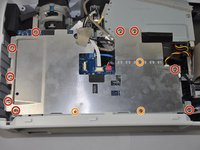
    • Use a Phillips #1 screwdriver to remove the three 7.5mm screws on the bottom of the device.

    Pergunte ao FixBot

    Comentar

  3. Optoma HD20 Fan Replacement: passo 3, imagem 1 %32
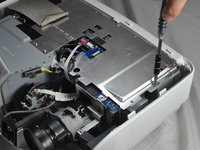
    • Use a plastic opening tool to gently pry the top cover off of the device.

    • It is easier to pry off the cover from the back side just above the HDMI ports.

    Pergunte ao FixBot

    Comentar

  4. Optoma HD20 Fan Replacement: passo 4, imagem 1 %32
    • When removing the cover, be cautious of the ribbon connecting the top buttons to the main circuit board. The ribbon must be disconnected before proceeding.

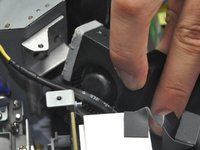
    • Remove the ribbon by disconnecting it from the main circuit board.

    • Lift up the clip holding it down and pull the ribbon out.

    Pergunte ao FixBot

    Comentar

  5. Optoma HD20 Fan Replacement, Fan: passo 5, imagem 1 %32
    • Peel off the tape that is holding the metal casing down.

    Pergunte ao FixBot

    Comentar

  6. Optoma HD20 Fan Replacement: passo 6, imagem 1 %32 Optoma HD20 Fan Replacement: passo 6, imagem 2 %32
    • Use a Phillips #1 screwdriver to unscrew the nine 4.5mm screws.

    • Use a Phillips #0 screwdriver to unscrew the three 2.5 mm screws. This will allow you to remove the metal casing.

    Pergunte ao FixBot

    Comentar

  7. Optoma HD20 Fan Replacement: passo 7, imagem 1 %32
    • Remove the metal casing by lifting it up off of the circuit board.

    Pergunte ao FixBot

    Comentar

  8. Optoma HD20 Fan Replacement: passo 8, imagem 1 %32
    • Unplug the six wires stemming from the circuit board.

    Pergunte ao FixBot

    Comentar

  9. Optoma HD20 Fan Replacement: passo 9, imagem 1 %32
    • Use a Philips #1 screwdriver to remove the four 4.5 mm screws

    Pergunte ao FixBot

    Comentar

  10. Optoma HD20 Fan Replacement: passo 10, imagem 1 %32
    • Remove the three 4.5 mm screws using the Philips #1 screwdriver.

    Pergunte ao FixBot

    Comentar

  11. Optoma HD20 Fan Replacement: passo 11, imagem 1 %32
    • Remove the two 4.5 mm screws located on either side of the VGA/SCART port using a 5 mm nut driver. This will further release the plastic backing from the motherboard.

    Pergunte ao FixBot

    Comentar

  12. Optoma HD20 Fan Replacement: passo 12, imagem 1 %32
    • Slightly rotate the motherboard clockwise. This will prevent ports from getting caught on the plastic backing.

    • Lift the plastic backing to remove it.

    Pergunte ao FixBot

    Comentar

  13. Optoma HD20 Fan Replacement: passo 13, imagem 1 %32
    • Ensure all screws are removed

    • Lift up the motherboard and take out the metal container beneath it.

    • Do this very carefully as there is still one cable attached.

    Pergunte ao FixBot

    Comentar

  14. Optoma HD20 Fan Replacement: passo 14, imagem 1 %32
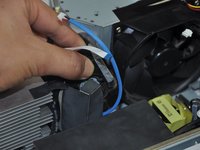
    • Unplug the white connector underneath the right side of the circuit board.

    • To remove, pinch both sides of the connector and pull it away from the circuit board.

    Pergunte ao FixBot

    Comentar

  15. Optoma HD20 Fan Replacement: passo 15, imagem 1 %32 Optoma HD20 Fan Replacement: passo 15, imagem 2 %32
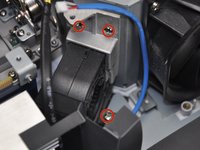
    • Use a Phillips #1 screwdriver to remove four 5 mm screws. This will release the fan.

    Pergunte ao FixBot

    Comentar

  16. Optoma HD20 Fan Replacement: passo 16, imagem 1 %32 Optoma HD20 Fan Replacement: passo 16, imagem 2 %32
    • Pull the fan away from the metal housing unit.

    • Gently lift the fan up and out of the device. The fan is now removed.

    Pergunte ao FixBot

    Comentar

Conclusão

To reassemble your device, follow these instructions in reverse order.

Cancelar: não concluí este guia.

6 outras pessoas executaram este guia.

Trever

Membro desde: 01/22/15

1.282 Reputação

Autoria de 6 guias

Equipe

Cal Poly, Team 21-23, Maness Winter 2015 Membro de Cal Poly, Team 21-23, Maness Winter 2015

CPSU-MANESS-W15S21G23

4 Membros

Autoria de 6 guias

6Comentários do guia

Very nice set of instructions! Excellent images and identification of items to remove. Thank you!

Graveyard Workshop - Responder Compartilhar

Do you know where to get this fan for replacement? Having trouble finding a parts list.

Sterling Grogg - Responder Compartilhar

Small fan is GB1245PKVX-8, large fan is KDE1285PTV1

Gyrovague - Responder Compartilhar

I am trying to determine if the fan works or not. Should the fan come on when there is no bulb in the projector? I removed the bulb when it burned up and I am not sure whether it was due to a failed fan or simply the bulb.

merrill277 - Responder Compartilhar

Amazing! Thank you!!! Took a bit of effort to get the fan but in the end it worked like a charm!! Thank you for saving money!!!!

Mike Popov - Responder Compartilhar

Comentar

Visualizações:

Últimas 24 horas: 7

Últimos 7 dias: 15

Últimos 30 dias: 71

Ao todo: 14,308