Introdução
Este é um guia que ensina como substituir a placa-mãe do Nintendo DS, também conhecida como placa de circuito.
O Nintendo DS é um console de jogo lançado pela Nintendo que oferece duas telas funcionando em conjunto, com conectividade sem fio e um microfone integrado.
A placa-mãe sustenta e viabiliza toda a comunicação entre os componentes do dispositivo. Portanto, sempre que a comunicação entre os componentes funcionais demorar mais do que o esperado ou se não houver comunicação, a substituição da placa-mãe é uma necessidade.
A remoção da placa-mãe do DS é essencial para acessar as telas e substituir outros componentes fundamentais.
A substituição pode ser feita em 10 passos simples.
O que você precisa
-
-
-
Remova o cartucho do console.
-
Use uma chave Phillips #00 para remover o parafuso que prende a tampa da bateria à carcaça traseira.
-
Remova a tampa da bateria.
 Pergunte ao FixBot
-
-
-
Use uma ferramenta de abertura de plástico ou uma espátula para retirar a bateria pela parte inferior. Se não tiver uma ferramenta de abertura de plástico ou uma espátula, você pode usar as unhas.
-
-
-
Remova a bateria do Nintendo DS.
-
-
-
-
-
Remova os sete parafusos Y00 de 6,4 mm localizados na parte traseira.
-
-
-
-
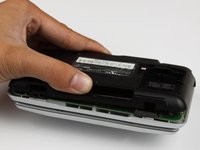
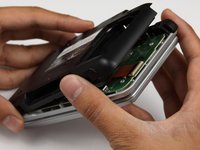
Com as mãos, force a tampa traseira para fora da estrutura principal.
-
Separe a parte traseira da frontal e coloque-a de lado.
-
-
-
-
-
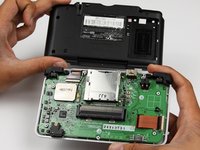
Usando uma chave Phillips #00, remova os quatro parafusos da placa de circuito.
-
-
-
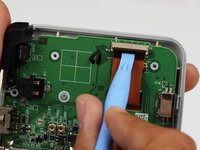
Destrave os dois cabos planos grandes movendo o clipe preto para cima.
-
Com cuidado, puxe os cabos planos para baixo e para fora com os dedos.
-
-
Ferramenta utilizada neste passo:Tweezers$4.99
-
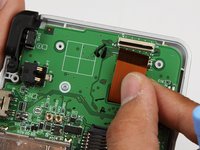
Localize os dois pequenos cabos planos, sob o cabo plano maior localizado mais à direita.
-
Deslize as travas dos pequenos cabos planos para o lado e remova os cabos.
-
-
-
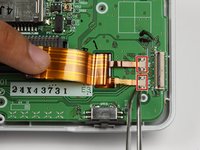
Localize o conector pigtail da antena Wi-Fi.
-
Remova a antena segurando-a pela cabeça com uma pinça. Usando um leve movimento de balanço, puxe para cima para desconectar o conector.
-
-
-
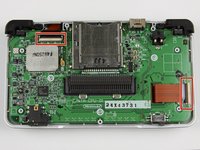
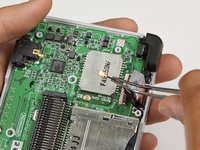
Passe os cabos planos pela abertura na placa.
-
Puxe a placa de circuito para cima, remova-a e coloque-a de lado.
-
-


Para a remontagem de seu dispositivo, siga estas instruções na ordem inversa.
Cancelar: não concluí este guia.
24 outras pessoas executaram este guia.
Um agradecimento especial a esses tradutores:
100%

Translation Bot está nos ajudando a consertar o mundo! Quer contribuir?
Comece a traduzir ›
Equipe

Cal Poly, Team 18-3, Maness Fall 2009 Membro de Cal Poly, Team 18-3, Maness Fall 2009
CPSU-MANESS-F09S18G3
4 Membros
Autoria de 36 guias
2Comentários do guia
This was really helpful. Thank you!
I need a ds ribbon bale ?