Essa tradução foi gerada por um programa e ainda não foi revisada por uma pessoa. Falas essa língua? Dá uma olhada.
Introdução
Este guia fornece instruções passo a passo sobre como desmontar sua câmera até que você consiga acessar a lente e removê-la ou limpá-la.
O que você precisa
-
-
-
Remova os dois parafusos de 2,8 mm do lado esquerdo da câmera.
 Pergunte ao FixBot
-
-
-
Remova os quatro parafusos de 2,8 mm no lado direito da câmera.
-
-
-
Remova os três parafusos de 4,1 mm na parte inferior da câmera.
-
-
-
-
-
Ferramenta utilizada neste passo:Tweezers$4.99
-
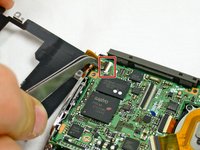
Use a pinça para levantar o conector ZIF que prende os cabos planos que conectam a tela LCD à placa-mãe.
-
-
-
-
Remova os quatro parafusos de 3,8 mm localizados perto da parte inferior direita e superior esquerda da placa de base do LCD.
-
-
Ferramenta utilizada neste passo:Tweezers$4.99
-
Com uma pinça, levante a aba de retenção no conector ZIF que prende o cabo plano do painel de botões.
-
Deslize o cabo plano do painel de botões para fora do seu soquete na placa-mãe.
-
-
-
-
-
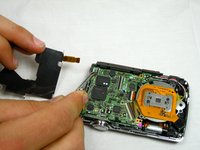
A fita preta que a conecta à câmera irá se levantar e permitir que você libere o lado esquerdo da placa retangular.
-
-
-
Remova os dois parafusos de 3,1 mm da placa retangular laranja sobre a lente.
-
-
Ferramenta utilizada neste passo:Tweezers$4.99
-
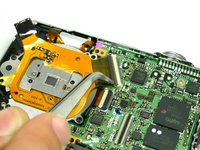
Use pinça para levantar a aba de retenção no conector ZIF do cabo plano.
-
Puxe delicadamente o cabo plano para fora do seu soquete na placa-mãe e remova o conjunto da placa.
-
-
-
Remova os quatro parafusos pretos de 3,4 mm do perímetro da placa prateada.
-
-
-
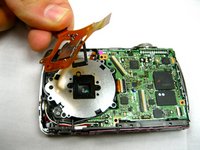
Puxe cuidadosamente a placa à qual a lente está presa.
-
-






Para a remontagem de seu dispositivo, siga estas instruções na ordem inversa.
Cancelar: não concluí este guia.
18 outras pessoas executaram este guia.

Equipe

Cal Poly, Team 12-32, Maness Spring 2011 Membro de Cal Poly, Team 12-32, Maness Spring 2011
CPSU-MANESS-S11S12G32
4 Membros
Autoria de 60 guias
8Comentários do guia
thank you so much. I just finished this guide and got myself a new camera (it was a "if you can fix it, you can keep it).
Hmm, I did all steps and put the camera back together and what do you know, it worked great! The procedure was relatively easy, ESP. since I've never done a job this intricate.
It seemed that it wasn't a dirty lens problem to me that is causing the lens to go in and out, but a dirty, partially stripped gear. It could be a combo though... The gear is located in the left side of the last photo in a recess next to the lens. This gear is easy to access. Complete all steps as shown, then turn over the camera and tap it a little. The gear will come out.
A couple final notes: a. Remember to take out the battery and memory card first. b. The screws are on pretty tight, Nikon probably used Loctite, so be ready. c. get a quality screwdriver. Mine was a Husky, but by the time. It was done one of the blades chipped off. d. Finally, when you are done, boot up and reset the camera's date item hour and turn off. Then reboot and you should be good to go!
Thanks for posting this. One thing of note, you will get a shock from the flash capacitor if you are not careful. I don't know how to discharge it so I will be more careful next time. My camera got dropped (not by me) and would get intermittent lens errors. Using these instructions I was able to find that one of the small copper windings under the lens (I think its a magnet or part of a stepper drive) was loose. I glued it back on and the camera works again. Unfortunately I think the CCD also took a hit because there are lines on photos but not on videos or the LCD preview screen. I found a cheap CCD online so I am going to swap it out to see if I can fix it. After the drop the camera was a throw-away but I like to fix things so this might work out.
Oh. My, &&^&.
If I had looked over this repair manual before I started repairing, MAYBE I would still have a camera.
I did all the steps but it seems the lens barrel inside was broken so like it or not i need to open all the case ,sadly i don't have a proper tools to melt down i don't know what it called that thing
