Introdução
If the Nikon Coolpix L32 suffered from physical damages and it remains dark after trying to power it on, consider replacing the LCD Screen. No hazards are associated with this replacement.
O que você precisa
-
-
-
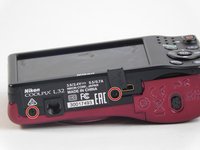
Remove the six(3.93mm screws) on the outside of the camera using a Phillips 00 screwdriver.
 Pergunte ao FixBot
-
-
-
Open the battery compartment door and pull the black back face apart from the front red face.
-
-
-
-
-
-
Using the spudger, gently pull the LCD screen from the tray holding it.
-
-
-
Use the spudger to lift up the small white retaining flap on the motherboard that is connected to the LCD screen's ribbon cable.
-
-
-
With the small retaining white flap up, remove the LCD screen ribbon cable from the motherboard by sliding it out.
-
-




To reassemble your device, follow these instructions in reverse order.
Cancelar: não concluí este guia.
Uma outra pessoa concluiu este guia.

Equipe

USF Tampa, Team 2-4, Blackwell Fall 2016 Membro de USF Tampa, Team 2-4, Blackwell Fall 2016
USFT-BLACKWELL-F16S2G4
4 Membros
Autoria de 15 guias
