Ir para o conteúdo principal

Esta versão pode conter edições incorretas. Mude para o último instantâneo verificado.

O que você precisa

  1. Este passo não foi traduzido. Ajude a traduzi-lo

    : passo 1, imagem 1 %32
    • Rotate the device so that the bottom is facing up.

  2. Este passo não foi traduzido. Ajude a traduzi-lo

    : passo 2, imagem 1 %32 : passo 2, imagem 2 %32
    • Lift up all four rubber pads on the bottom of the router with the plastic opening tool.

    • Be careful not to pull the rubber pads all the way out when lifting as they are difficult to reinsert.

  3. Este passo não foi traduzido. Ajude a traduzi-lo

    : passo 3, imagem 1 %32 : passo 3, imagem 2 %32
    • Unscrew the four 11.8 mm T-8 torx screws from the bottom of the router.

  4. Este passo não foi traduzido. Ajude a traduzi-lo

    : passo 4, imagem 1 %32
    • Lift the bottom casing straight up from the router.

  5. Este passo não foi traduzido. Ajude a traduzi-lo

    : passo 5, imagem 1 %32
    • Remove the clear plastic casing by lifting it straight up from the router.

  6. Este passo não foi traduzido. Ajude a traduzi-lo

    : passo 6, imagem 1 %32 : passo 6, imagem 2 %32
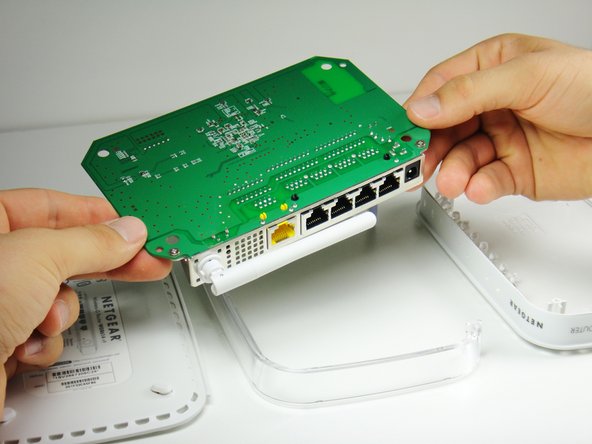
    • Separate the motherboard from the top shell by lifting it straight up from the router.

  7. Este passo não foi traduzido. Ajude a traduzi-lo

    : passo 7, imagem 1 %32 : passo 7, imagem 2 %32
    • Rotate the motherboard so that the top is facing up.

    • Set the motherboard on a flat clean surface.

  8. Este passo não foi traduzido. Ajude a traduzi-lo

    : passo 8, imagem 1 %32 : passo 8, imagem 2 %32
    • Do not refer to the pictures in this step for proper de-soldering and soldering techniques. They are for illustration purposes only.

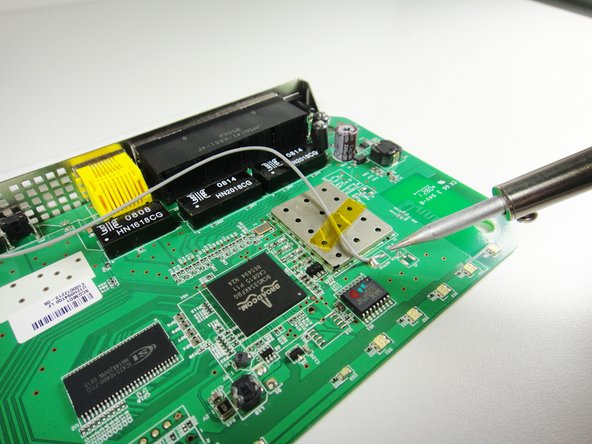
    • Refer to this link for proper de-soldering and soldering techniques.

    • Be patient. This may take some time depending on the quality of your soldering iron.

  9. Este passo não foi traduzido. Ajude a traduzi-lo

    : passo 9, imagem 1 %32
    • Peel off the yellow tape holding the wires.

    • Set the tape aside on a clean surface so that it can be reused.

  10. Este passo não foi traduzido. Ajude a traduzi-lo

    : passo 10, imagem 1 %32 : passo 10, imagem 2 %32
    • Extend the antenna outwards from the device so that it is straight.

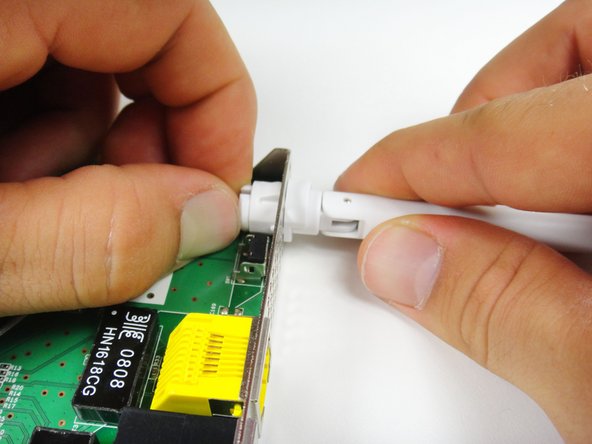
    • Locate the clips that hold the antenna onto the router.

    • Push the clips in with one hand and pull the antenna out with your other hand. Slightly twist the antenna until it becomes free from the hole.

  11. Este passo não foi traduzido. Ajude a traduzi-lo

    : passo 11, imagem 1 %32
    • Pull out the antenna as well as the connected wire.

Linha de Chegada

3 outras pessoas executaram este guia.

Ryan Murphy

Membro desde: 10/03/11

488 Reputação

Autoria de 4 guias

Equipe

Cal Poly, Team 21-24, Maness Fall 2011 Membro de Cal Poly, Team 21-24, Maness Fall 2011

CPSU-MANESS-F11S21G24

Membros da 4

Autoria de 11 guias

0 comentários

Adicione um comentário

Exibir estatísticas:

Últimas 24 horas: 0

Últimos 7 dias: 1

Últimos 30 dias: 3

Duração total: 7,571